In the modern cloud-driven world, managing and provisioning infrastructure can be a time-consuming task. The Terraform, an Infrastructure as Code (IaC) tool that simplifies defining, provisioning, and managing your Oracle Cloud Infrastructure (OCI). With Terraform, you can automate resource setup, minimize manual errors, and easily recreate or scale your infrastructure as needed.
Recently, I had the opportunities to discuss OCI’s IaC capabilities with the customers. They wanted to quickly test OCI services and delete resources after the test using code rather than manually interacting with the GUI console. Using a free-tier OCI tenancy, I showcased how simple it is to automate infrastructure provisioning using Terraform.
On this blogpost I have covered up, development environment set up, Installed terraform, generated SSH keys that will be used in OCI API access and created required terraform files for the automation.
Section 1: Development Environment Setup
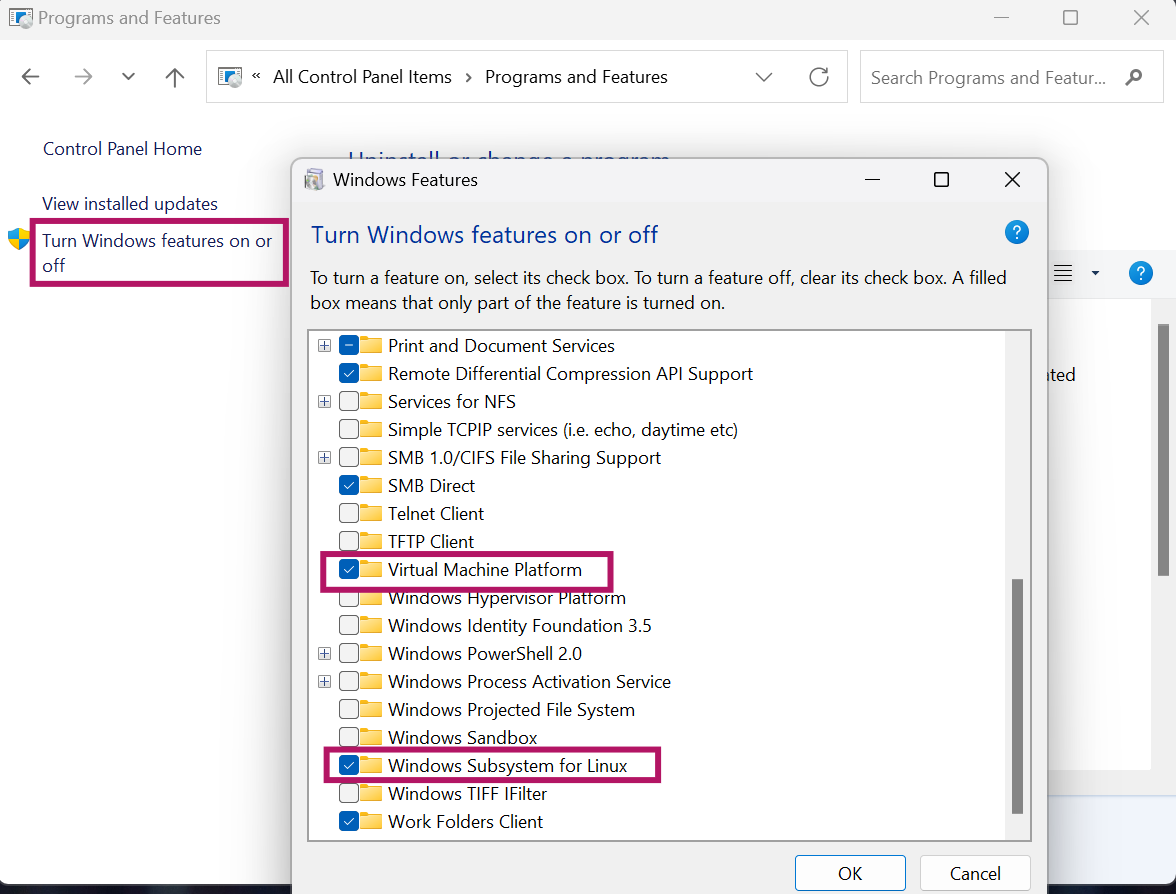
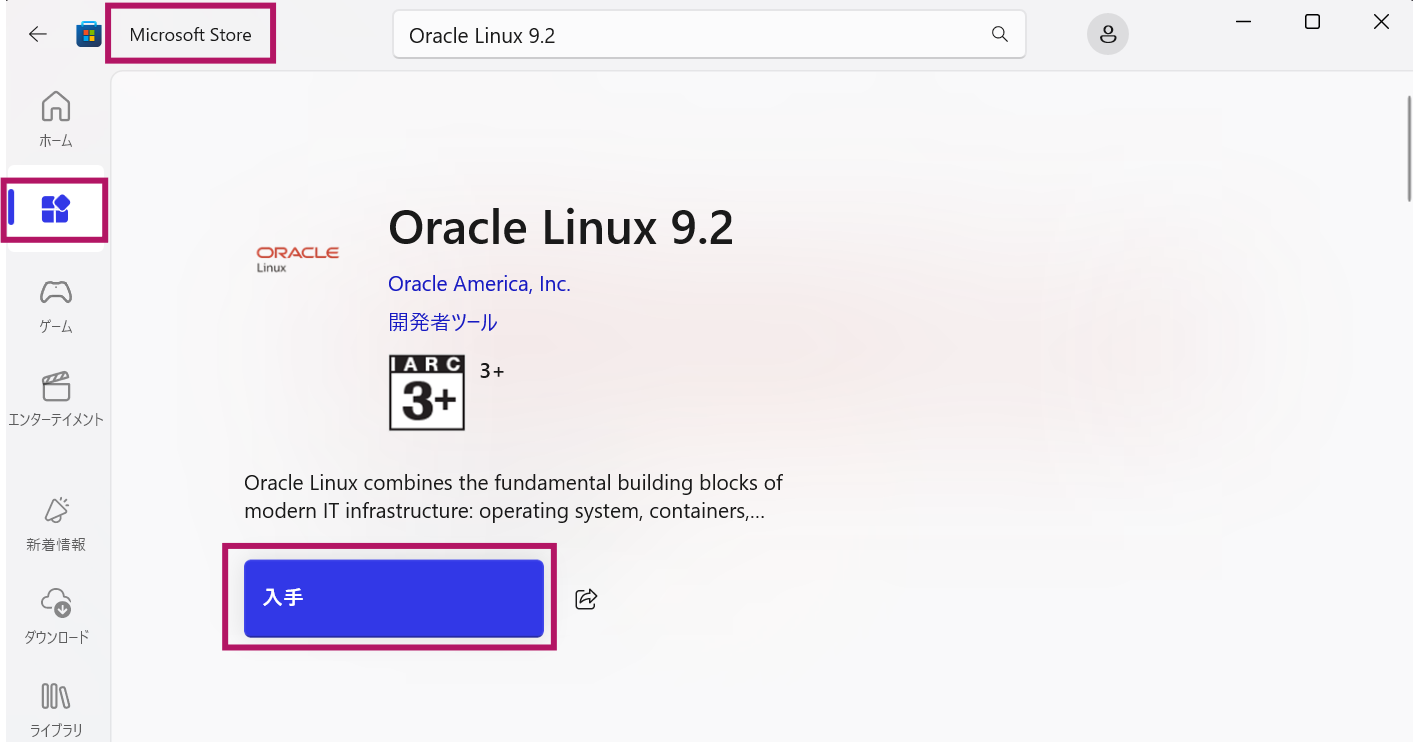
- On the Windows laptop, enable the Windows Subsystem for Linux (WSL) and install Oracle Linux 9.2.
- Install Visual Studio Code and integrate it with Oracle Linux to create a robust development environment.
Section 2: Install Terraform generate ssh keys and add the key on OCI console
- After setting up Oracle Linux, install Terraform on the Oracle Linux OS.
- Generate SSH keys for API and compute access to securely manage resources.
- Add the public key to your OCI user account using OCI console.
Section 3: Create and Deploy and Remove Resources using terraform
- Create necessary .tf (Terraform) script files to automate the deployment process. And initialize, plan and apply to for the resource creation.
Final Architecture
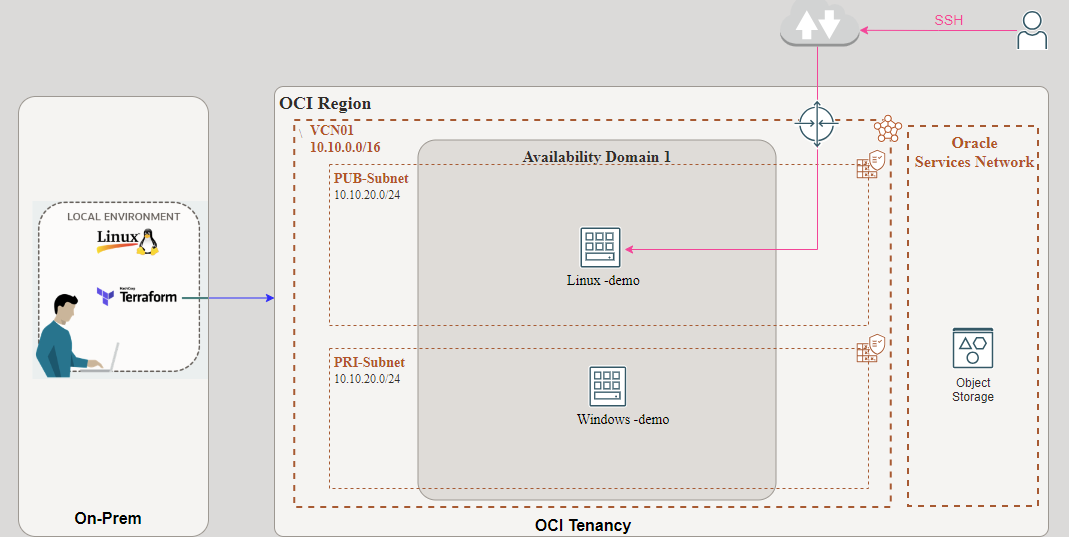
Using terraform – it creates a VCN network, public subnet, private subnet, Internet gateway and Linux and windows compute Instance as shown in the following diagram.
Prerequisites
- Access to an OCI tenancy, A free-tier tenancy works perfectly for testing and development purposes.
- Appropriate privileges to access OCI services and resources.
Section 1: Development Environment Setup
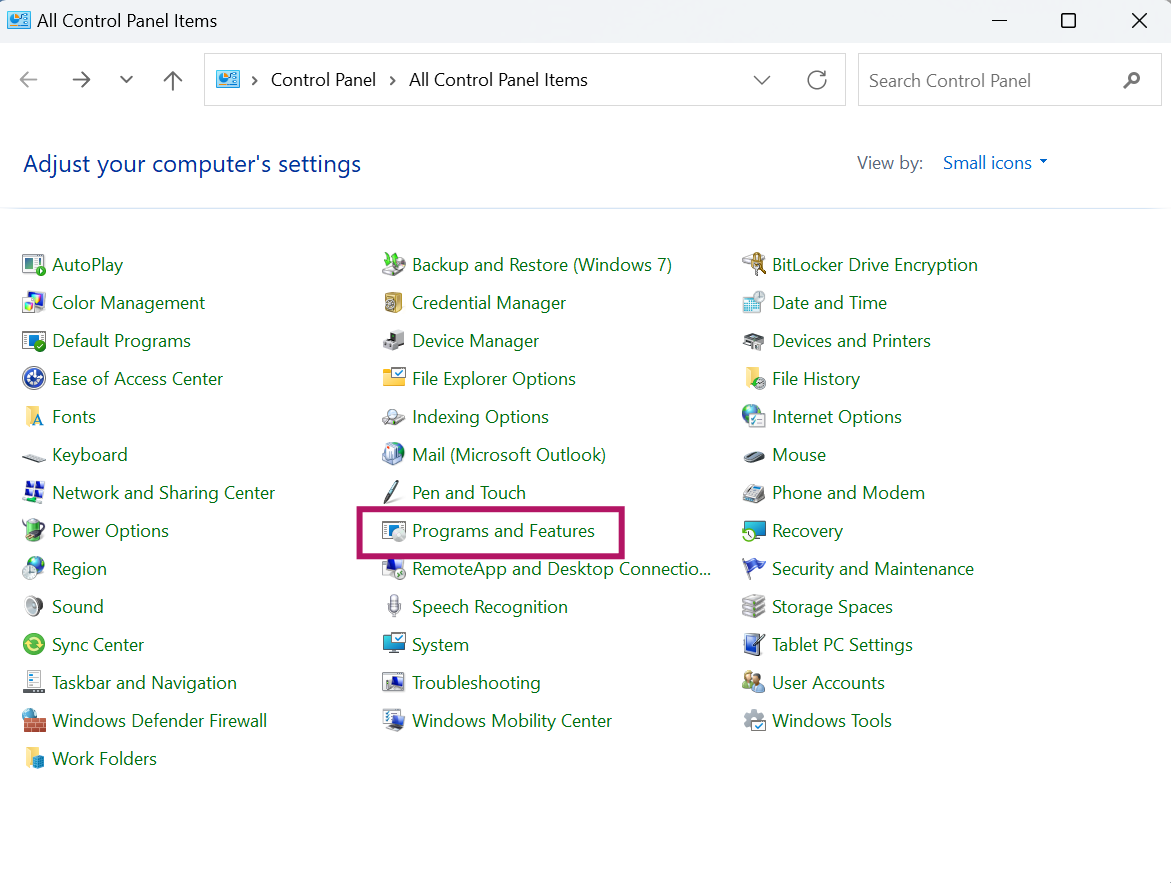
Go to Control panel and click on Program and Features.
It will open Turn Windows Feature on or of console and select Virtual Machine Platform and Windows subsystem for Linux and click on OK. To apply the change, it will prompt to reboot the system and reboot to continue
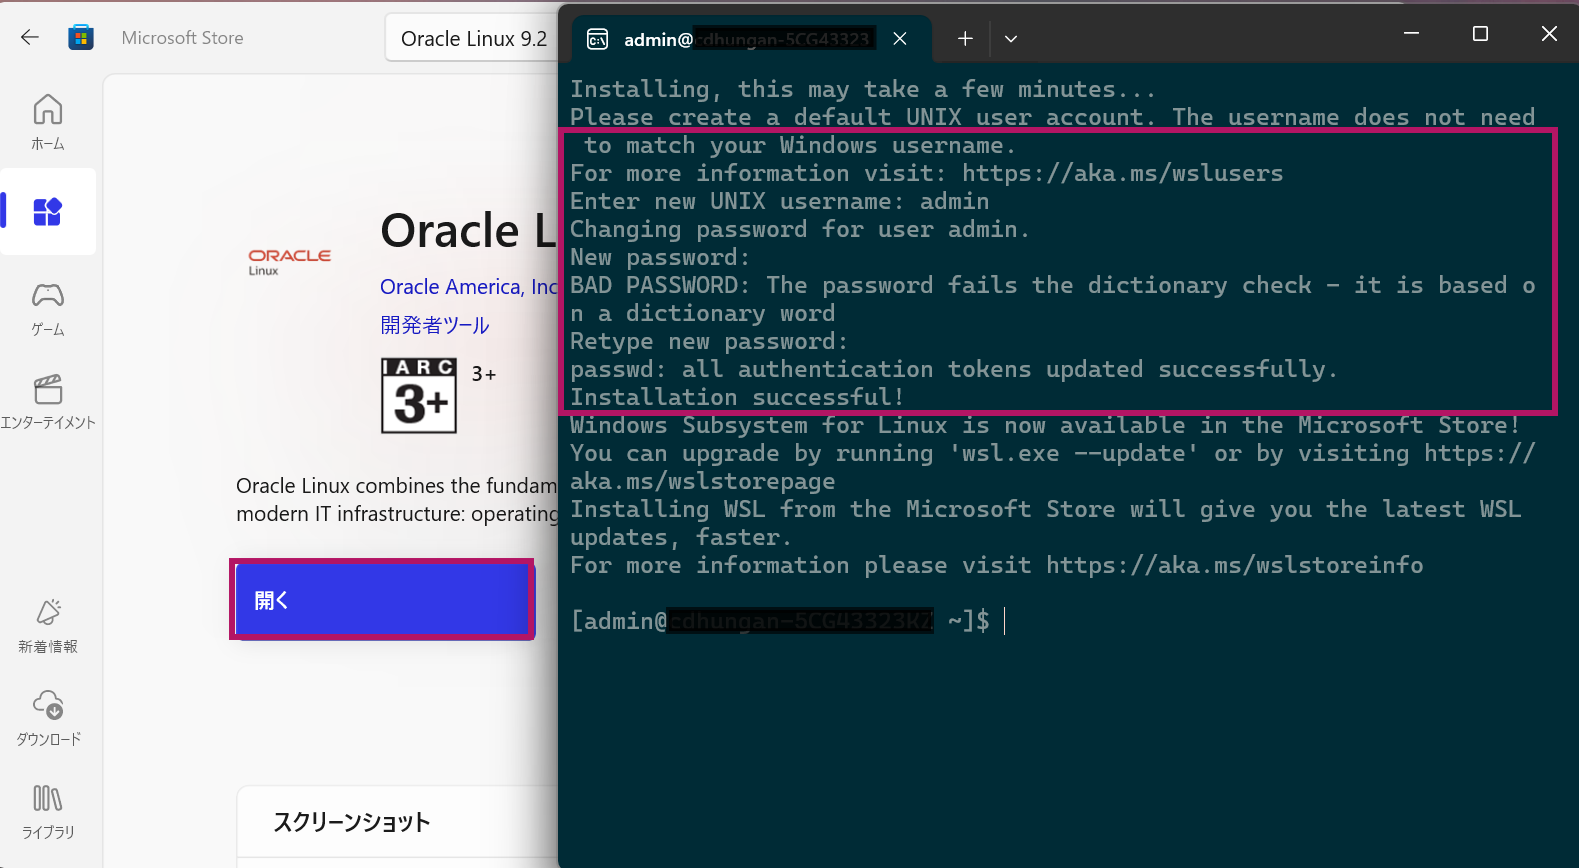
Go to Microsoft Store on your windows machine and choose App icon on the left, choose Oracle Linux and click on Install.
After installation completes click on Open, and supply username and password.
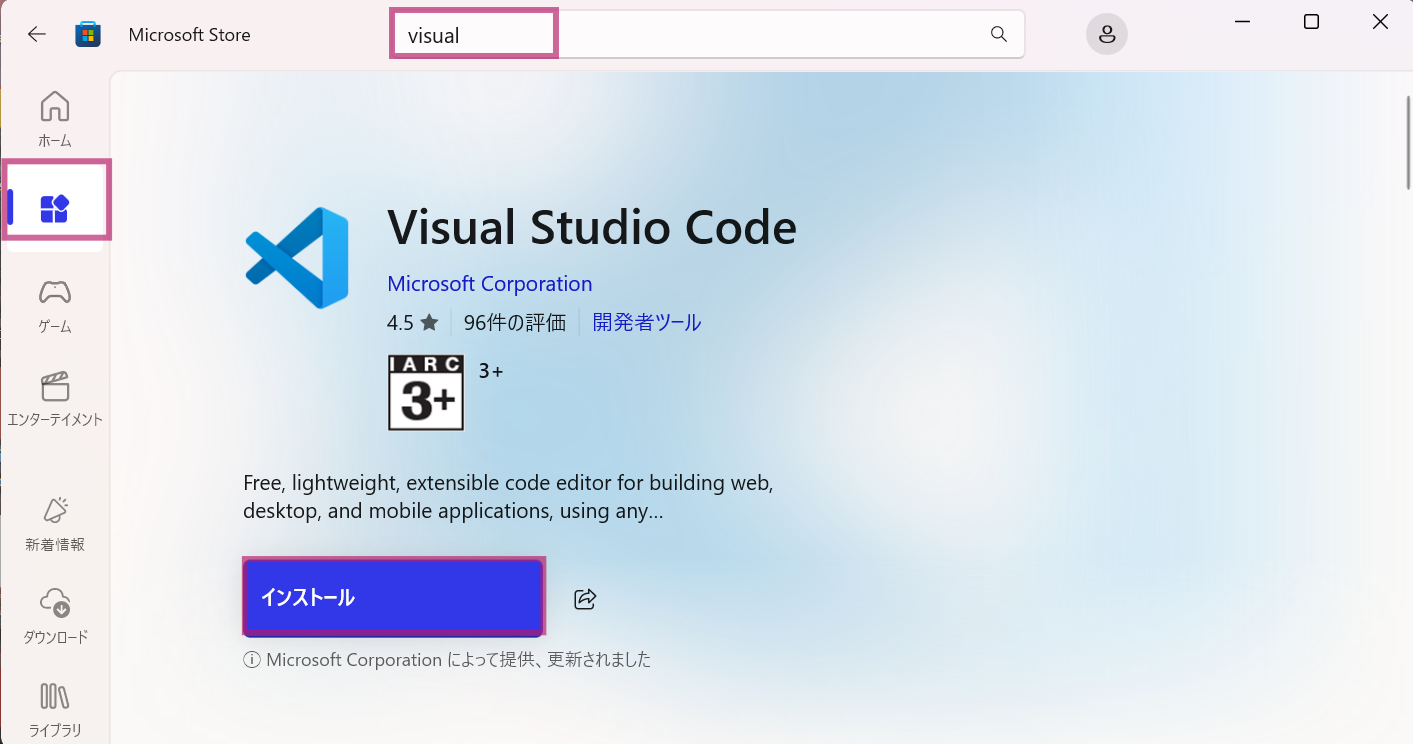
To install Visual code studio- go to Microsoft Store on you windows machine, click on App, Search Visual code studio and click on Install. (You can download installer directly from https://code.visualstudio.com/download and install it)
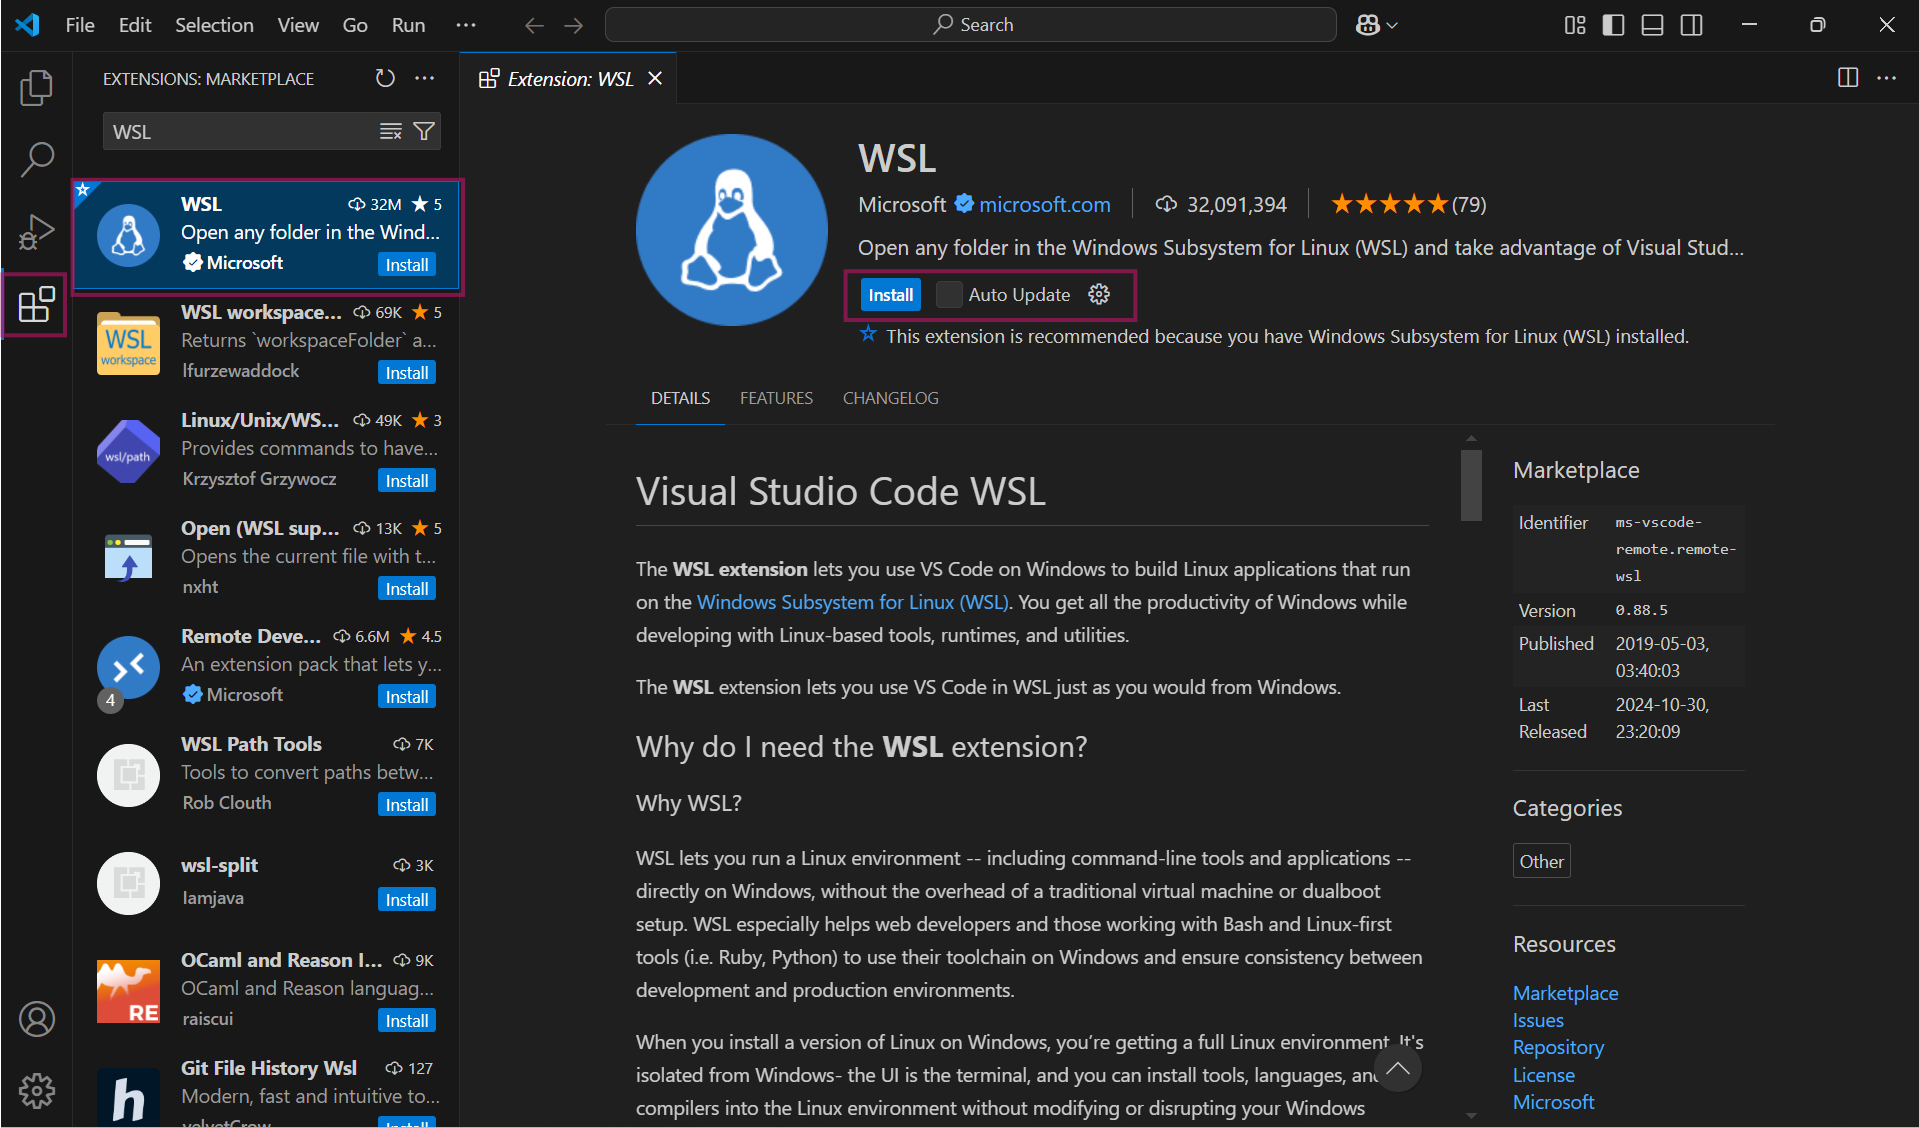
After the Visual code installation, open it and click on Extension on left panel, choose WSL and install the extension.
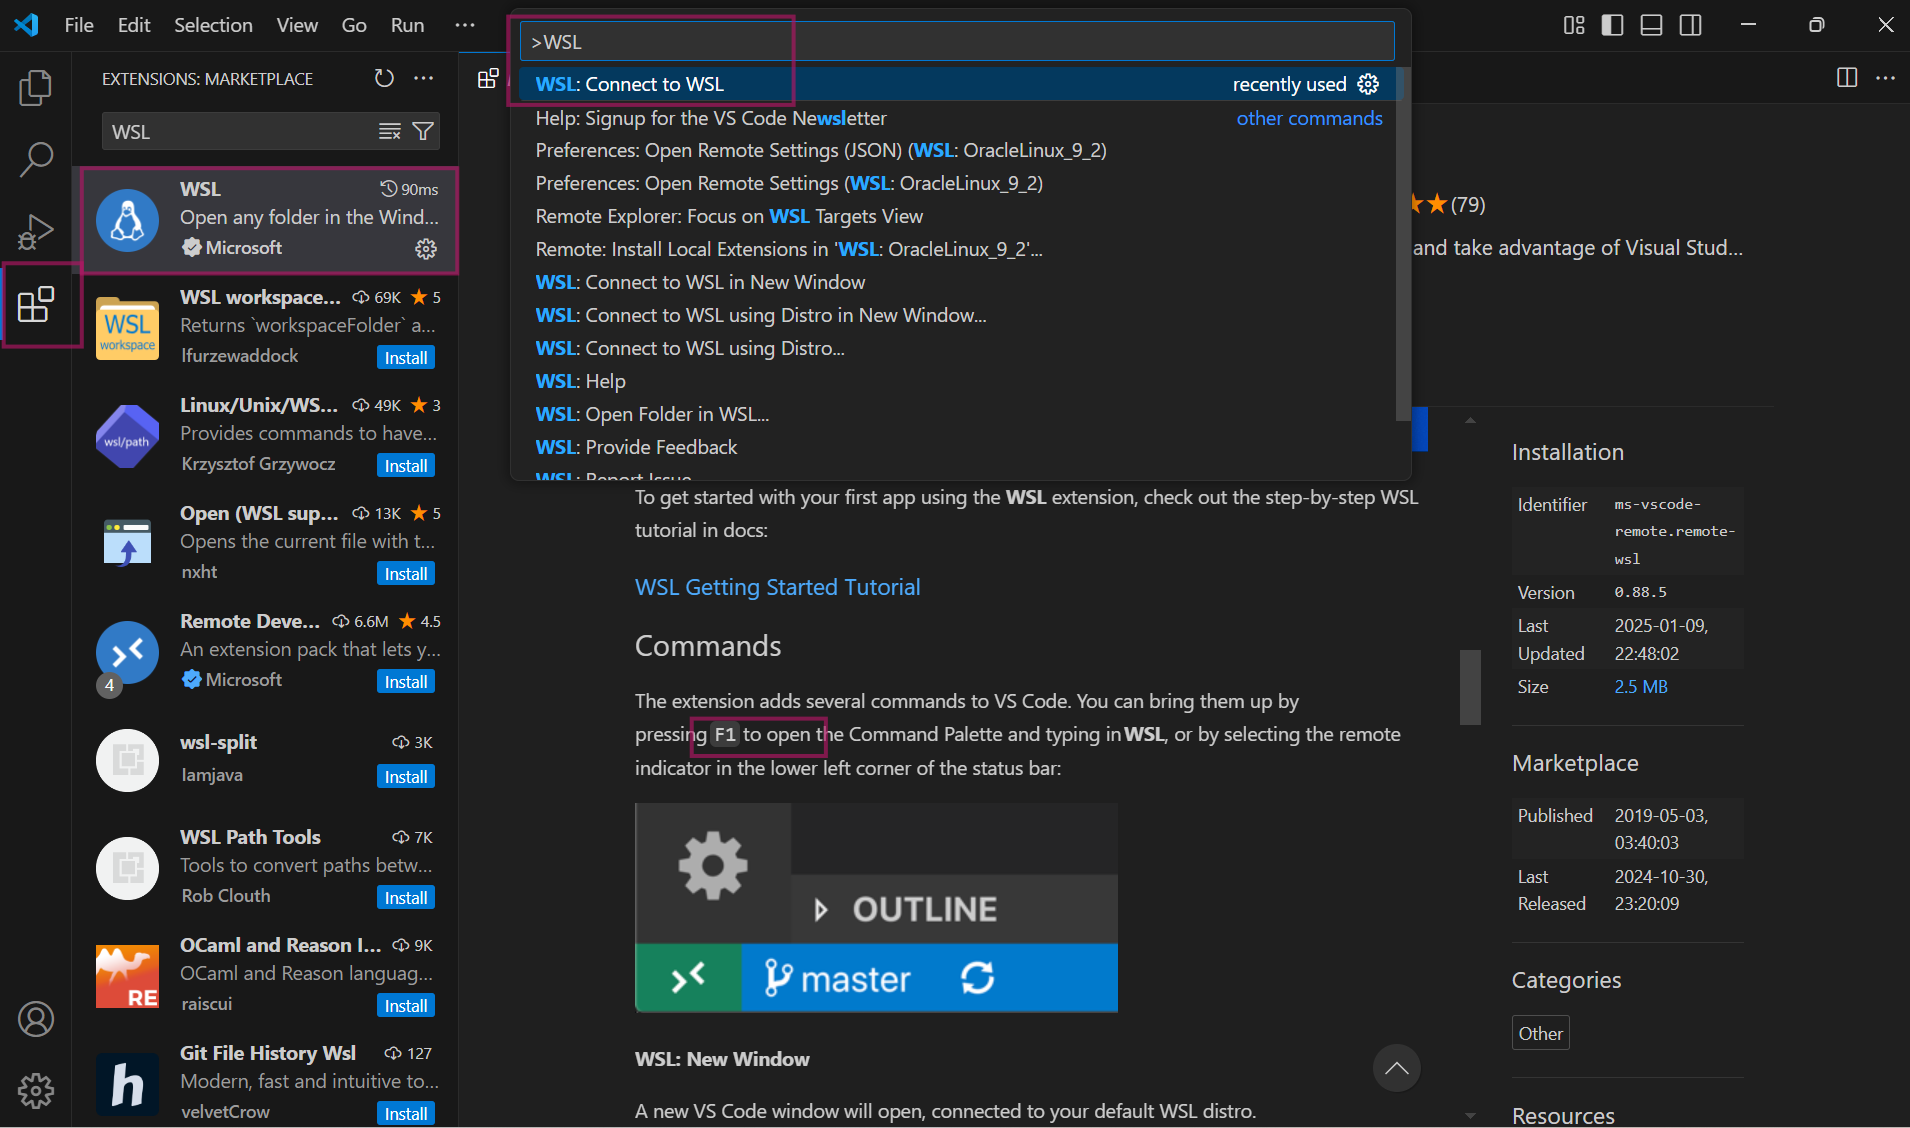
Press F1 type WSL and choose Connect to WSL and it will connect the Oracle Linux machine.
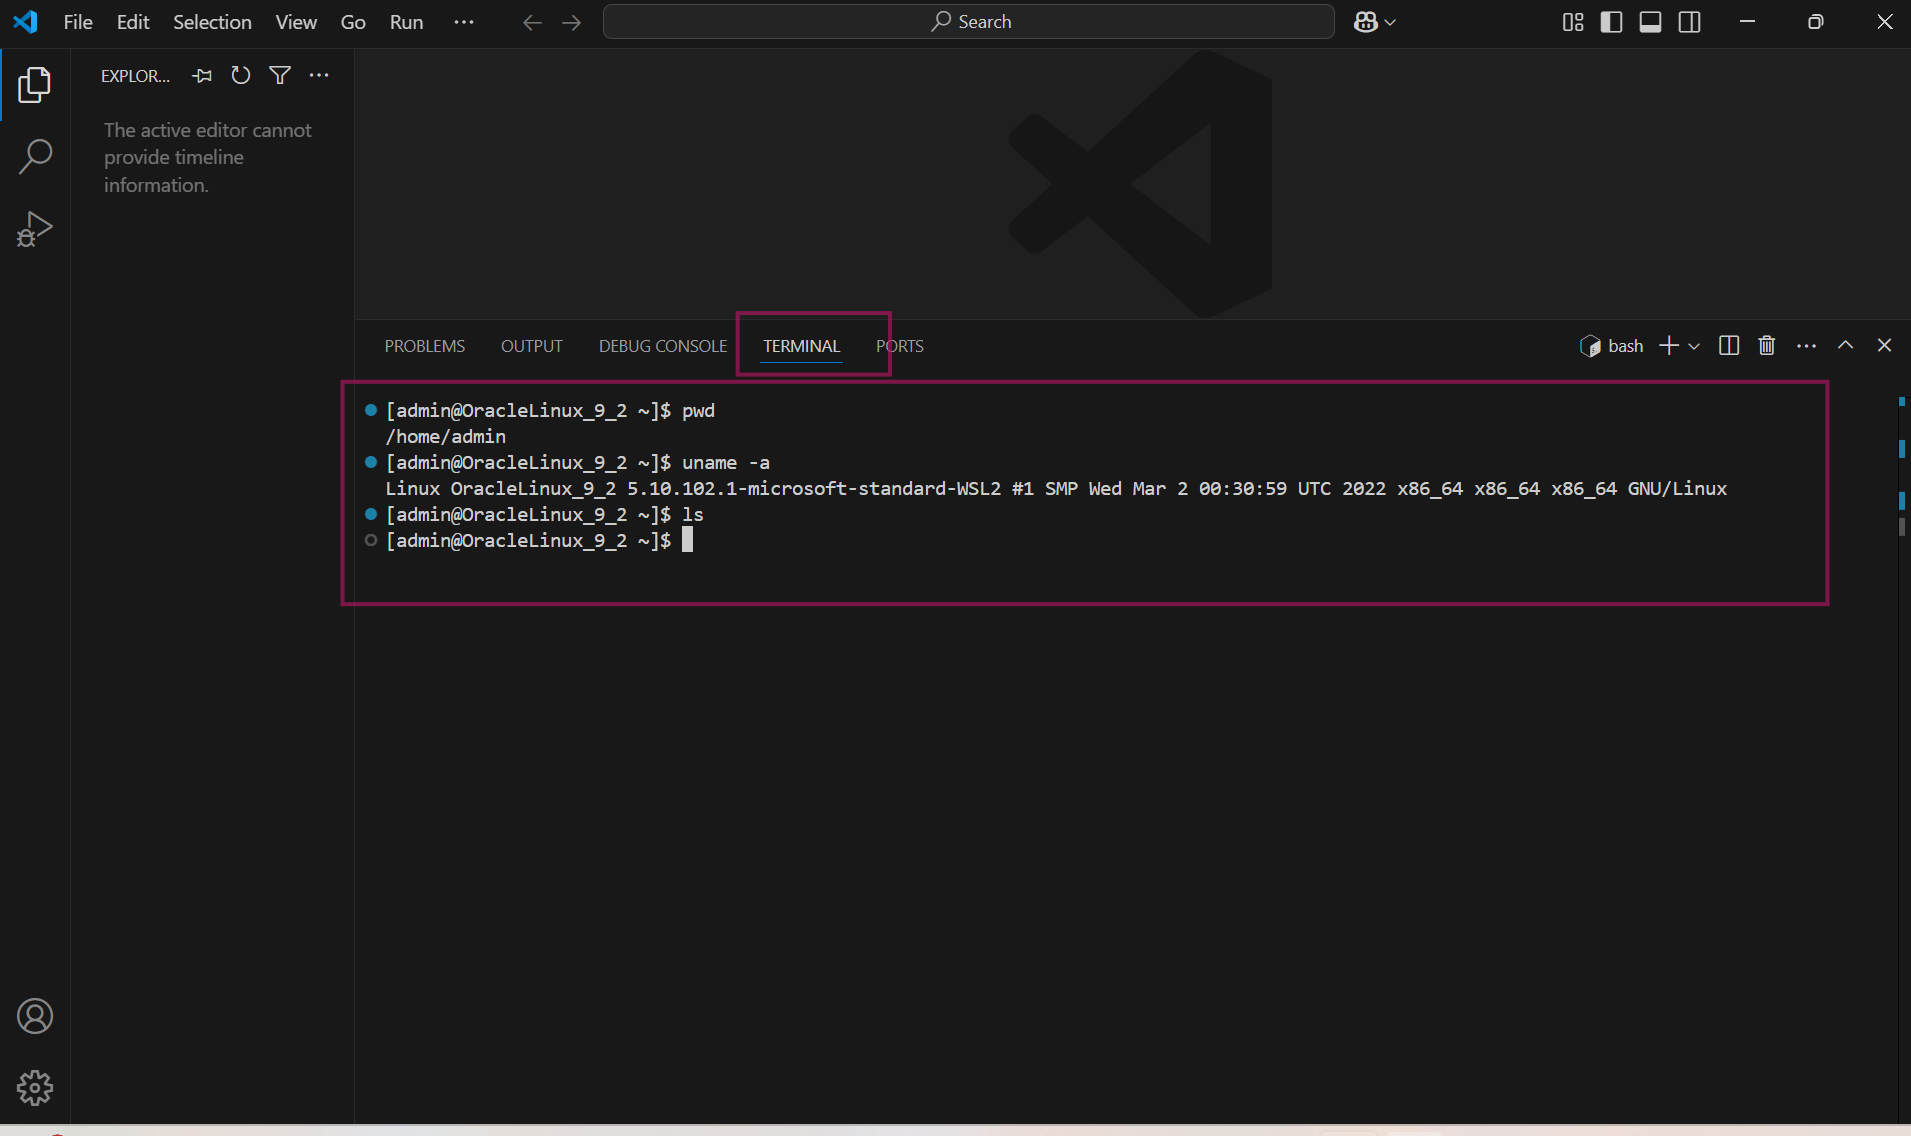
Once it connects, click on Terminal tab you will get access on Oracle Linux
Section 2: Install Terraform generate ssh keys and add the key on OCI console
To install Terraform with yum command, you need to add the official HashiCorpLinux repository. Before adding repository install yum-utils package.
sudo yum install -y yum-utils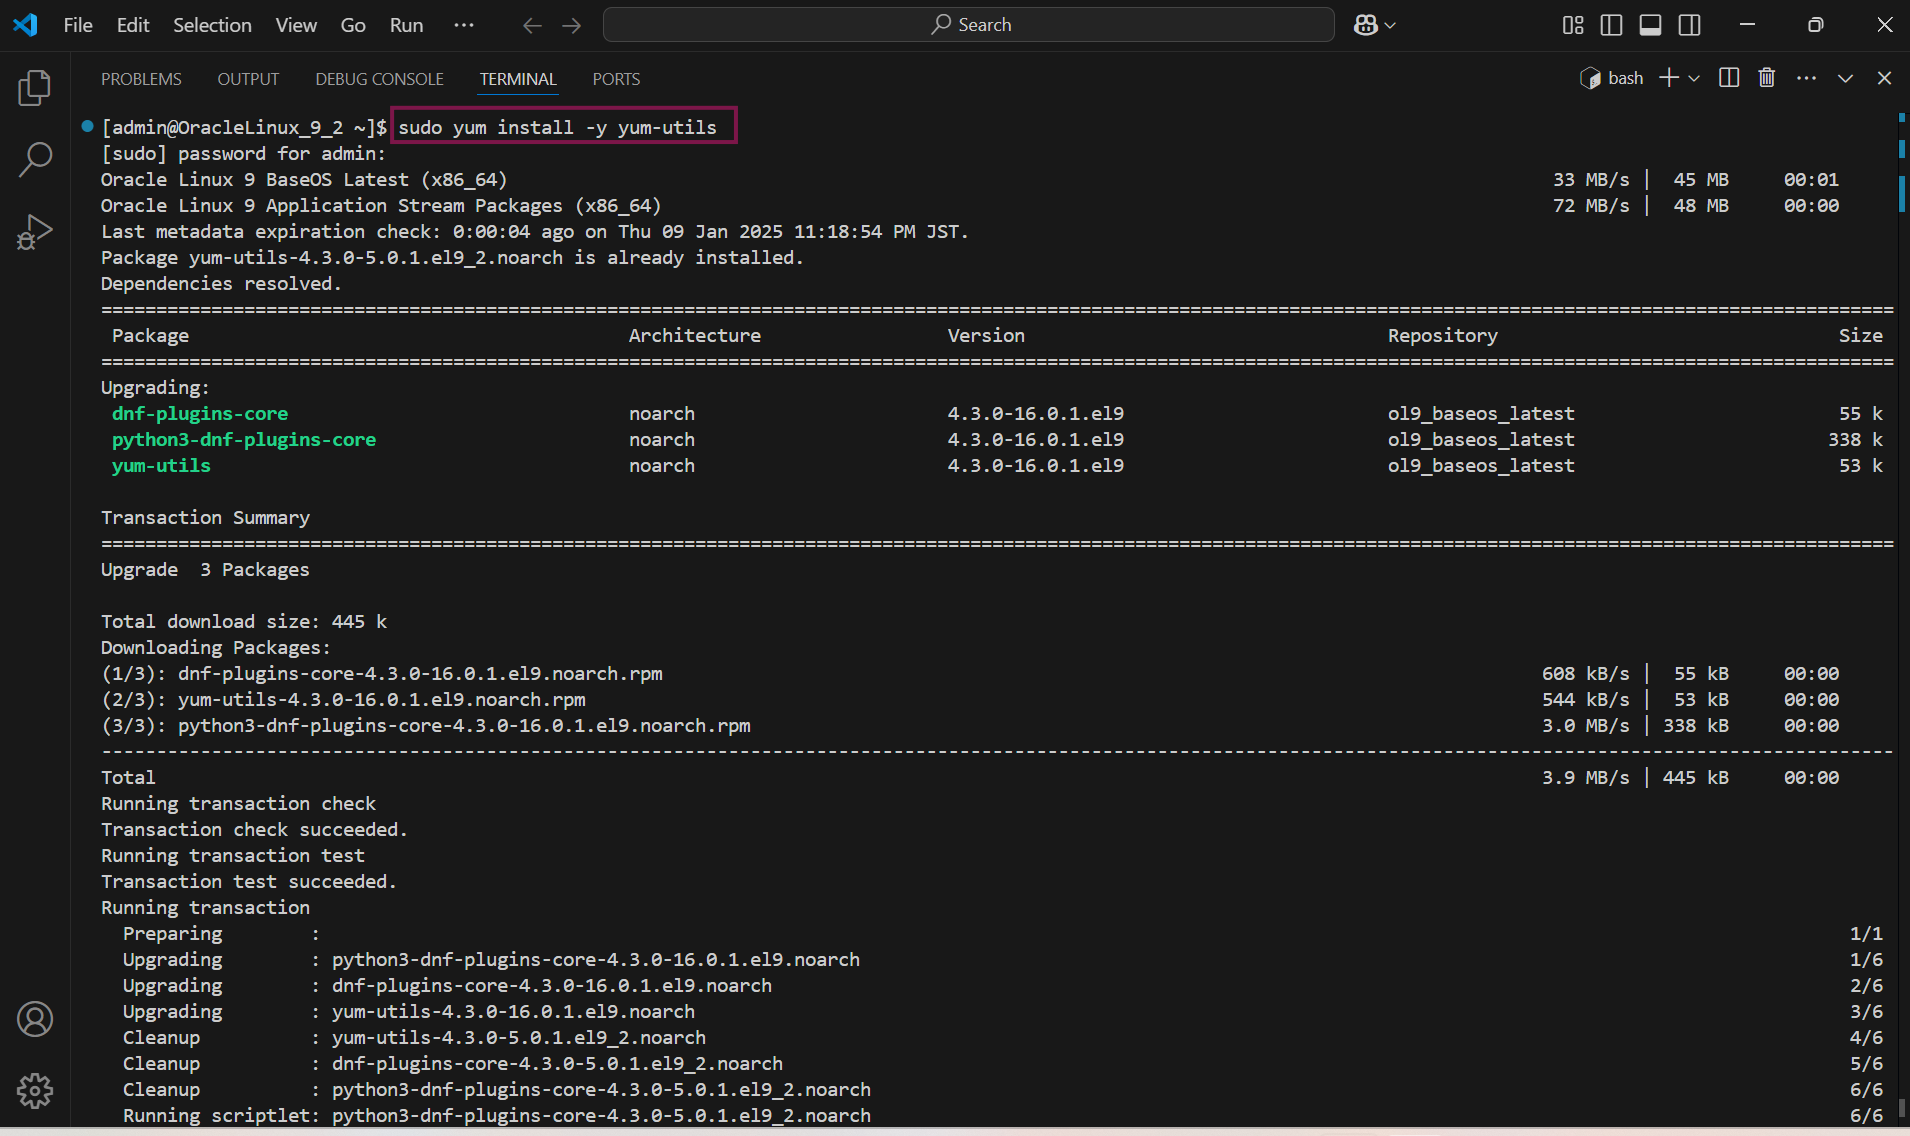
Next, add the official HashiCorpLinux repository to yum-config-manager. Use yum command and install the terraform.
sudo yum-config-manager --add-repo https://rpm.releases.hashicorp.com/RHEL/hashicorp.repo

sudo yum -y install terraform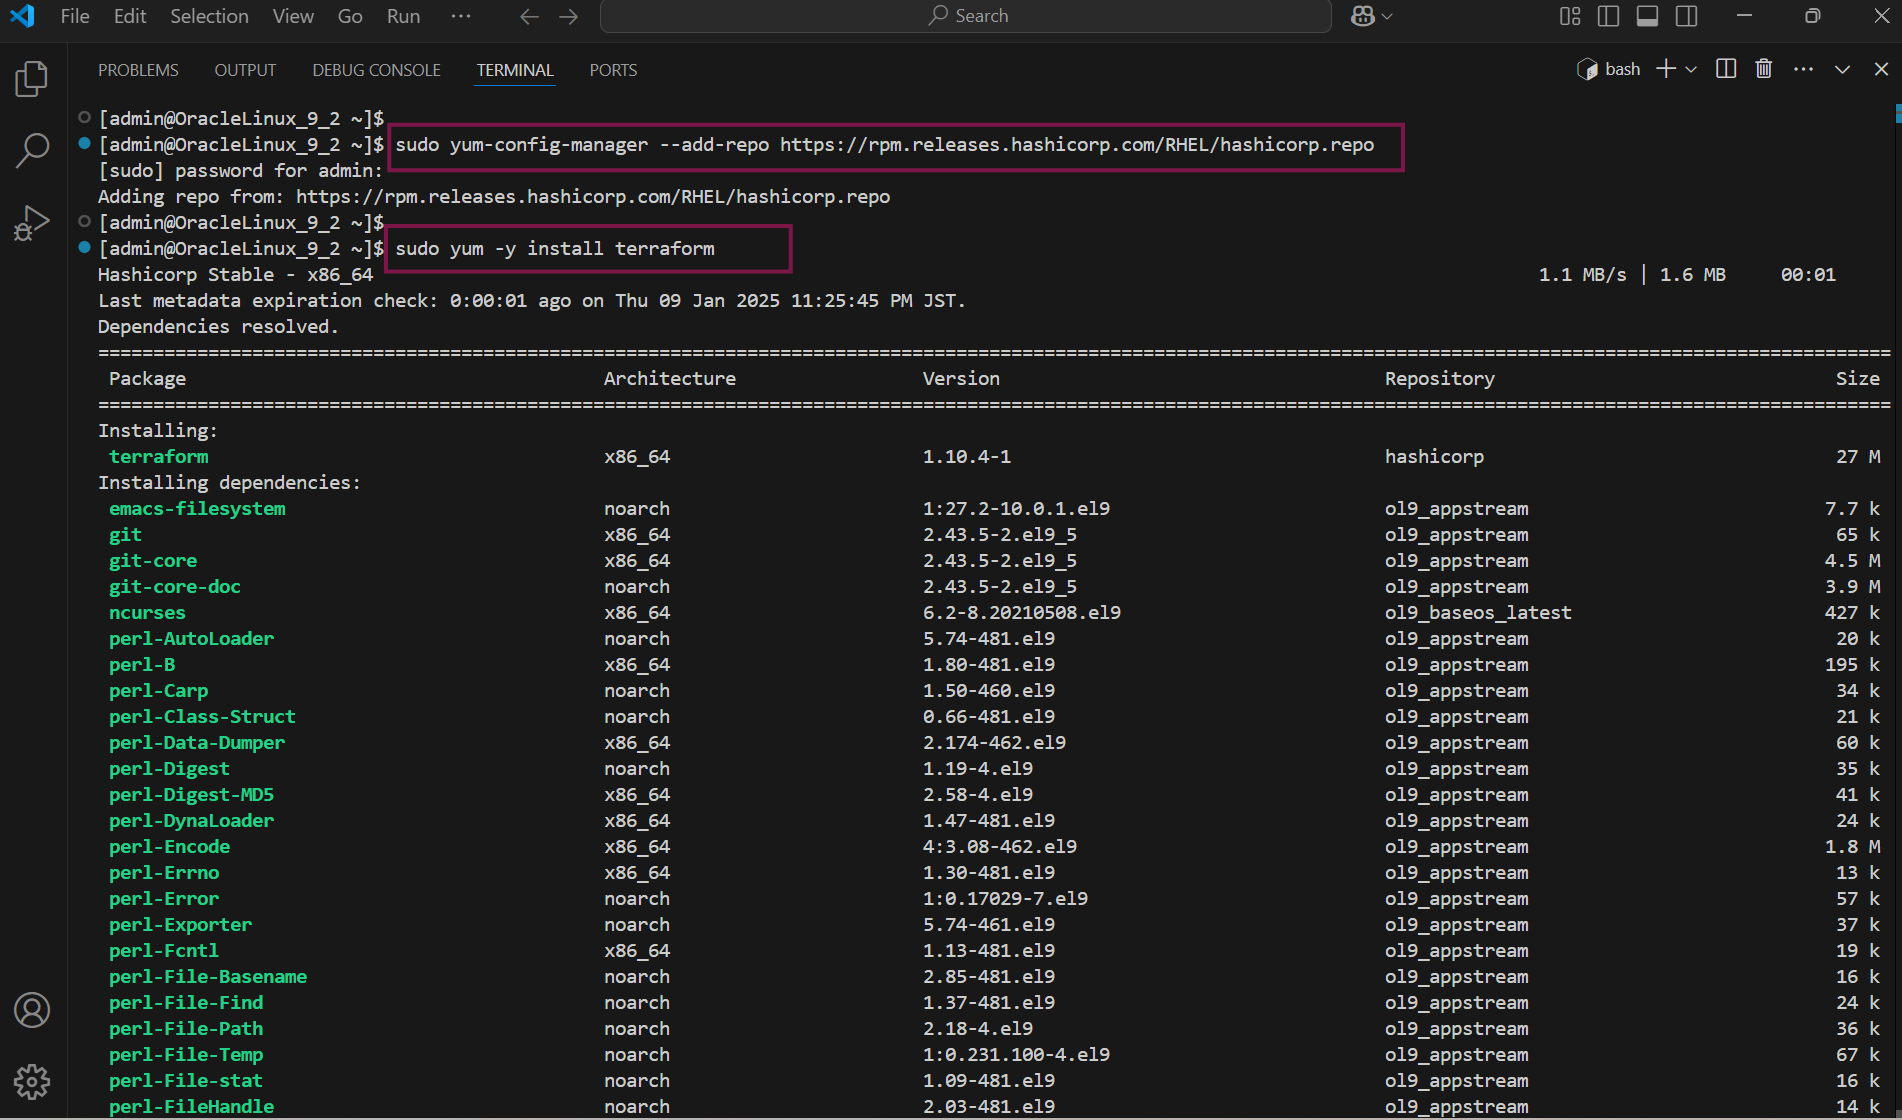
Verify the terraform has been installed
terraform –version

terraform –help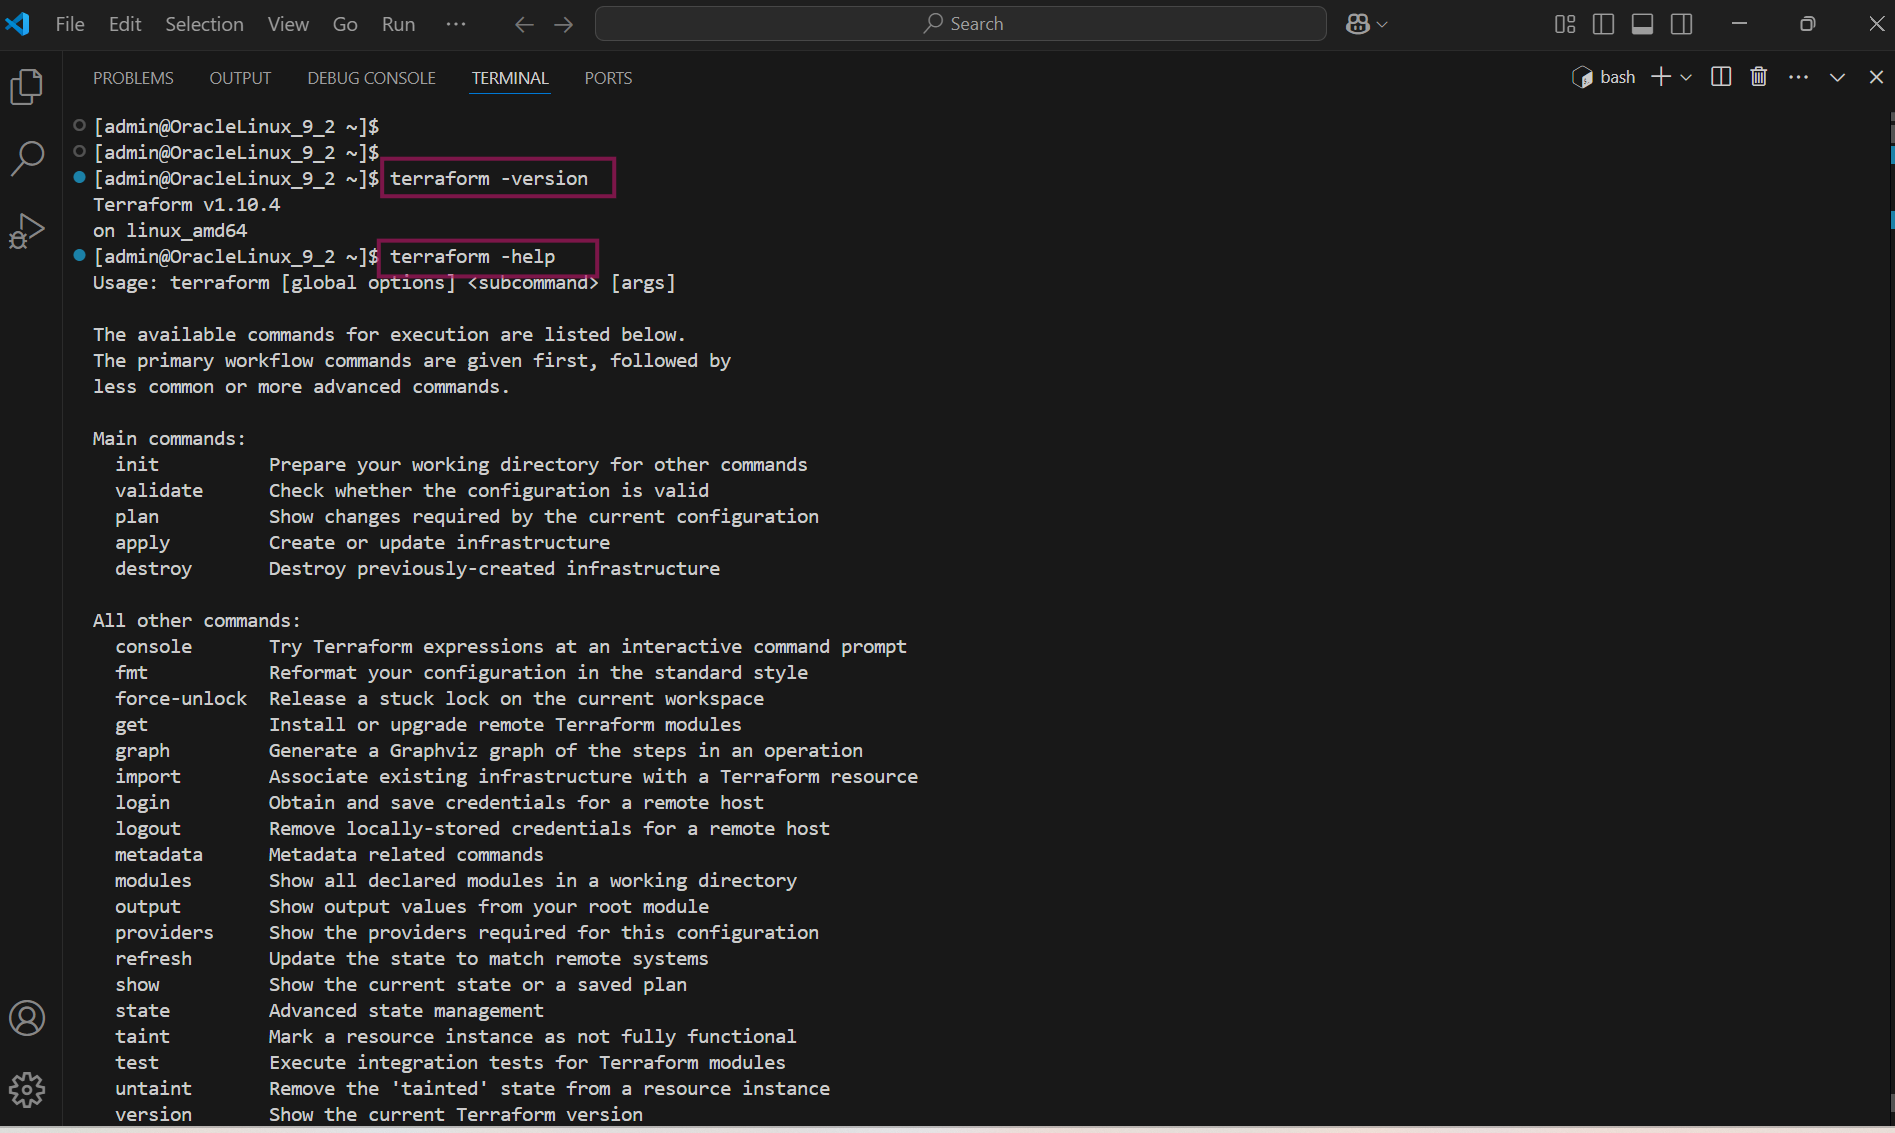
To create and run the terraform code, create project-terraform under the $HOME directory
mkdir $HOME/project-terrraform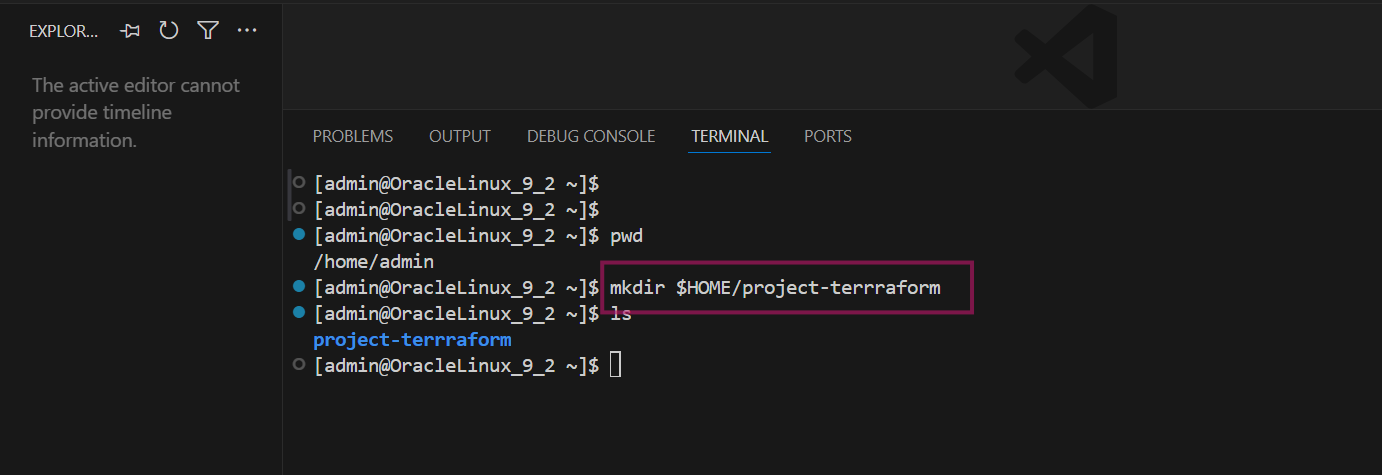
Now, from your visual code studio click on File and select Open folder.
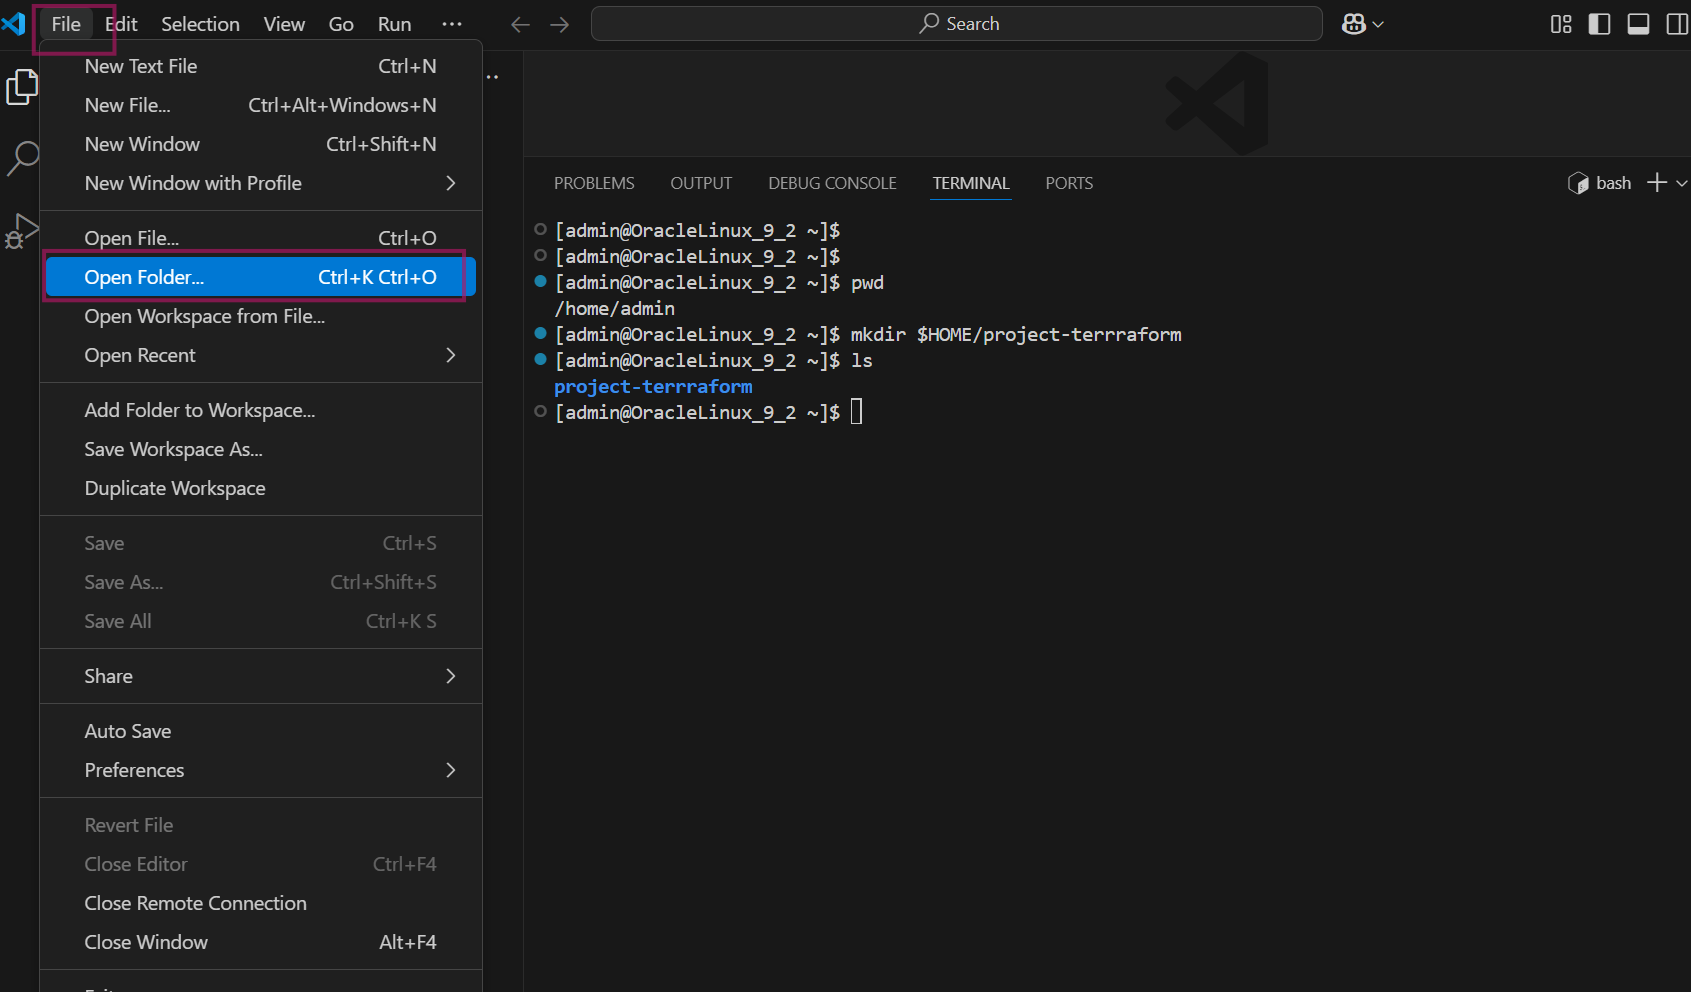
choose ‘project-terraform’ folder that you created earlier step and click on OK.

Verify that your terminal lands on right directory
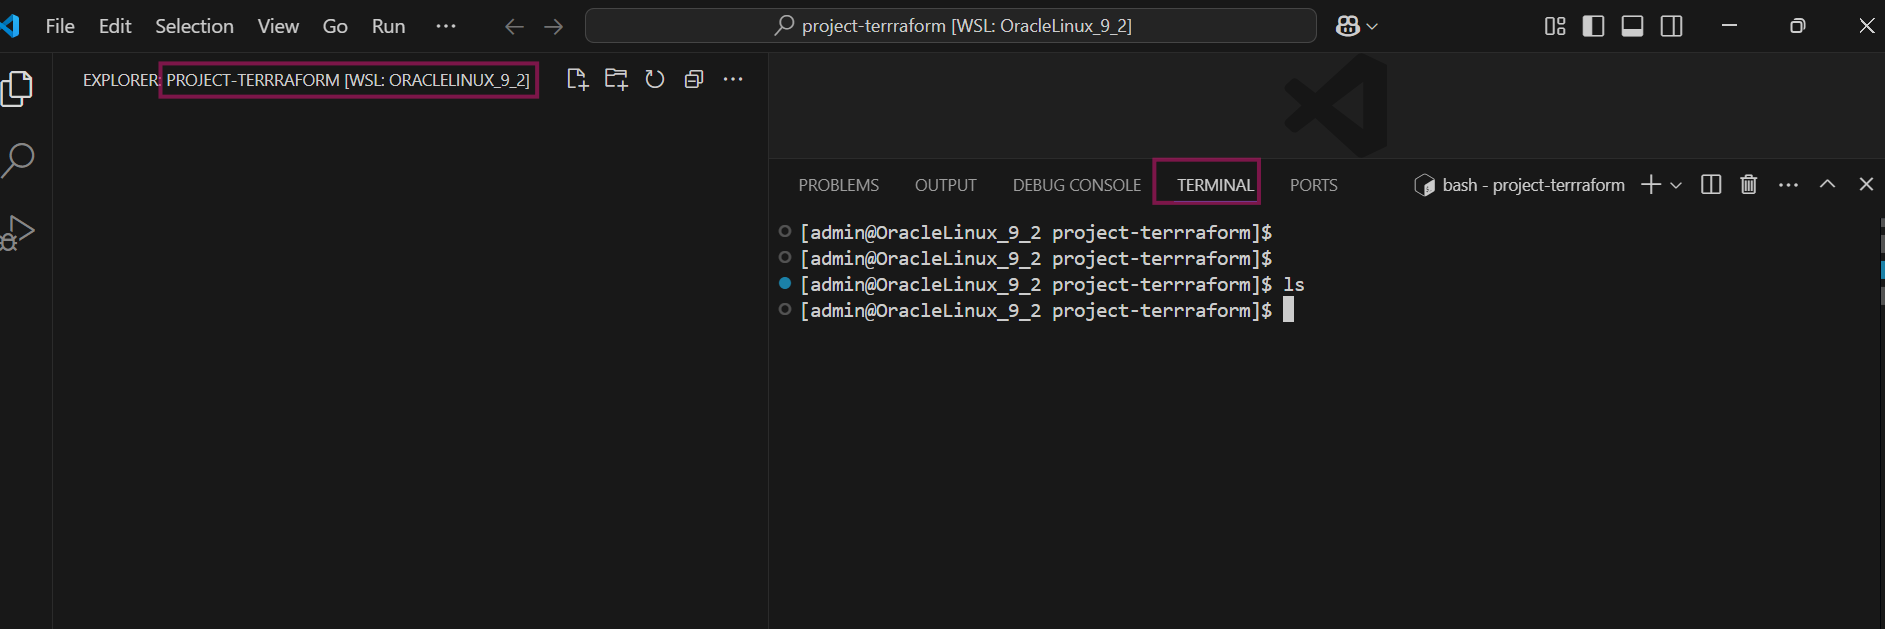
Although it is possible to generate API signing key pairs using the console, but in my case, I have created ssh key pairs using openssl and I am storing it under the $HOME/.oci directory. Create .oci folder under the home
mkdir $HOME/.ociGenerate 2048 bit private key using openssl genrsa command.
openssl genrsa -out $HOME/.oci/<rsa-private-key-name>.pem 2048Generate public key based on the private key that you generated that you generated on previous step
openssl rsa -pubout -in $HOME/.oci/<rsa-public-key-name>.pem -out $HOME/.oci/<rsa-key-name>.pem
We also need .pub format key for the compute access. Use ssh-keygen command and generate 2028 bit .pub format key. I am storing it under the same ($HOME/.oci ) directory
ssh-keygen -b 2048 -t rsa -f <rsa-key-name>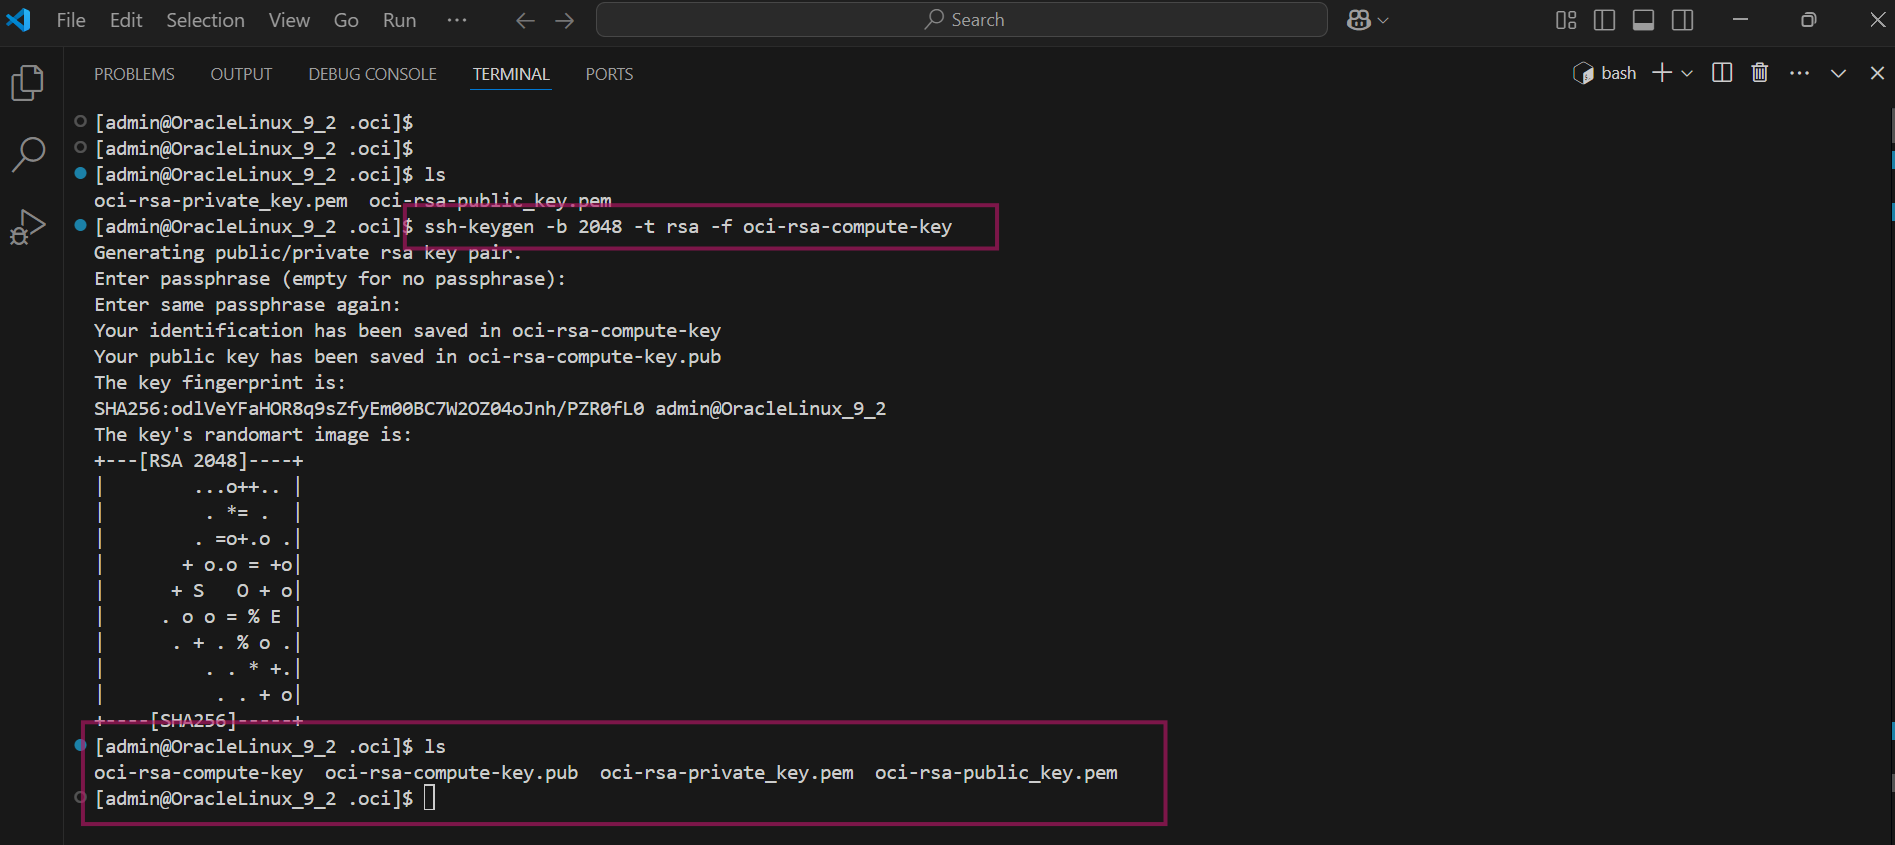
Open the .pem public key file and copy it that we add it on OCI user account that is used for the API access
cat $HOME/.oci/<rsa-key-name>.pem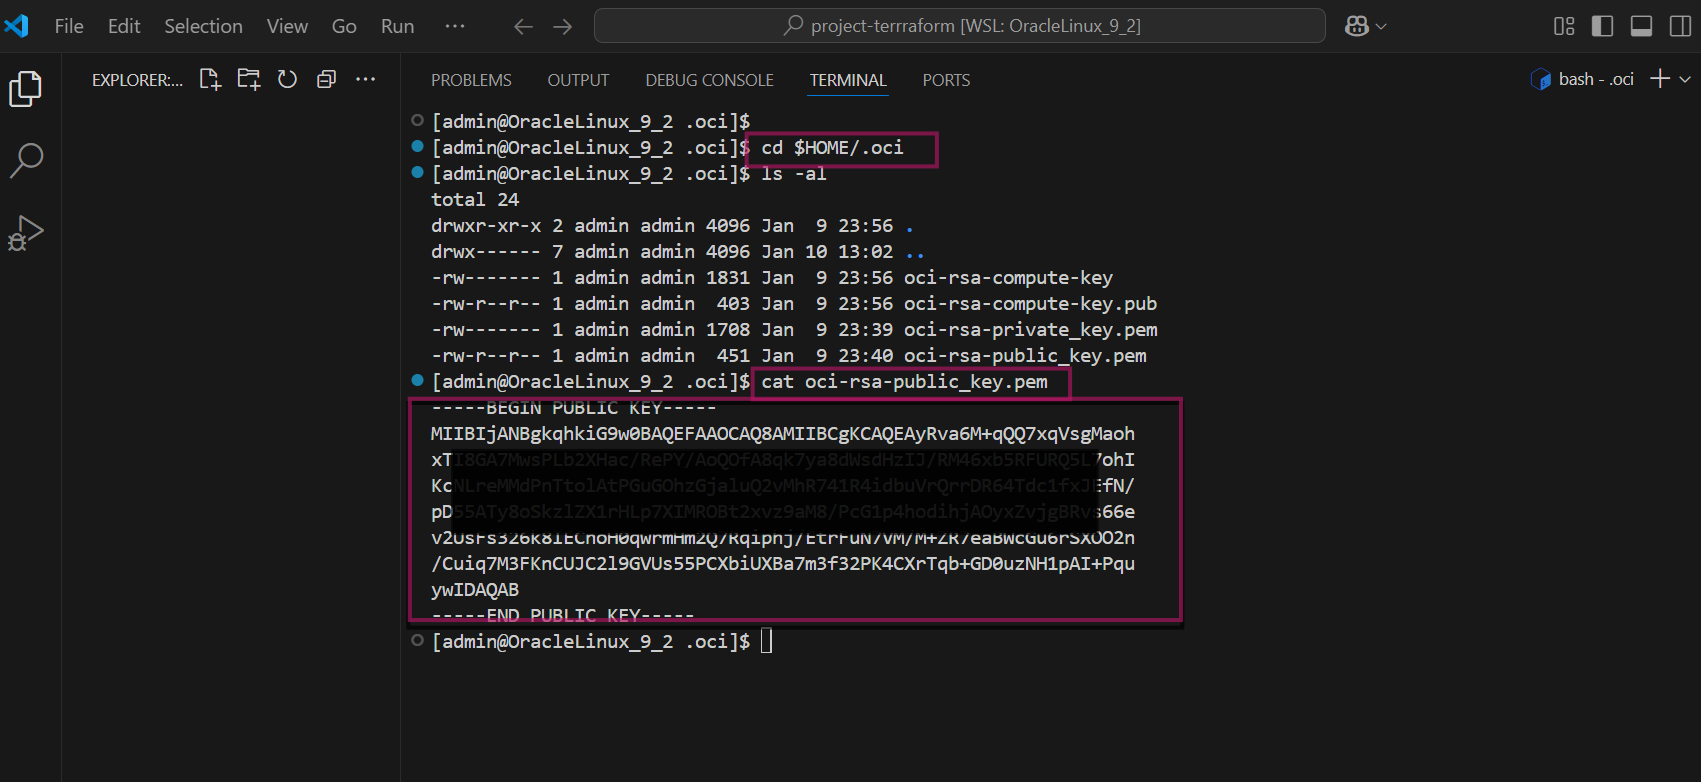
Once the API signing key pair generation is complete, add the generated public key to the OCI user account, this task will be performed in the OCI GUI console
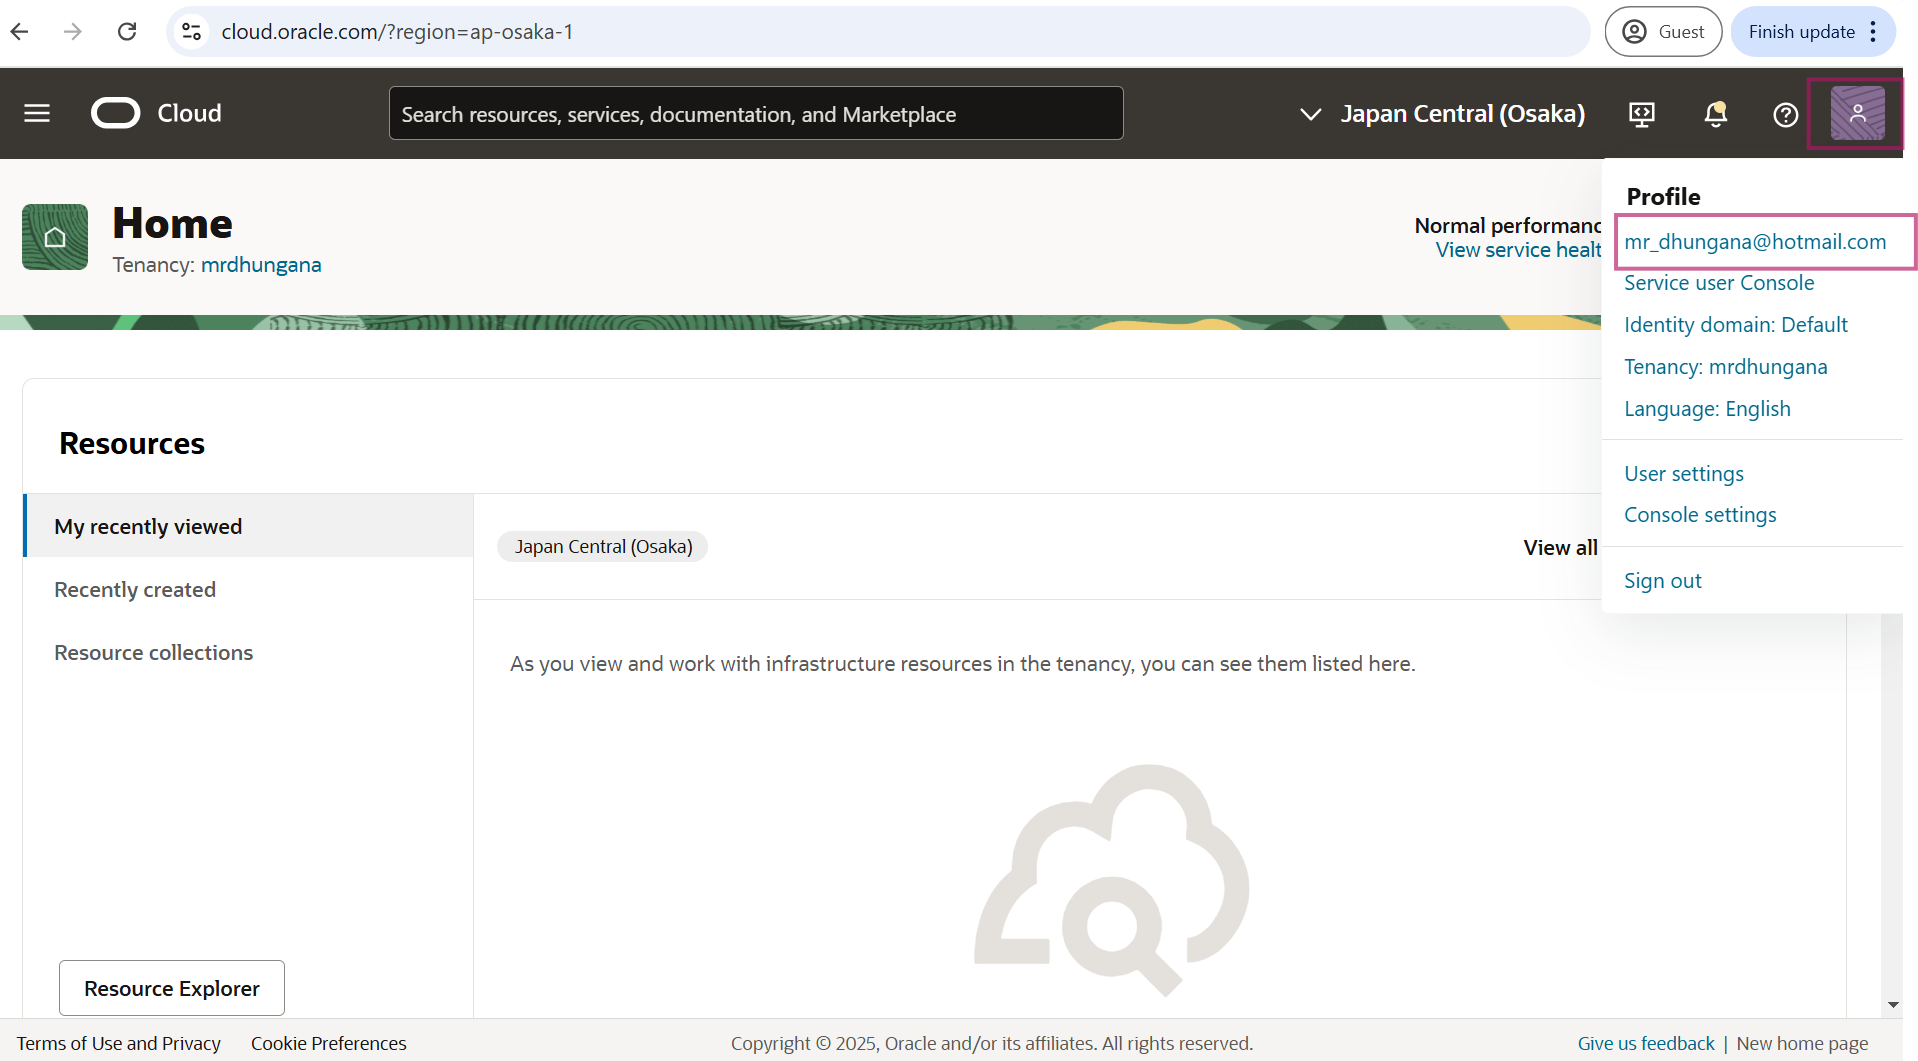
Log in to the OCI Console and click user profile icon and select My profile.
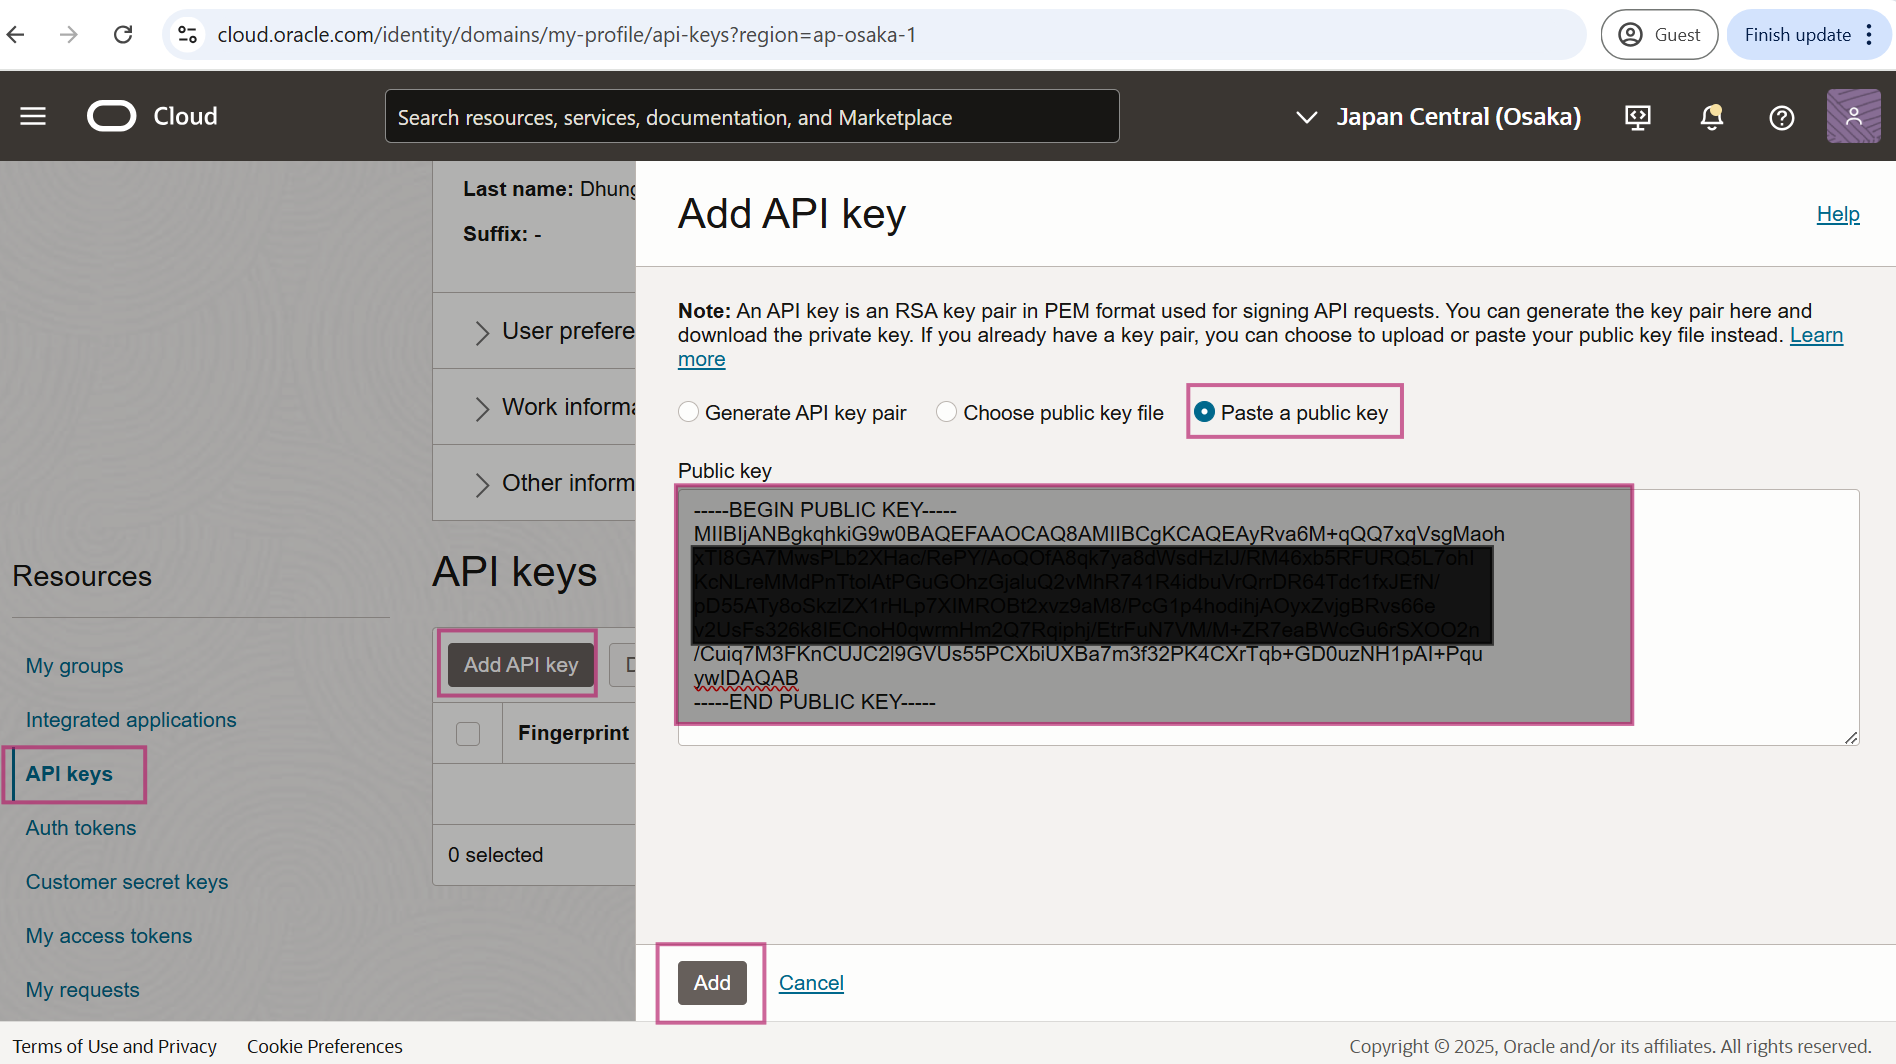
Go to under the Resources and select API Keys and click on API Keys and Paste a public key that we generated earlier. Click on Add
Copy details provided on configuration file preview and save it somewhere. This will be used in the terraform variables file on later steps.
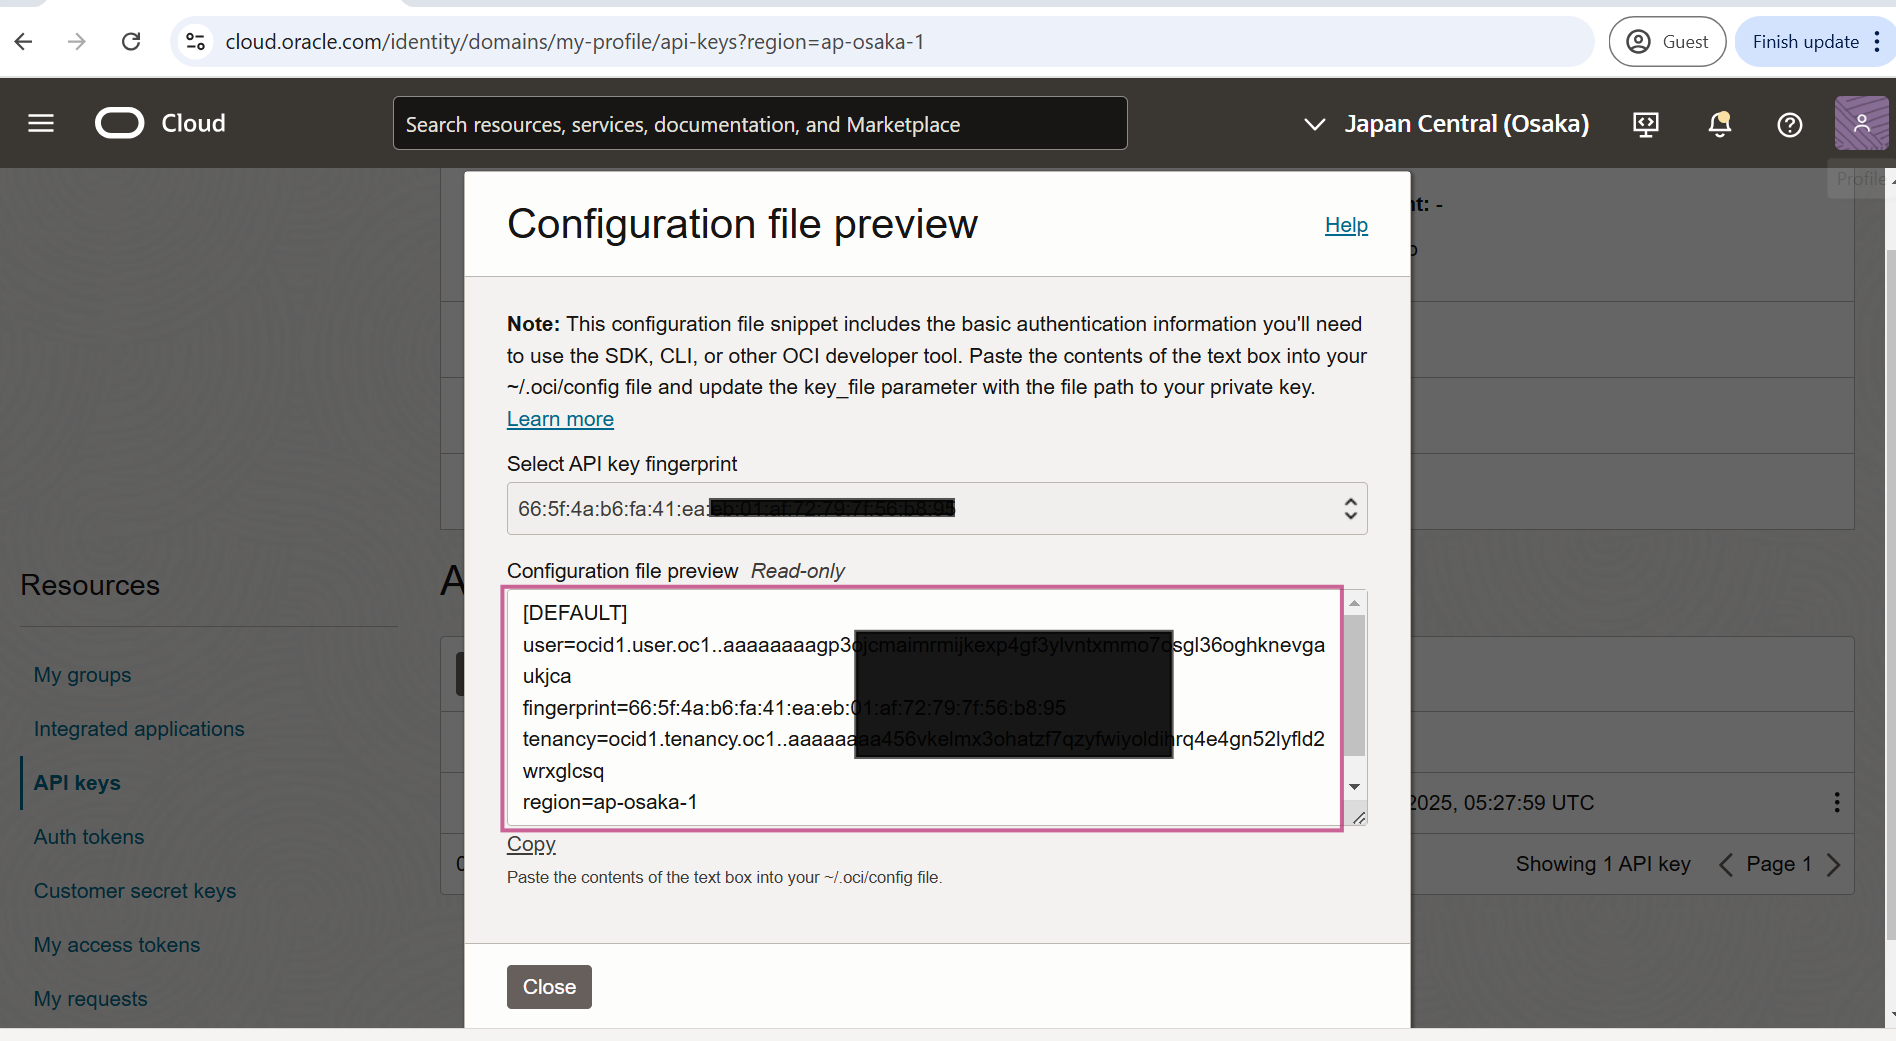
Configuration file preview, should be like this:
[DEFAULT]

user=ocid1.user.oc1. aaaaaaaaxxxxxxx

fingerprint=66:5f:4a:xx:xx:xx:xx:xx:xx

tenancy=ocid1.tenancy.oc1..aaaaaaaaxxxxxxx

region=ap-osaka-1

key_file=<path to your private keyfile> # TODO
Section 3: Create and Deploy and Remove the Resources
Open visual code studio and under the /home/admin/project-terraform directory and create the following terraform files:
terrafrom.tfvars
veriables.tf
provider.tf
availability_domains.tf
networking.tf
compute_linux.tf
compute_windows.tf
output.tf
Create terraform.tfvar file – define default values for variables in your configuration. It allows you to specify variables without hardcoding them into the configuration. Modify IAM and compartment details that you collected from your environment earlier
########################################################################################################
# OCI Identity and access parameters
########################################################################################################
user_id =   "ocid1.user.oc1..aaaaaaaagp3xxxxxxx"  # Change is your OCI user id
api_fingerprint =   "66:5f:4a:b6:fa:41:xx:xx:xx:xxx " # Change it with your api signature
tenancy_id  =   "ocid1.tenancy.oc1..aaaaaaaagp3xxxxxxx" # Change it with your Oci Tenant ID
api_private_key_path    =   "/home/admin/.oci/oci-rsa-private_key.pem"
region  =   "ap-osaka-1"

########################################################################################################
# Compartment Id where your resouces will be created
########################################################################################################
compartment_id  = "ocid1.tenancy.oc1..aaaaaaaagp3xxxxxxx" # Change it with your compartment id where you want to create OCI resouces

########################################################################################################
# VCN specific variables
########################################################################################################
create_new_vcn  = true # Set this to true if you want terraform to crearte the network for you, otherwise set it to false.
vcn_cidr_block  = "10.10.0.0/16"   # The list of IPv4 CIDR blocks the VCN will use
vcn_display_name    = "VCN01"      # provide the name that will be displayed in the OCI console
vcn_dns_label   = "vcn01"          # provide a descriptive alphanumeric name for the DNS

#Configure CIDR Blocks, Subnet(Public, Private) OCIDS for an existing VCN
vcn_id  = "REPLACE_BY_YOUR_VCN_OCID"                            #ADD WITH YOUR VCN OCID
private_subnet_id   = "REPLACE_BY_YOUR__PRIVATE_SUBNET_OCID"    #ADD WITH YOUR PRIVATE SUBNET
public_subnet_id = "REPLACE_BY_YOUR_PUBLIC_SUBNET__OCID"        #AA WITH YOUR PUBLIC SUBNET

#Private subnet variables
private_subnet_cidr_block = "10.10.10.0/24"           # OCI private subnet CIDR block range
private_subnet_display_name = "private_subnet_demo"   # provide a descriptive name for the private subnet, that will be displayed in the OCI console
private_subnet_prohibit_public_ip_on_vnic   = false  # Allow public IP address to the VNIC

#Public subnet variables
public_subnet_cidr_block    = "10.10.20.0/24"       # OCI public subnet CIDR block range
public_subnet_display_name  = "public_subnet_demo"  # provide a descriptive name for the public subnets, that will be displayed in the OCI console
public_subnet_prohibit_public_ip_on_vnic    = false # Allow public IP address to the VNIC

########################################################################################################
#Compute variables - Make sure to select a compatible shape VM.Standard.E5.Flex)
########################################################################################################
instance_shape = "VM.Standard.E5.Flex"       # Shape of the compute instance
instance_flex_memory_in_gbs = 8           #The total amount of memory available to the instance, in gigabytes (you can modify memory size)
instance_flex_ocpus = 1                      #The total number of OCPUs available to the instance. (you can modify OCPU)
instance_create_vnic_details_assign_public_ip = true # To allow compute connectivity from internet
instance_display_name   = "compute_demo" # provide a descriptive name for the compute instance - this is what you will see displayed in the OCI console
public_ssh_key  = "/home/admin/.oci/oci-rsa-compute-key.pub" # Add your public ssh key
private_ssh_key = "home/admin/.oci/oci-rsa-compute-key"     # Add your private ssh key
create_linux_instance = true # if set to true a test linux instance will be created and false no linux instance will be deployed.
create_windows_instance = true # # If set to true a test windows instance will be created and false no windows instance will be deployed.
linux_image_ocid = "ocid1.image.oc1.ap-osaka-1.aaaaaaaafqowh456grk3td6tsd4reg2vyqjvfhqyjx3kyaece4znxj2ydbqq"   # OCID for chosen image (Oracle Linux 9 example) specific to the test region  (in my case ap-osaka-1))
windows_image_ocid = "ocid1.image.oc1.ap-osaka-1.aaaaaaaargxtf5sxr5r3ifegnyjy4s6gsxtqemtwjff4uyes4bmofv2jlwoa"  # OCID for chosen image (Windows example) specific to each region (in my case ap-osaka-1))

#Osaka Region
# Oracle linux image_id = ocid1.image.oc1.ap-osaka-1.aaaaaaaafqowh456grk3td6tsd4reg2vyqjvfhqyjx3kyaece4znxj2ydbqq
# Windows image_id = ocid1.image.oc1.ap-osaka-1.aaaaaaaargxtf5sxr5r3ifegnyjy4s6gsxtqemtwjff4uyes4bmofv2jlwoa
# for other image OCIDs: https://docs.oracle.com/en-us/iaas/images/
Create provider.tf file: provider is a plugin that helps terraform communicate with cloud services
##Provider
terraform {
  required_providers {
    oci = {
      source = "oracle/oci"
      version = "6.21.0"
    }
  }
}

provider "oci" {
  tenancy_ocid          = var.tenancy_id
  user_ocid             = var.user_id
  fingerprint           = var.api_fingerprint
  private_key_path      = var.api_private_key_path
  region                = var.region
}
Create availability_domain.tf file: defines resources or configurations related to the availability domains in a cloud provider,
#Avaiablity Domain
data "oci_identity_availability_domains" "ad" {
    #Required
    compartment_id = var.tenancy_id
}
Create veriables.tf file: used to define input variables for your configuration
########################################################################################################
#API and IAM realted veriables
########################################################################################################
variable "api_fingerprint" {
  description = "Fingerprint of OCI API private key for Tenancy"
  type        = string
}
variable "api_private_key_path" {
  description = "Path to OCI API private key used for Tenancy"
  type        = string
}
variable "tenancy_id" {
  description = "Tenancy ID where to create resources for Tenancy"
  type        = string
}
variable "user_id" {
  description = "User ID that Terraform will use to create resources for Tenancy"
  type        = string
}
variable "region" {
  description = "OCI region where resources will be created for Tenancy"
  type        = string
}

########################################################################################################
#VCN Specific variables
########################################################################################################
variable "create_new_vcn" {
  description = "Boolean variable to specify whether to create a new VCN or to reuse an existing one."
  type        = bool
}
variable "compartment_id" {
  description = "OCI compartment where resources will be created"
  type        = string
}
variable "vcn_cidr_block" {
  description = "The list of IPv4 CIDR blocks the VCN will use"
  type        = string
}
variable "vcn_display_name" {
  description = "provide a descriptive name for the VCN - this is what you will see displayed in the OCI console"
  type        = string
}
variable "vcn_dns_label" {
  description = "provide a descriptive alphanumeric name for the DNS - this is what you will see displayed in the OCI console"
  type        = string
}
variable "vcn_id" {
  description = "provide your existing VCN OCID if create_new_vcn = false"
  type = string
}
variable "private_subnet_id" {
  description = "provide existing private subnet OCID"
  type = string
}
variable "public_subnet_id" {
  description = "provide existing public subnet OCID"
  type = string
}

#Private subnet variables
variable "private_subnet_cidr_block" {
  description = "OCI private subnet CIDR block range"
  type        = string
}
variable "private_subnet_display_name" {
  description = "provide a descriptive name for the private subnet - this is what you will see displayed in the OCI console"
  type        = string
}
variable "private_subnet_prohibit_public_ip_on_vnic" {
  description = "Allow public IP address to the VNIC"
  type        = bool
}

#Public subnet variables
variable "public_subnet_cidr_block" {
  description = "OCI public subnet CIDR block range"
  type        = string
}
variable "public_subnet_display_name" {
  description = "provide a descriptive name for the public subnet - this is what you will see displayed in the OCI console"
  type        = string
}
variable "public_subnet_prohibit_public_ip_on_vnic" {
  description = "Allow public IP address to the VNIC"
  type        = bool
}

########################################################################################################
#Compute variables
########################################################################################################

variable "instance_shape" {
  description = "value"
  type        = string
}

variable "instance_flex_memory_in_gbs" {
  description = "The total amount of memory available to the instance, in gigabytes."
  type        = number
}

variable "instance_flex_ocpus" {
  description = "The total number of OCPUs available to the instance."
  type        = number
}

variable "instance_create_vnic_details_assign_public_ip" {
  description = "To allow compute connectivity from internet"
  type        = bool
}

variable "instance_display_name" {
  description = "provide a descriptive name for the compute instance - this is what you will see displayed in the OCI console"
  type        = string
}

variable "public_ssh_key" {
  description = "Add your public ssh key - for provisioning your compute instance"
  type        = string
}

variable "private_ssh_key" {
  description = "Add your private ssh key - for accessing your compute instance after creation"
  type        = string
}

variable "create_linux_instance" {
  description = "Boolean variable to specify whether to provision a Linux instances"
  type        = bool
}

variable "create_windows_instance" {
  description = "Boolean variable to specify whether to provision a Windows instances"
  type        = bool
}

variable "windows_image_ocid" {
  description = "OCID of the Windows image to use"
  type        = string
}

variable "linux_image_ocid" {
  description = "OCID of the Linux image to use"
  type        = string
}
Create networking.tf file: define and configure vcn network resources
resource "oci_core_vcn" "test_vcn" {
  count = (var.create_new_vcn) ? 1 : 0

  #Required
  compartment_id = var.compartment_id
  cidr_block   = var.vcn_cidr_block
  display_name = var.vcn_display_name
  dns_label    = var.vcn_dns_label
}
##Subnet
resource "oci_core_subnet" "private_subnet" {
  count = (var.create_new_vcn) ? 1 : 0

  #Required
  cidr_block     = var.private_subnet_cidr_block
  compartment_id = var.compartment_id
  vcn_id         = oci_core_vcn.test_vcn.*.id[0]
  display_name               = var.private_subnet_display_name
  prohibit_public_ip_on_vnic = var.private_subnet_prohibit_public_ip_on_vnic
}

resource "oci_core_subnet" "public_subnet" {
  count = (var.create_new_vcn) ? 1 : 0

  #Required
  cidr_block     = var.public_subnet_cidr_block
  compartment_id = var.compartment_id
  vcn_id         = oci_core_vcn.test_vcn.*.id[0]
  display_name               = var.public_subnet_display_name
  prohibit_public_ip_on_vnic = var.public_subnet_prohibit_public_ip_on_vnic
  route_table_id             = oci_core_route_table.test_route_table.*.id[0]
}

#Internet Gateway
resource "oci_core_internet_gateway" "test_internet_gateway" {
  count = (var.create_new_vcn) ? 1 : 0

  #Required
  compartment_id = var.compartment_id
  display_name   = "igw_for_${var.vcn_display_name}"
  vcn_id         = oci_core_vcn.test_vcn.*.id[0]
 # route_table_id = oci_core_route_table.test_route_table.id
}

## Route the traffice to internet
resource "oci_core_route_table" "test_route_table" {
  count = (var.create_new_vcn) ? 1 : 0

  #Required
  compartment_id = var.compartment_id
  vcn_id         = oci_core_vcn.test_vcn.*.id[0]
  route_rules {
    #Required
    network_entity_id = oci_core_internet_gateway.test_internet_gateway.*.id[0]
    description      = "route rule internet access for ${var.vcn_display_name}"
    destination      = "0.0.0.0/0"
    destination_type = "CIDR_BLOCK"
  }
}

##NSG
resource "oci_core_network_security_group" "test_nsg" {
  count = (var.create_new_vcn) ? 1 : 0

  #Required
  compartment_id = var.compartment_id
  vcn_id         = oci_core_vcn.test_vcn.*.id[0]
  display_name   = "NETWORK_SECURITY_GROUP_${var.vcn_display_name}"
  freeform_tags  = { "Lab" = "Terraofm 101 Guide" }
}
Create compute_linux.tf file: define compute (linux) related resources
resource "oci_core_instance" "test_linux_instance" {
  #Required Information
  count = var.create_linux_instance ? 1 : 0

  availability_domain = data.oci_identity_availability_domains.ad.availability_domains[0].name
  compartment_id      = var.compartment_id


  create_vnic_details {
    assign_public_ip       = "true"
    display_name           = var.instance_display_name
    nsg_ids                = []
    skip_source_dest_check = "false"
    subnet_id              = var.create_new_vcn ? oci_core_subnet.public_subnet.*.id[0] : var.public_subnet_id
  }

  display_name = "${var.instance_display_name}_linux"

  metadata = {
    ssh_authorized_keys = "${file(var.public_ssh_key)}"
  }

  shape = var.instance_shape
  shape_config {

    memory_in_gbs = var.instance_flex_memory_in_gbs
    ocpus         = var.instance_flex_ocpus
  }

  launch_options {
    boot_volume_type                    = "PARAVIRTUALIZED"
    firmware                            = "UEFI_64"
    is_consistent_volume_naming_enabled = "true"
    is_pv_encryption_in_transit_enabled = "true"
    network_type                        = "PARAVIRTUALIZED"
    remote_data_volume_type             = "PARAVIRTUALIZED"

  }

  source_details {
    #Required Information
    source_id   = var.linux_image_ocid
    source_type = "image"

  }
  preserve_boot_volume = false
}
Create compute_windows.tf file: define compute (Windows) related resources.
resource "oci_core_instance" "test_windows_instance" {
  #Required Information
  count = var.create_windows_instance ? 1 : 0


  availability_domain = data.oci_identity_availability_domains.ad.availability_domains[0].name
  compartment_id      = var.compartment_id


  create_vnic_details {
    assign_public_ip       = "false"
    display_name           = var.instance_display_name
    nsg_ids                = []
    skip_source_dest_check = "false"
    subnet_id              = var.create_new_vcn ? oci_core_subnet.private_subnet.*.id[0] : var.private_subnet_id


  }

  display_name = "${var.instance_display_name}_windows"

  metadata = {
  }

  shape = var.instance_shape
  shape_config {

    memory_in_gbs = var.instance_flex_memory_in_gbs
    ocpus         = var.instance_flex_ocpus
  }

  launch_options {
    boot_volume_type                    = "PARAVIRTUALIZED"
    firmware                            = "UEFI_64"
    is_pv_encryption_in_transit_enabled = "true"
    network_type                        = "PARAVIRTUALIZED"
    remote_data_volume_type             = "PARAVIRTUALIZED"

  }

  source_details {
    #Required Information
    source_id   = var.windows_image_ocid
    source_type = "image"

  }
  preserve_boot_volume = false
}
Create output.tf file: define outputs that display specific values after the configuration is applied
output "list_ads" {
  value = data.oci_identity_availability_domains.ad.availability_domains
}

# Regions
output "linux_instance_region" {
  value = oci_core_instance.test_linux_instance.*.region
}

output "windows_instance_region" {
  value = oci_core_instance.test_windows_instance.*.region
}

# Networking
output "network_vcn_name" {
  value = oci_core_vcn.test_vcn.*.display_name
}

# Compute: Linux Test Instance
output "output_linux_instance_display_name" {
  value = oci_core_instance.test_linux_instance.*.display_name
}

output "output_linux_instance_public_ip" {
  value = oci_core_instance.test_linux_instance.*.public_ip
}

output "output_linux_instance_state" {
  value = oci_core_instance.test_linux_instance.*.state
}

# Compute: Windows Test Instance
output "output_windows_instance_display_name" {
  value = oci_core_instance.test_windows_instance.*.display_name
}

output "output_windows_instance_public_ip" {
  value = oci_core_instance.test_windows_instance.*.public_ip
}

output "output_windows_instance_state" {
  value = oci_core_instance.test_windows_instance.*.state
}
Run the terraform init command to initialize working directory and it download necessary provider plugins
terraform init -var-file=terrafrom.tfvars 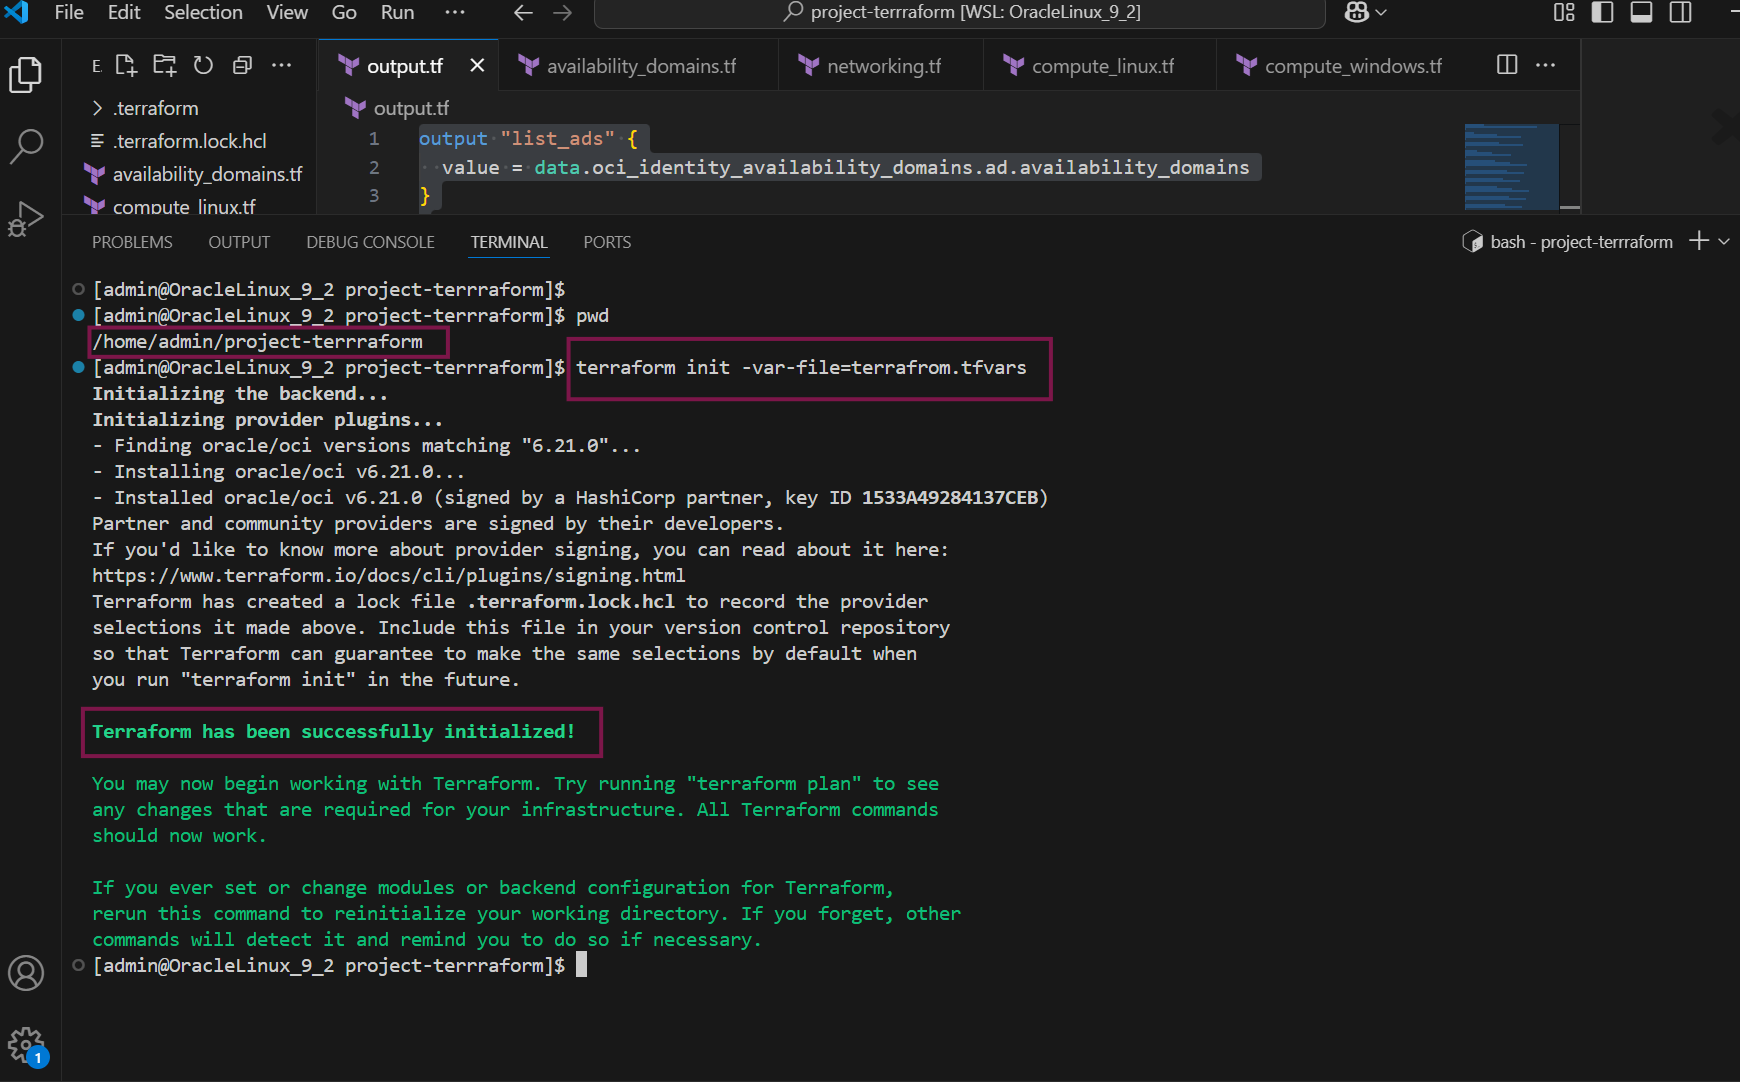
Execute terraform plan command. It gives you the preview of the changes that terraform will make to your infrastructure
terraform plan -var-file=terrafrom.tfvars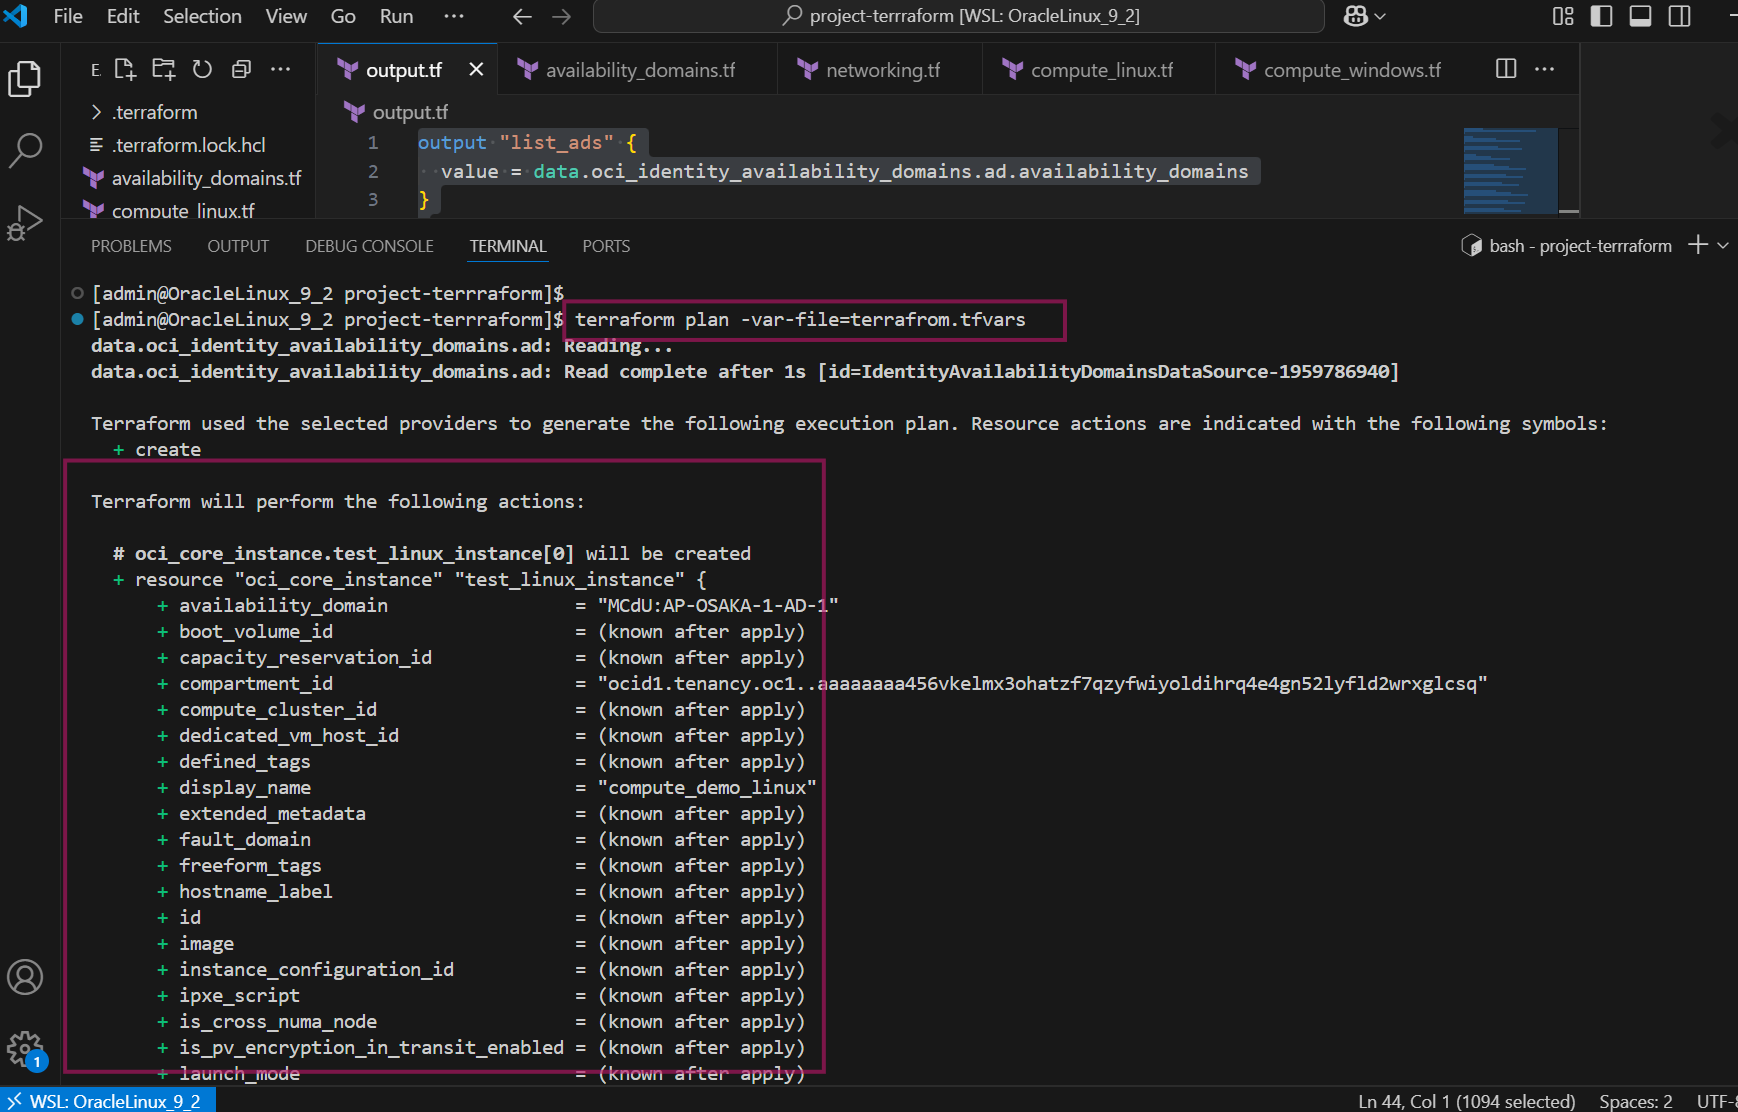
Execute terraform apply command and type Yes if it prompt for the apply action. It apples the changes to your cloud infrastructure
terraform apply -var-file=terrafrom.tfvars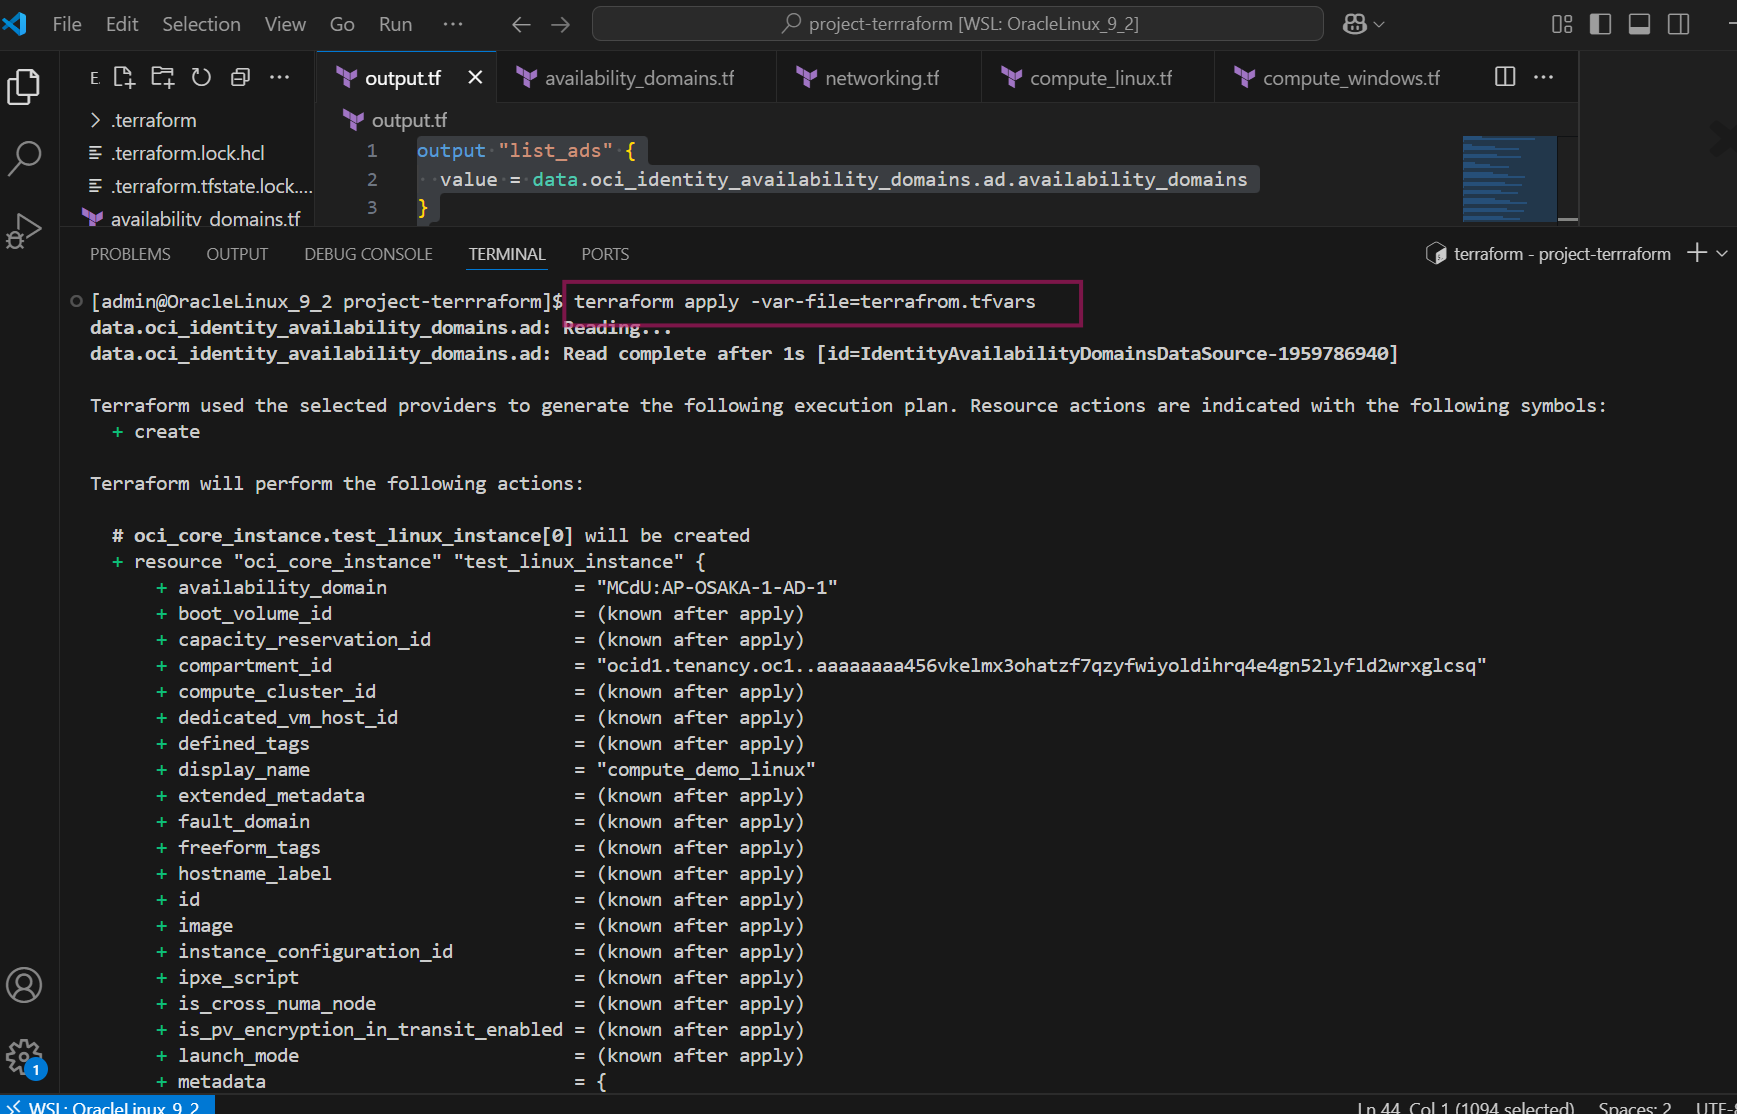
Log on to OCI console and verify that resources are created
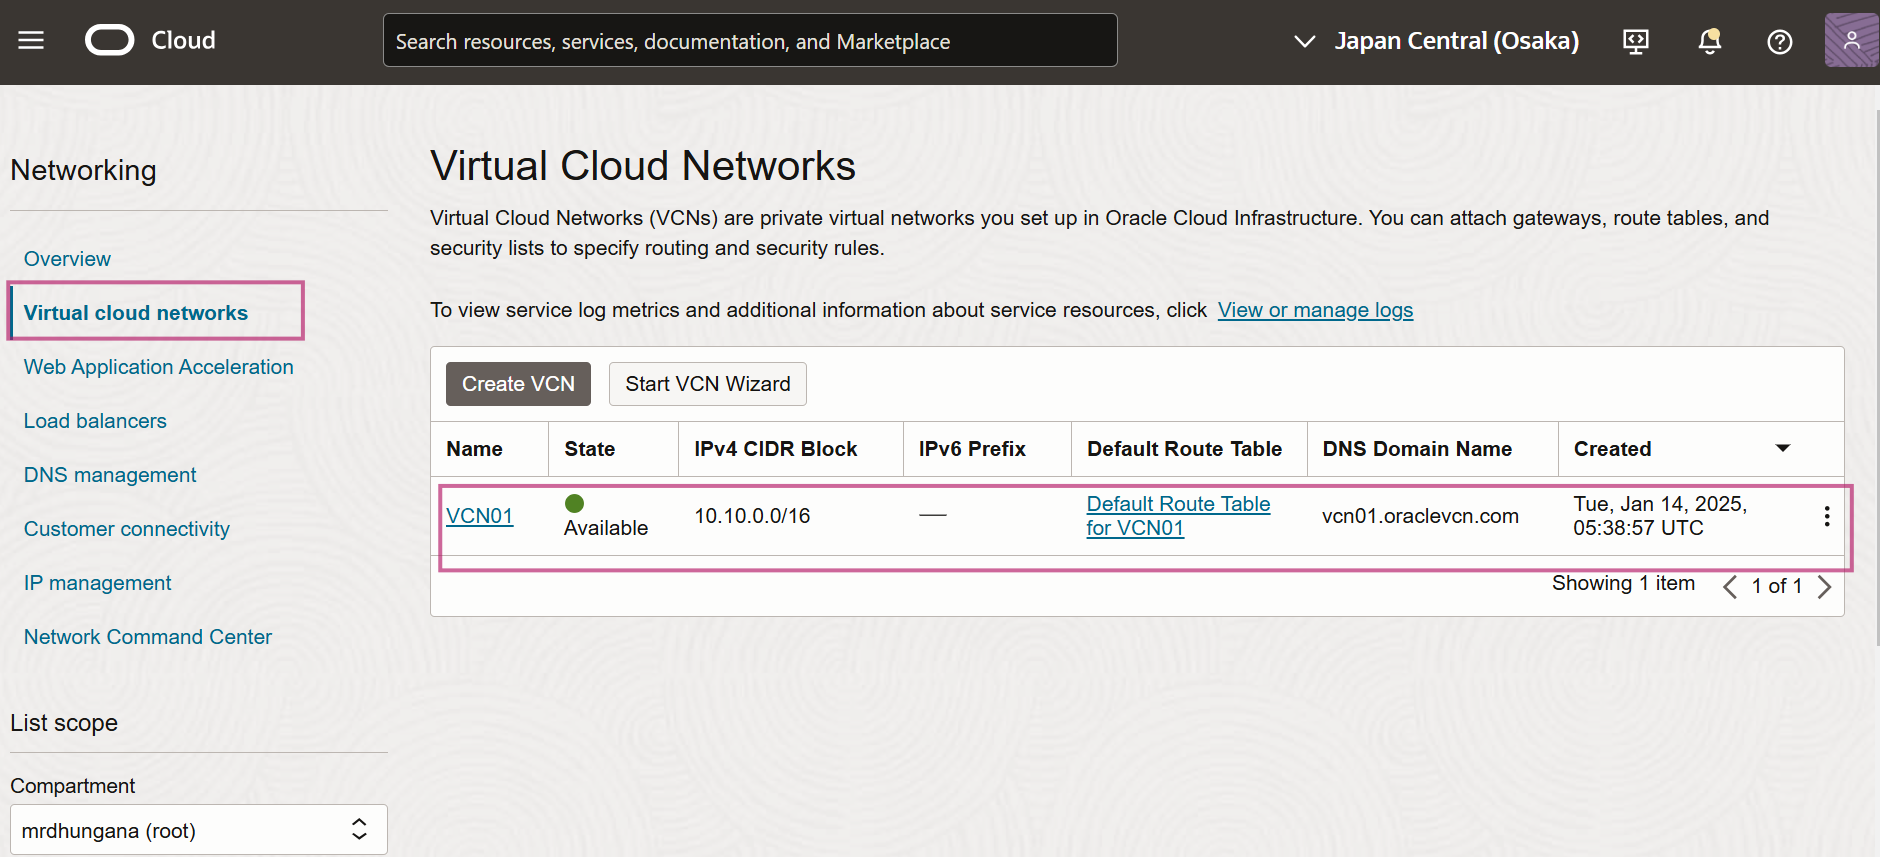
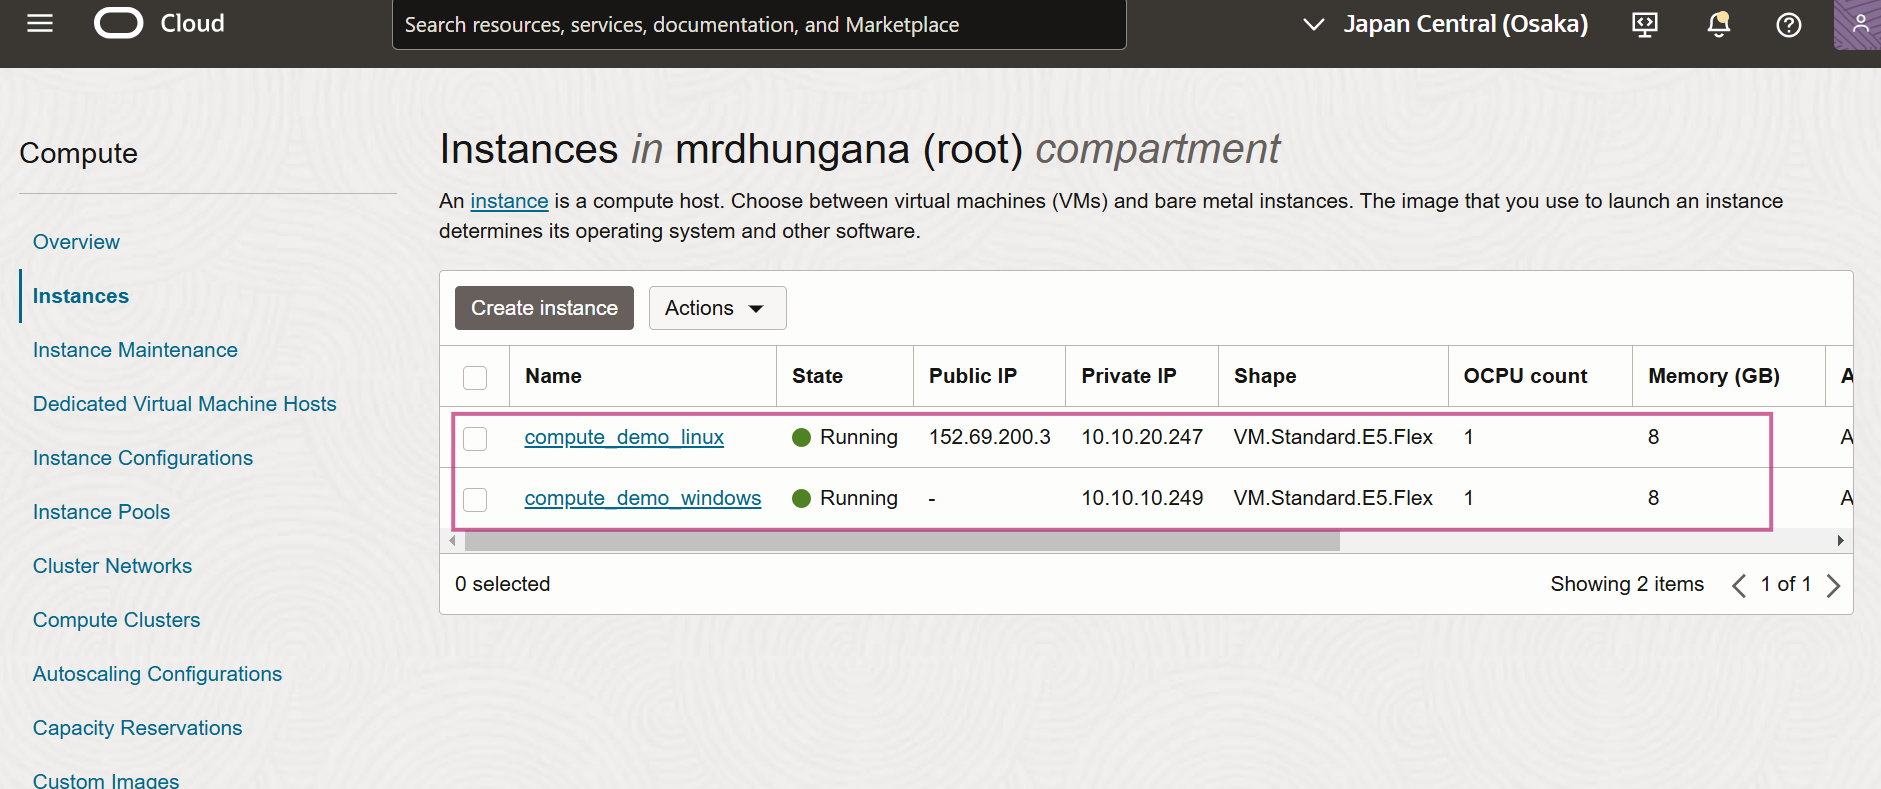
Resources have now been deployed using Terraform. Once you verify resource creation in your OCI tenancy use the following command to destroy all resources.
terraform destroy -var-file=terrafrom.tfvars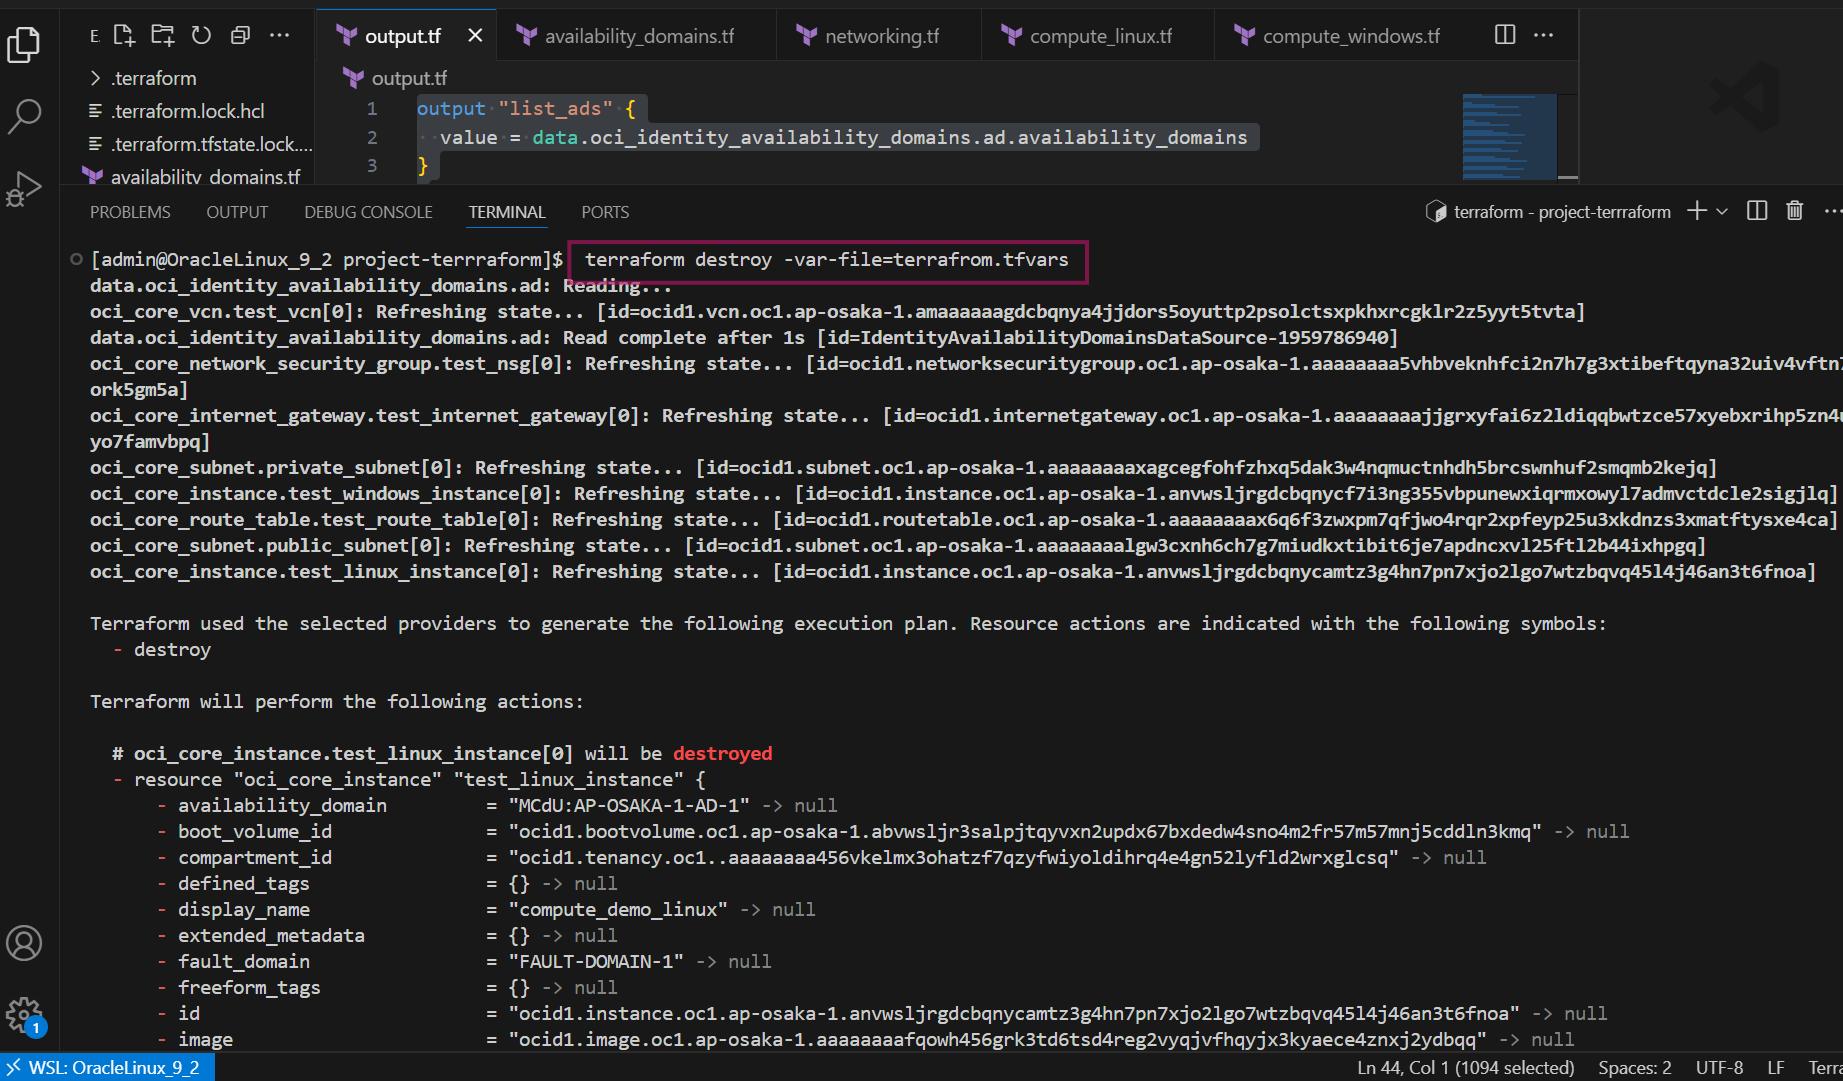
These steps conclude, how to created remove the OCI resources using terraform
![]()