In my previous blog post “Creating VTGW and Associating it with DXGW”, I provided a detailed guide on setting up a VMware Transit Gateway (VTGW) and attach it with the AWS Direct Connect Gateway (DXGW). Now, in this new post, I will show you how to establish peering connections between VMware Transit Gateway (VTGW) and AWS Transit Gateway (TGW), so you will have a seamless communication between an EC2 instance and a VMware Cloud on AWS SDDC.
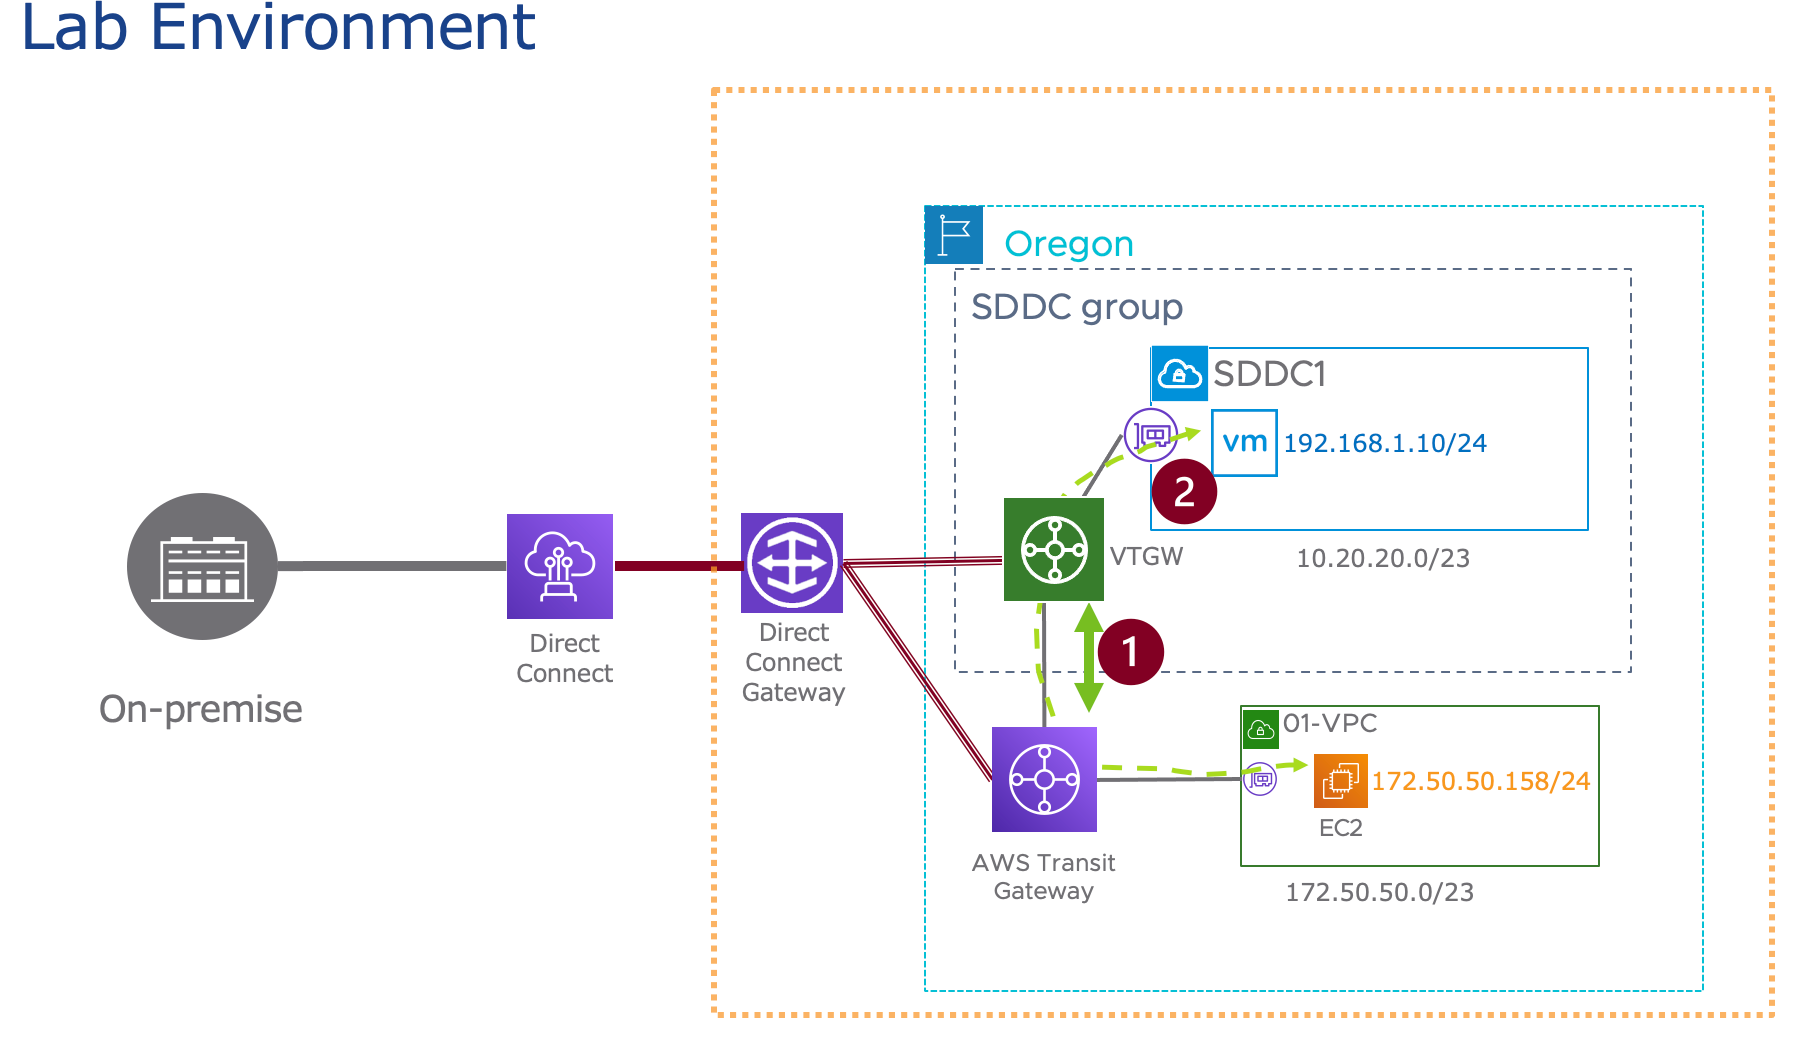
In my lab environment, I already have VMware Cloud on SDDC (SDDC1) and VMware Transit Gateway (VTGW) deployed, along with the LINUX01-VM (.10) running on the 192.168.1.0/24 segment. Additionally, AWS TGW and VPC (01-VPC) have been created, and the EC2-1 (.158) instance is up and running on the 10.50.50.0/24 network. I have divided the the post in two sections mainly:
SECTION 1, I will focus on the step-by-step process of creating Peering connections between VTGW and AWS TGW, including the propagation of the VPC route and the creation of a static route for the SDDC workload network.
SECTION 2, I will thoroughly verify network connectivity and perform the ping test between SDDC VM and EC2 instance to verify end to end connection.
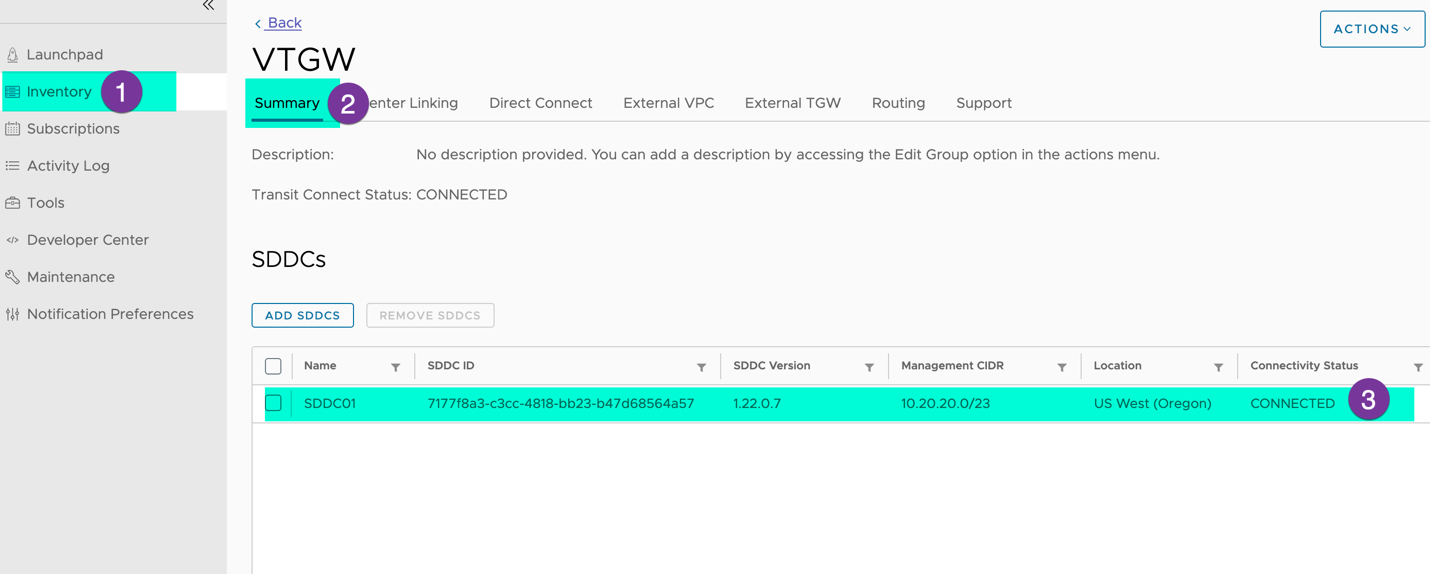
Section 1 Preparation and setup: Before creating Peer, it is essential to verify the SDDC group status and collect the AWS TGW id and AWS account ID
Go to the VMC console, click on Inventory, SDDC group (in my case VTGW), and ensure your SDC connectivity status shows ‘CONNECTED’.
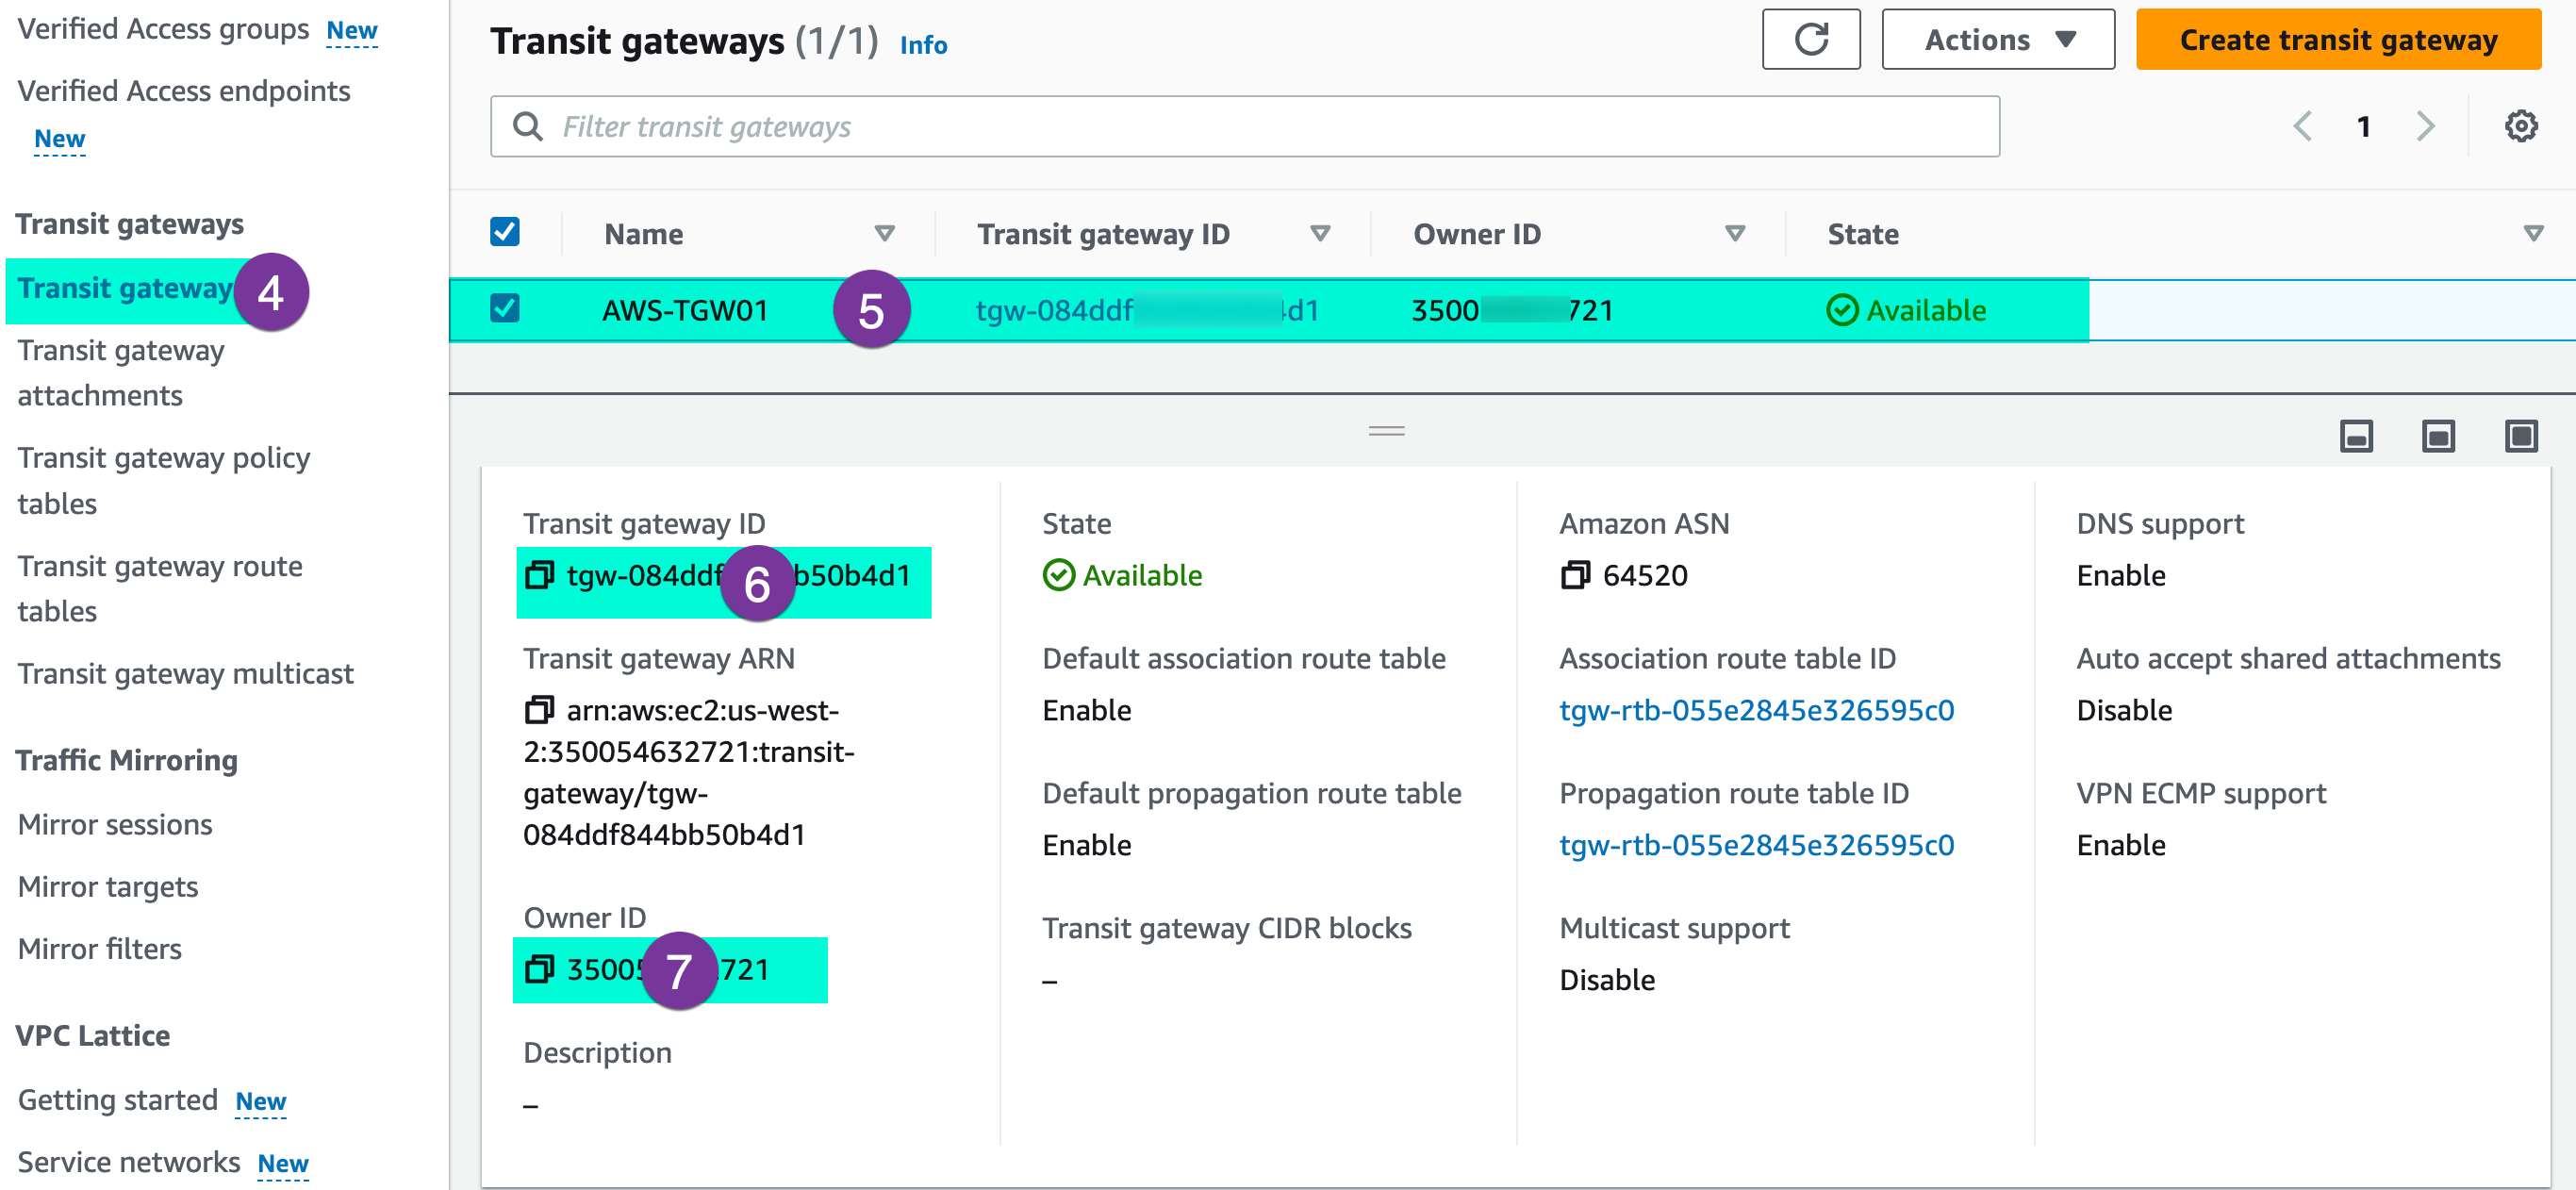
Access your AWS Console and note down your AWS TGW ID and Account Owner ID, we need these information for the peering in the next step.
Step 1: Create the VTGW and TGW Peering (You need both VMC and AWS Console access)
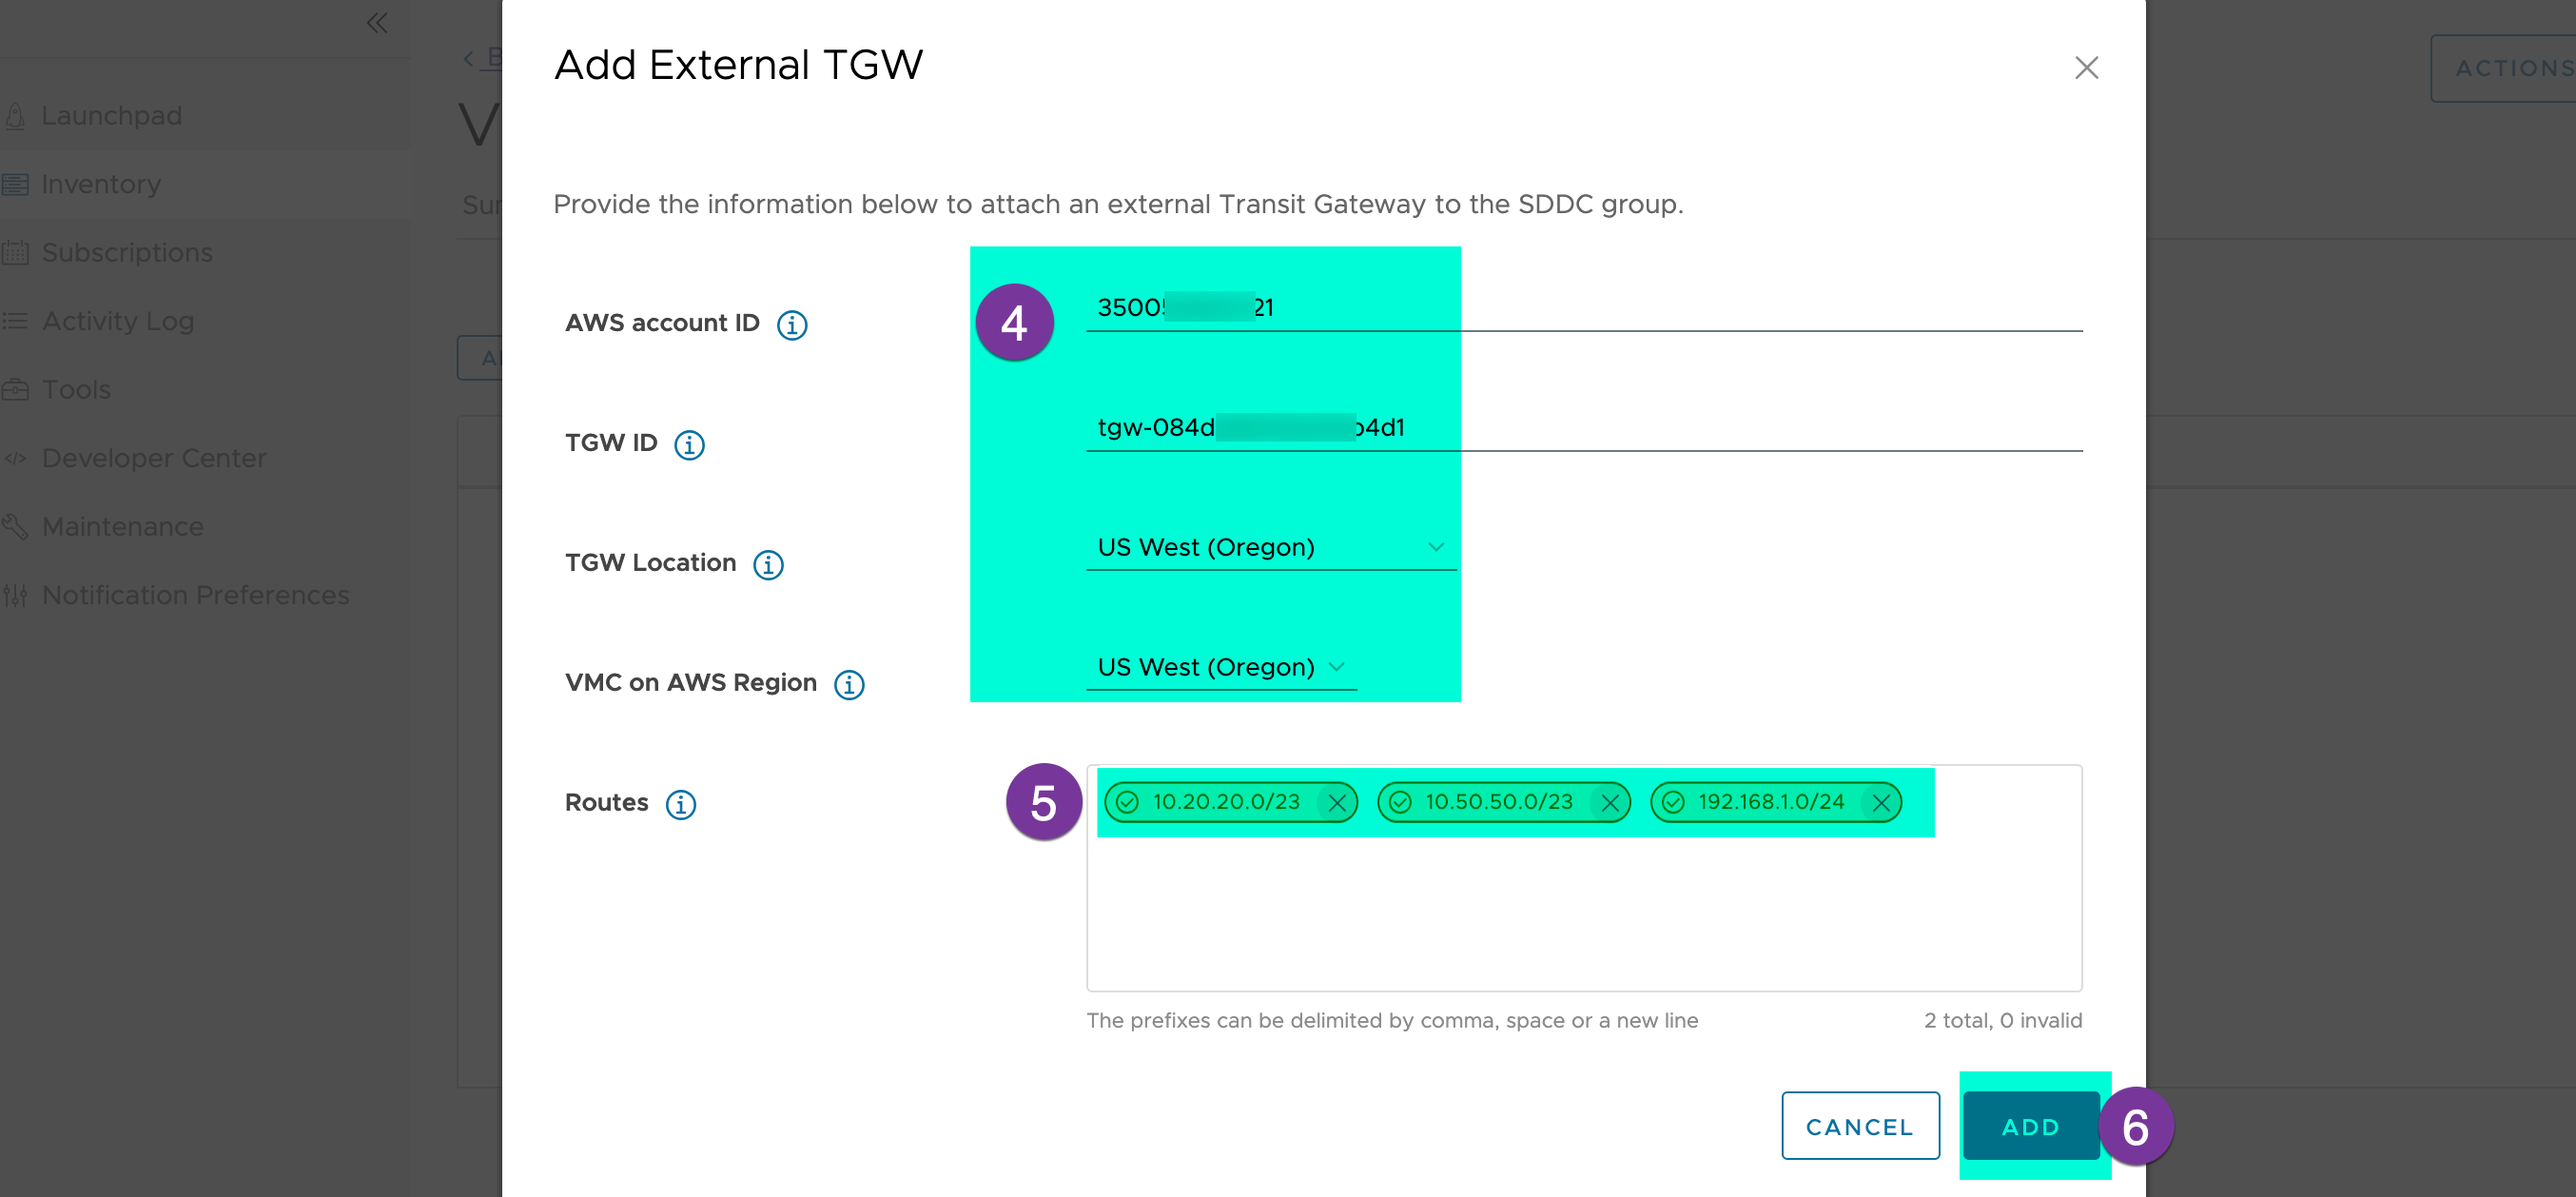
Go back to the VMC console choose your SDDC group, click on ‘External TGW’, and go to ‘ADD TGW’

Supply the AWS account ID, AWS TGW ID, TGW location and Region, and route-AWS resource destination prefixes reachable via this peering connection (in my case AWS VPC CIDRs). And click on ‘ADD’
Go to your AWS console, and under the VPC section choose ‘Transit Gateway attachment’. You will show the ‘Pending Accepting’ status, go to Action and click on ‘Accept transit gateway attachment’
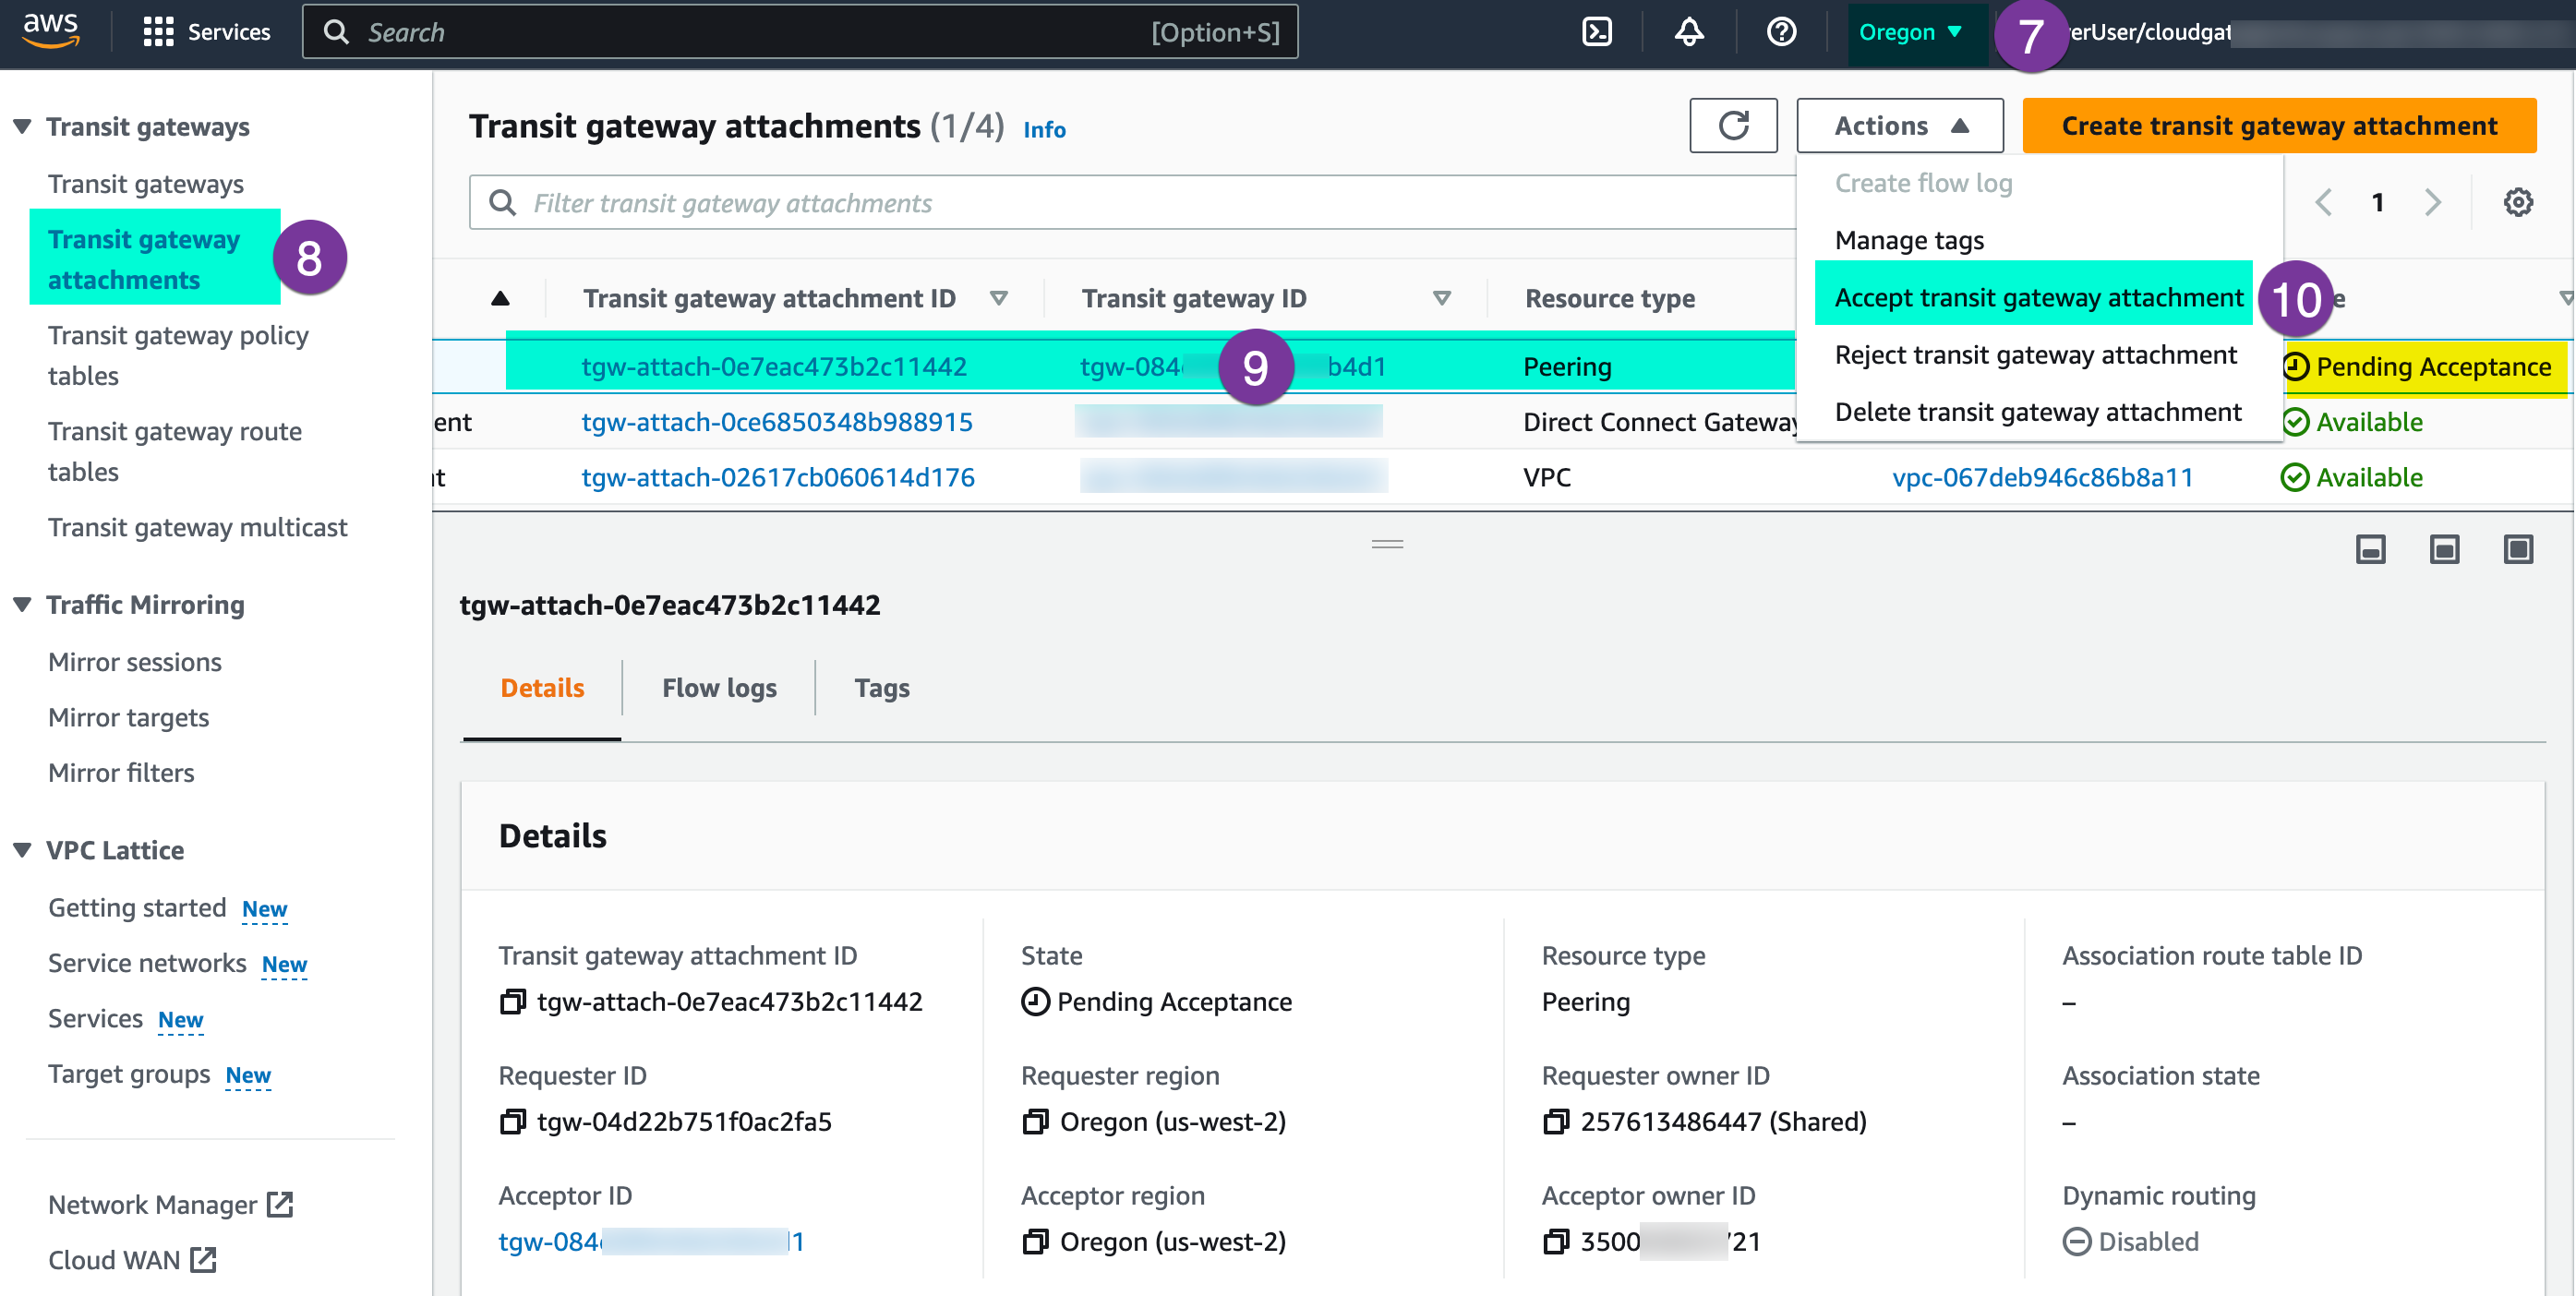
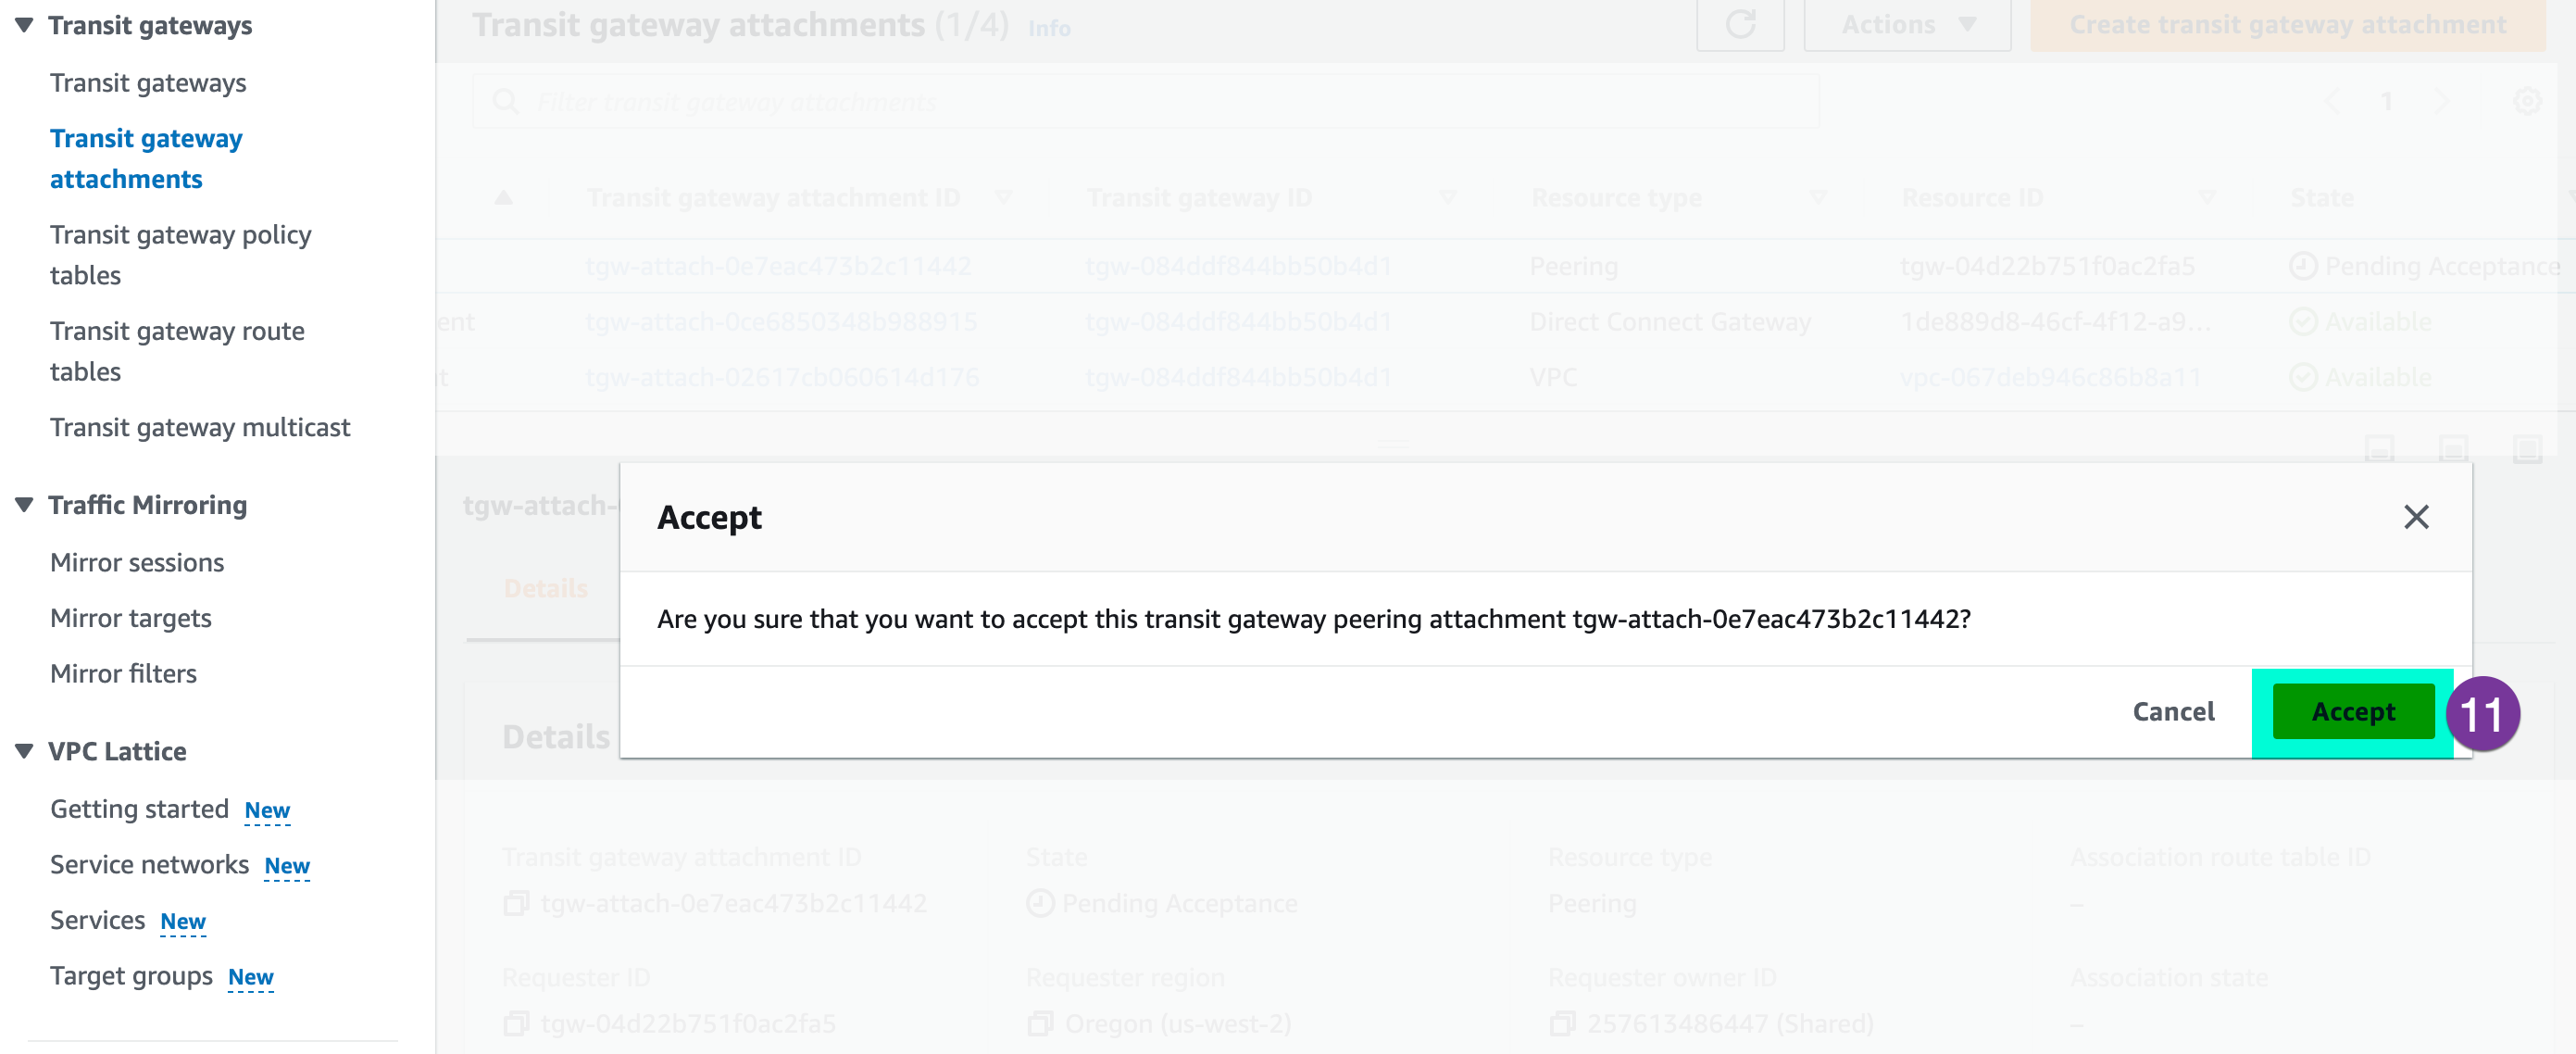
It will pop up the Accept message, click on ‘Accept’
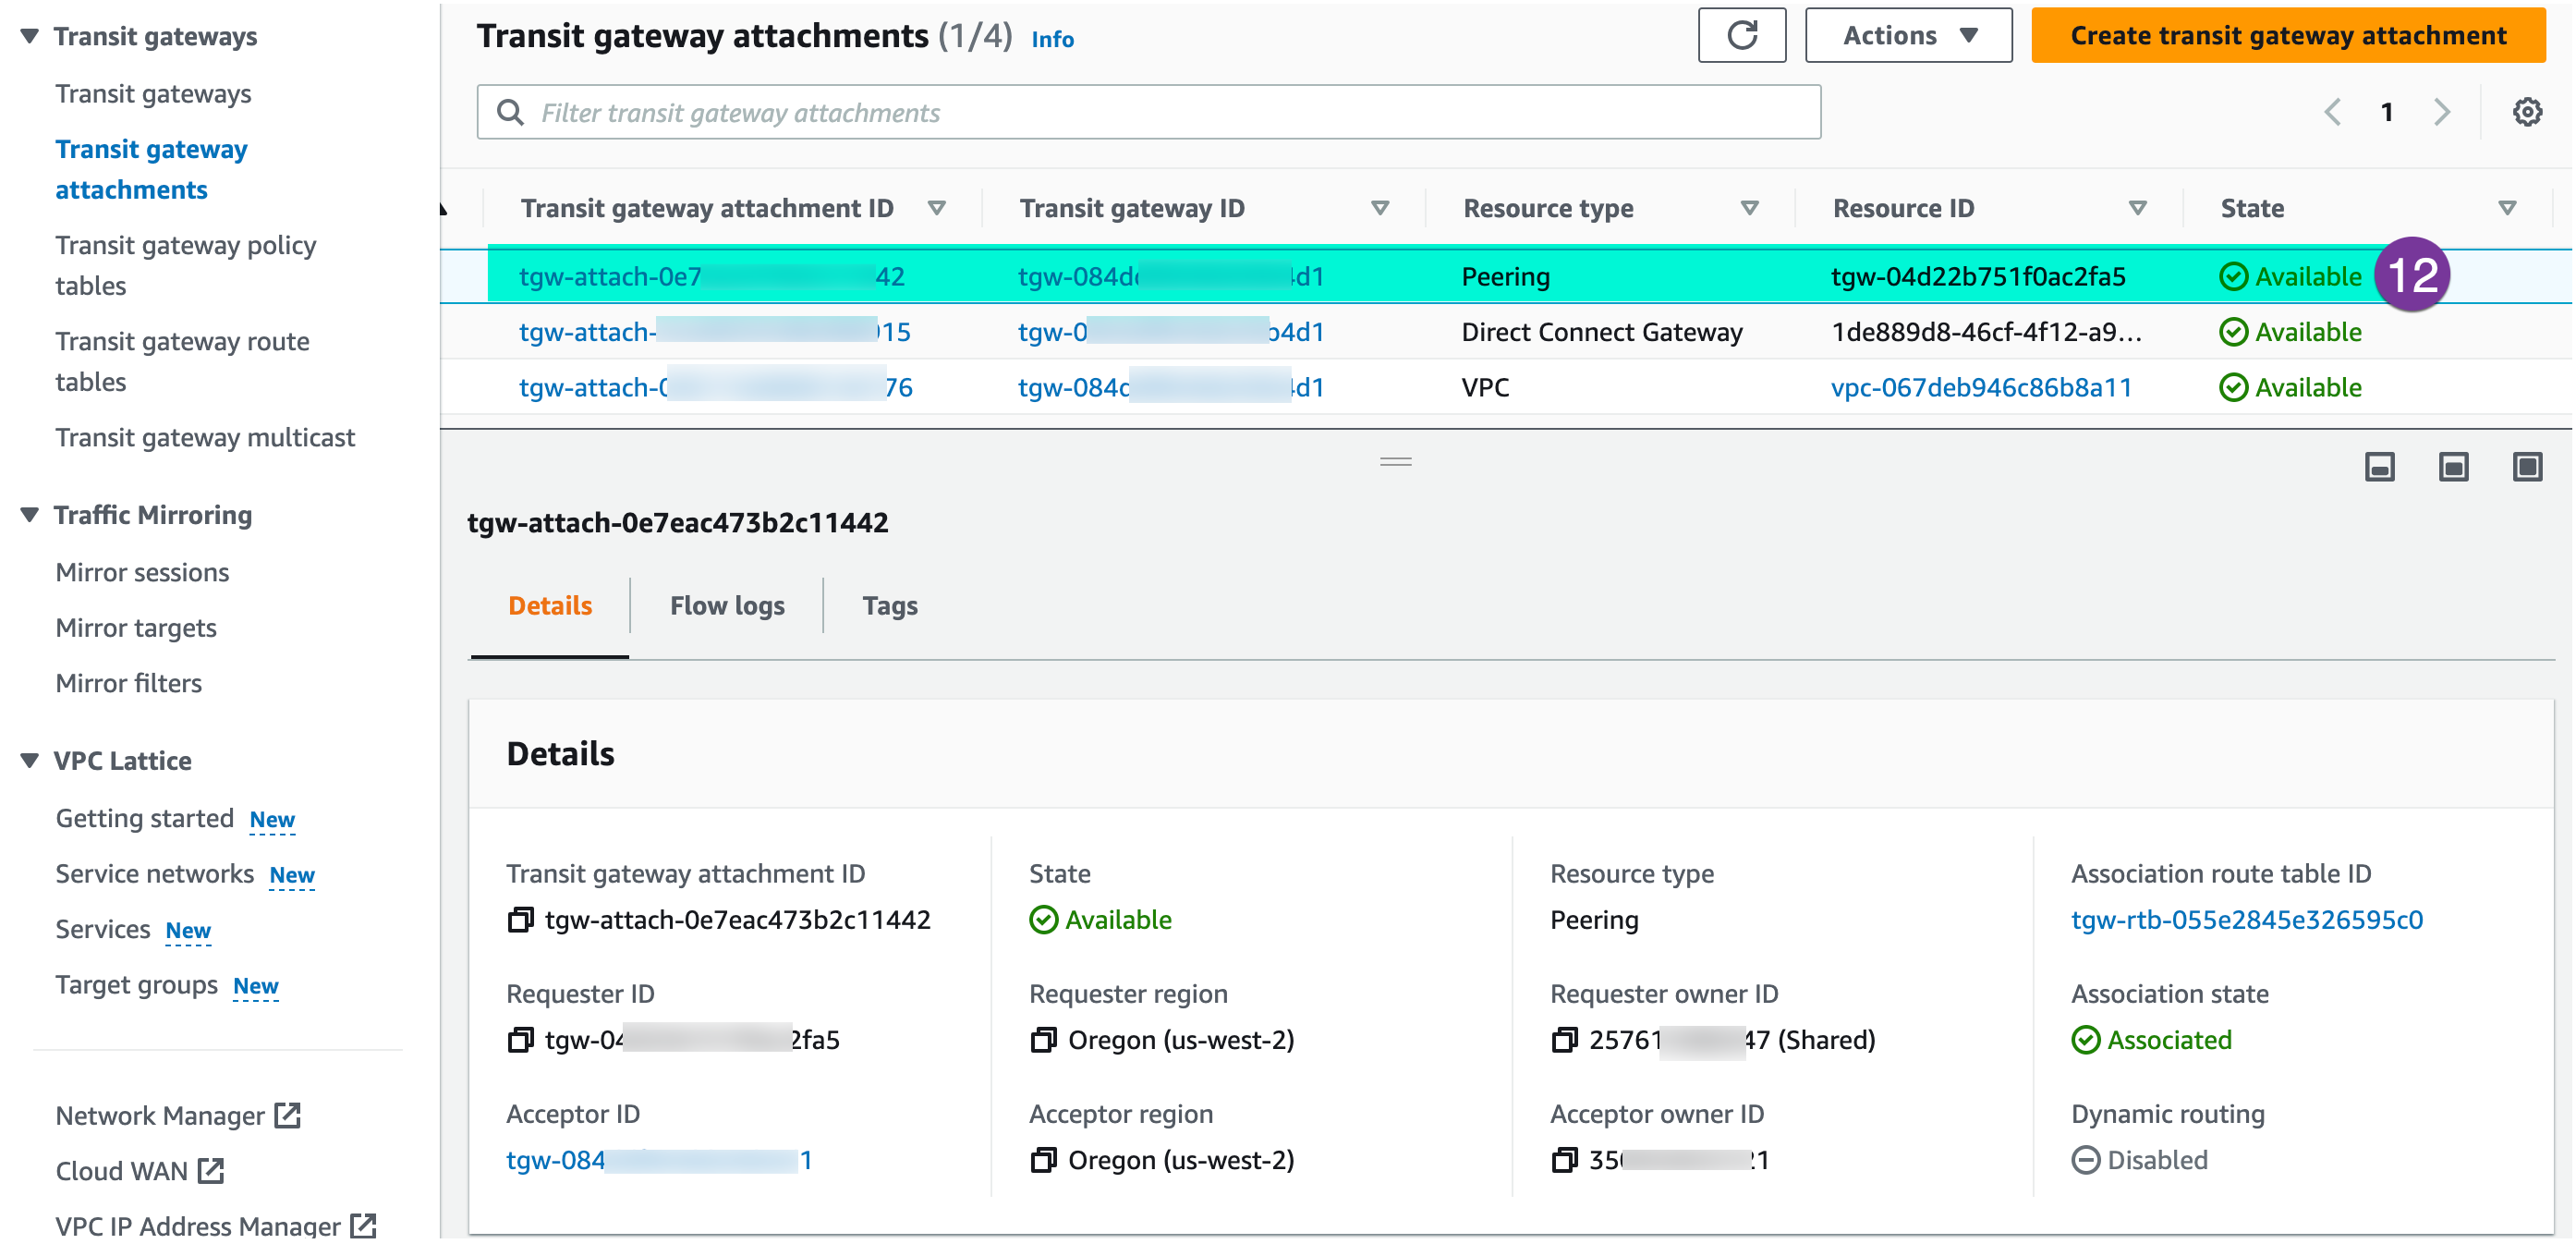
In a few minutes, the status will be changed and shows ‘Available’ and green
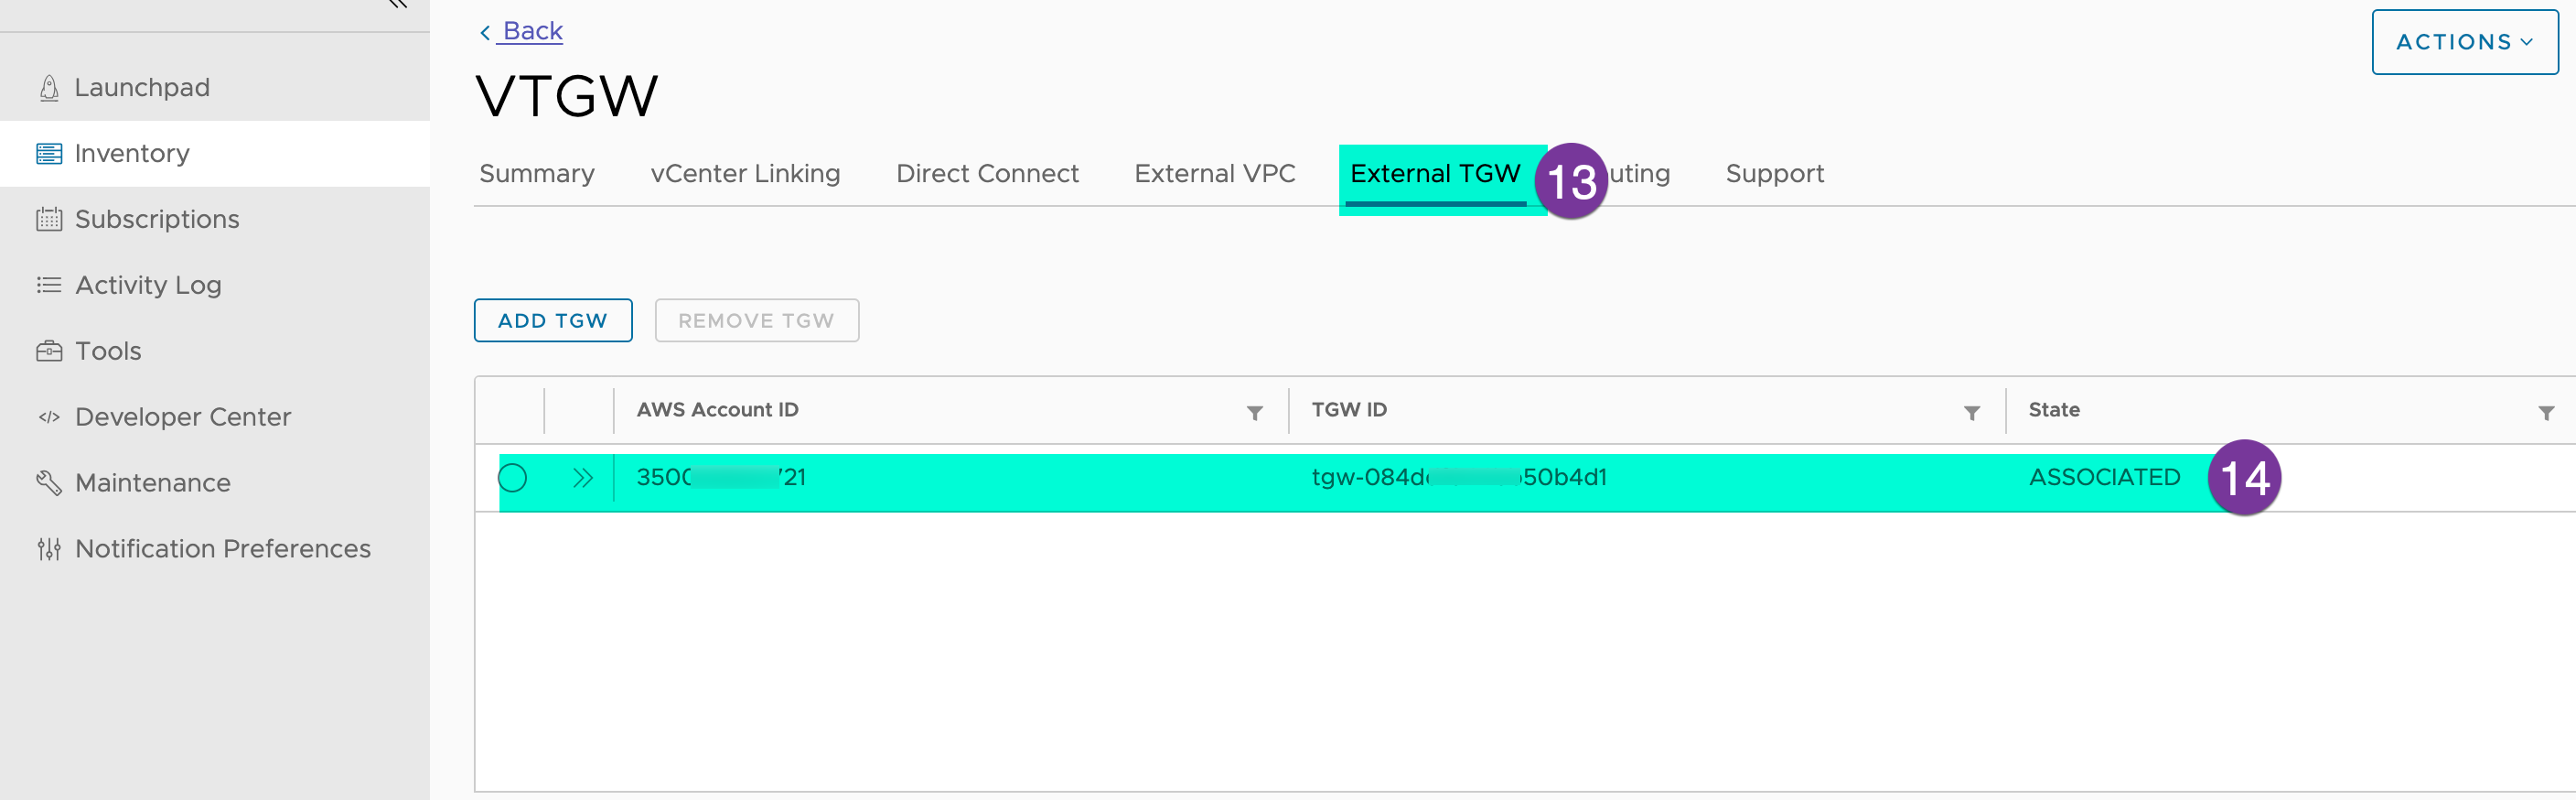
Now, go back to your SDDC group in the VMC console and click External TGW, State should be ‘ASSOCIATED’
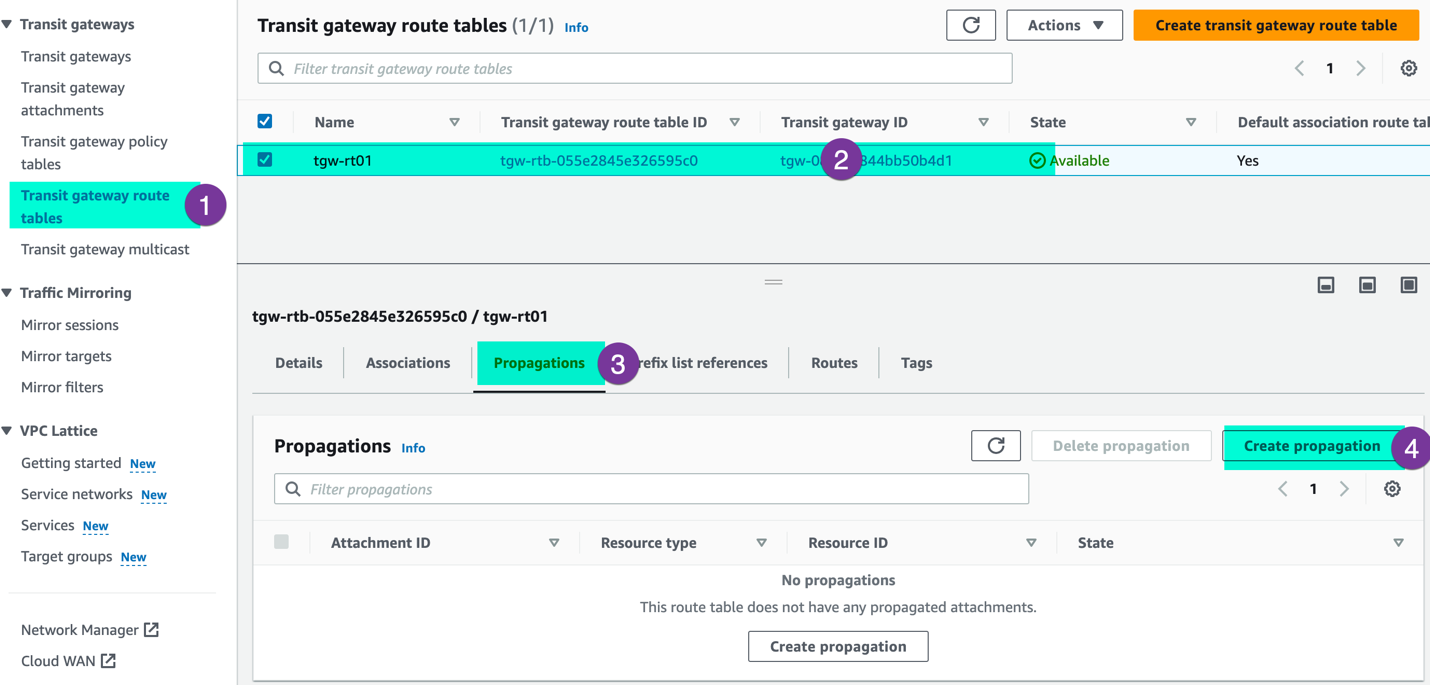
Step2: Route propagation : To ensure proper routing, route propagation is required to advertise the VPC routes (If you have already propagated, you can skip it). Navigate to the ‘Transit gateway rote table’ section under the VPC section, choose the specific route table, click on the ‘Propagate’ option and ‘create propagation’ to initiate the process
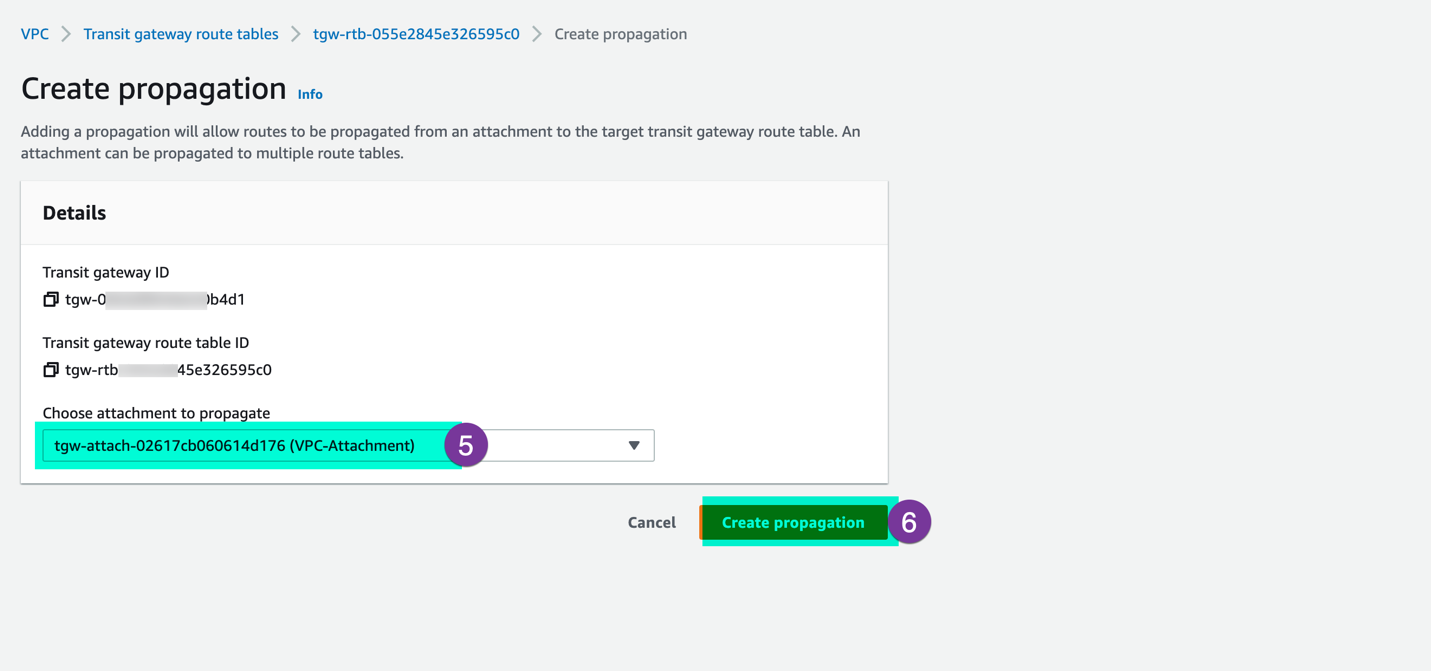
Choose your VPC attachment and click on ‘Create propagation’
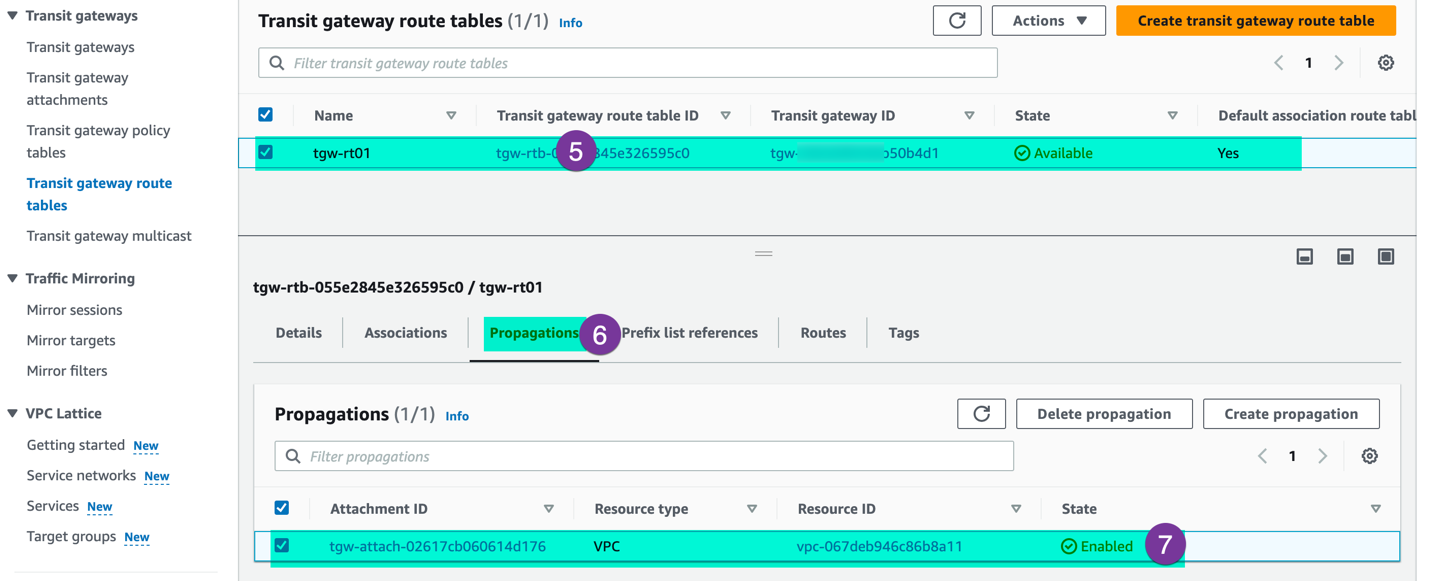
Verify the propagation state shows enabled and green.
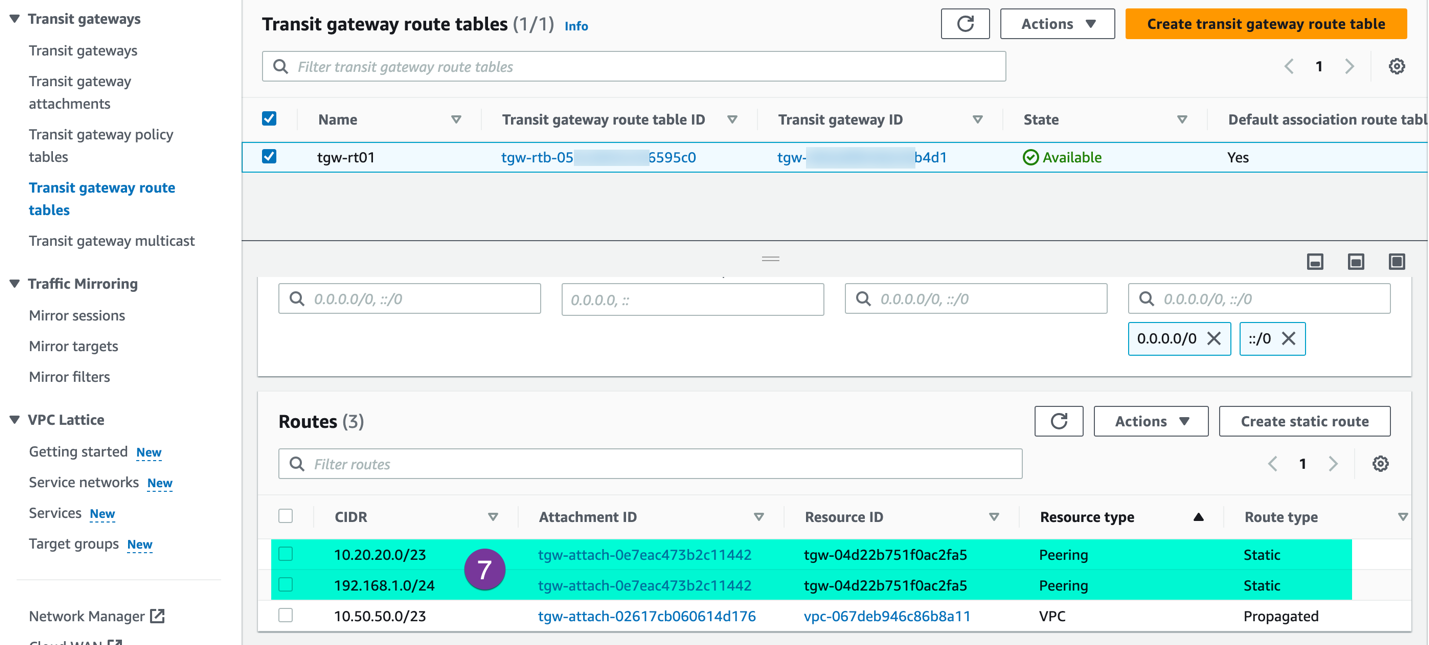
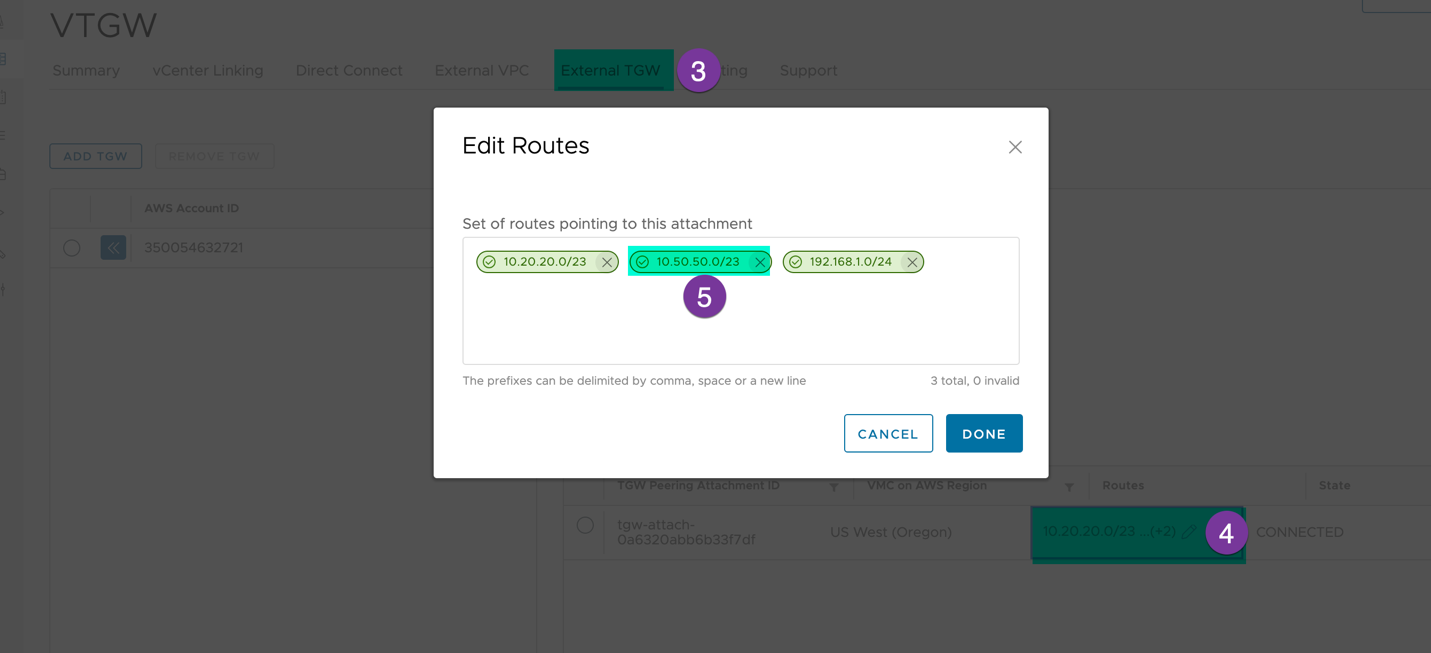
Step 3: Static Route configuration on TGW: On the AWS TGW, you need to configure static Route for your SDDC. On The AWS console go to ‘Transit gateway Routing tables’, choose route table, click on ‘Route’ and ‘Create Static Route’
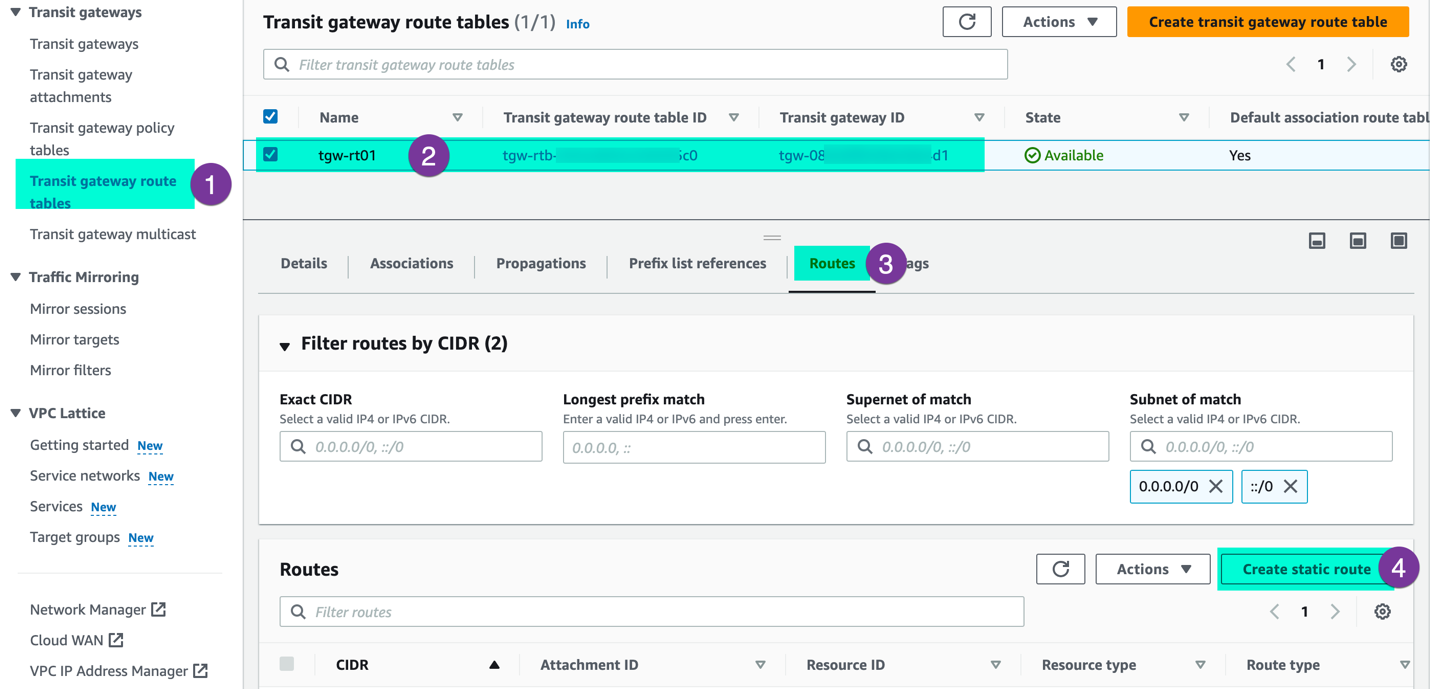
Provide CIDR information for both SDDC mgmt and SDDC workload segments. Then, select the VTGW attachment and click on ‘Create static route’.
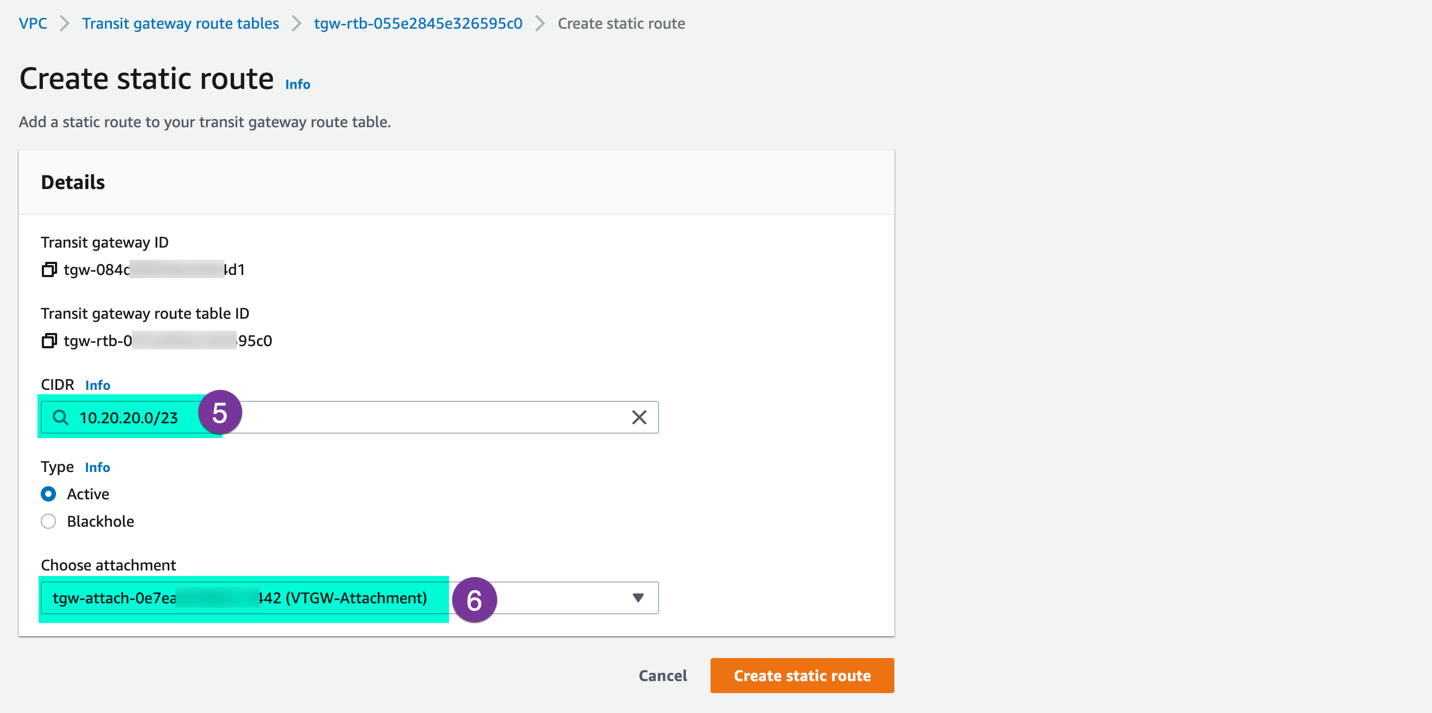
Make sure Appropriate static routes show on route table. This will establish the necessary state route.
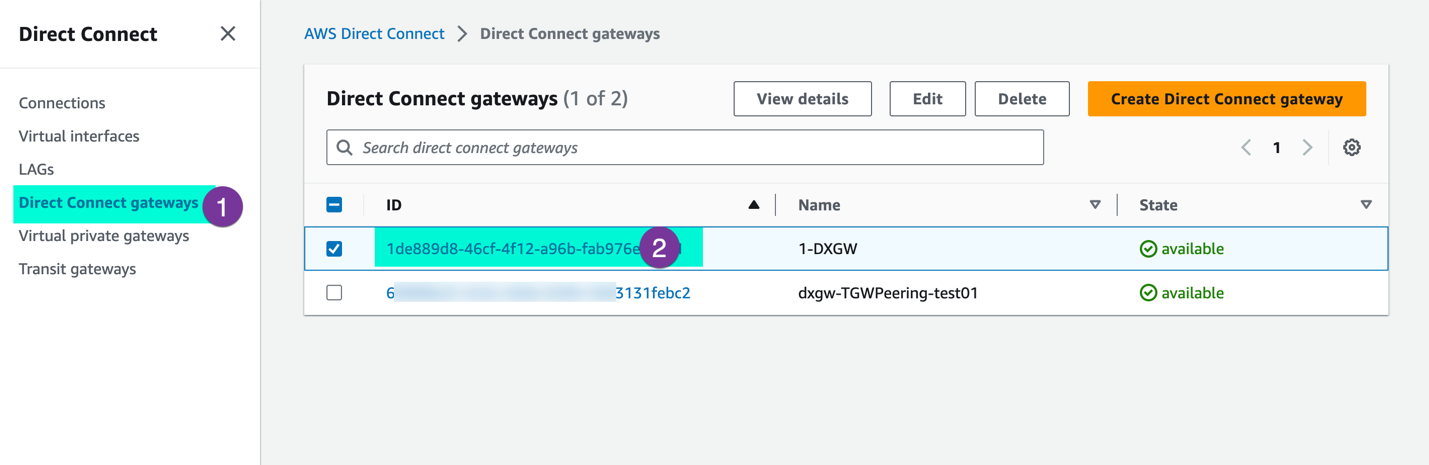
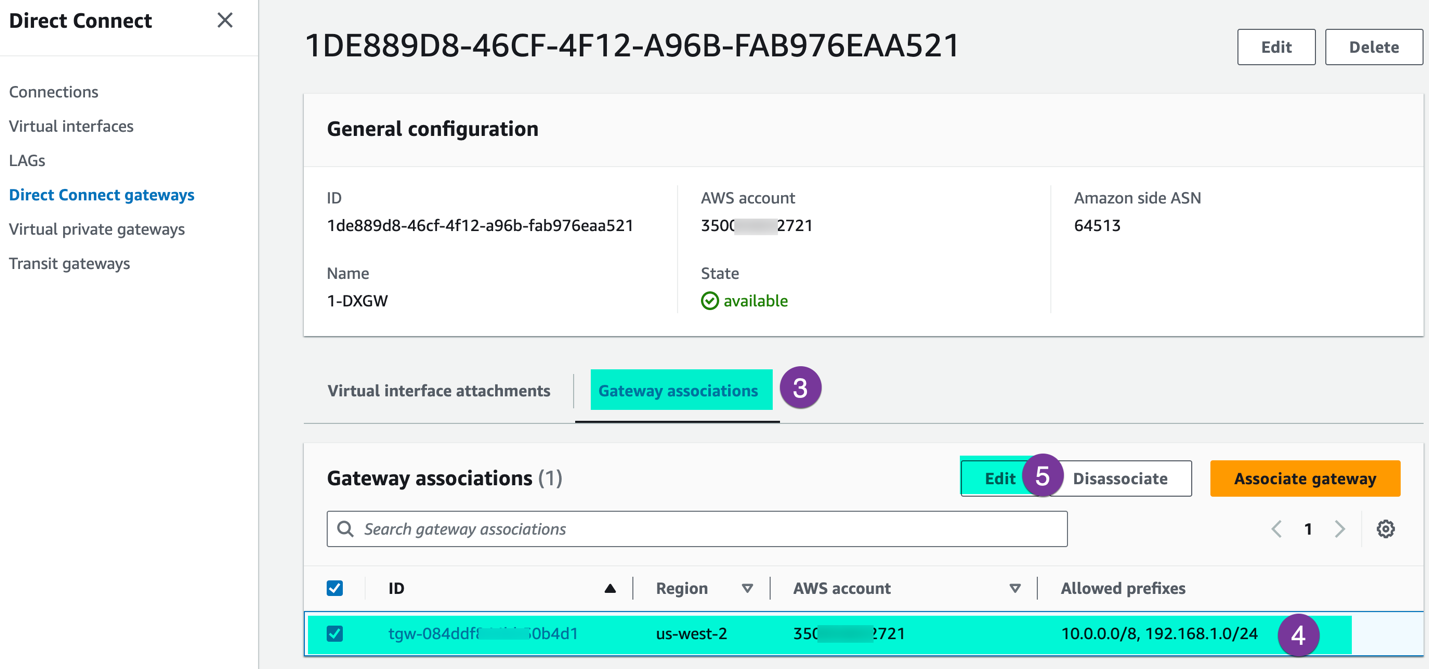
Step 4: On DXGW make sure SDDC prefixes are included in the allowed Prefixes. If you need to have communication between your SDDC and on-prem via AWS TGW, go to the Direct Connect gateway and allow the SDD-related prefixes (CIDRs)
Under the ‘Direct Connect’ section, navigate ‘Direct Connect gateway’ and select respective DXGW
Go to ‘Gateway associations’ and verify the allowed prefixed. If SDDC prefixes are not included, click on ‘Edit’ and update the prefixes
Section 2 Verification: On VMC side, make sure appropriate FW rules are configured on SDDC NSX and static route on VTGW. On the AWS side, check the proper static route on TGW and Security group with proper rule have been configured. The final step is the Ping test between SDDC VM and VPC EC2 instance.
On VMC console: Make sure, FW rules allow the communication between SDDC workloads and VPC CIDRs
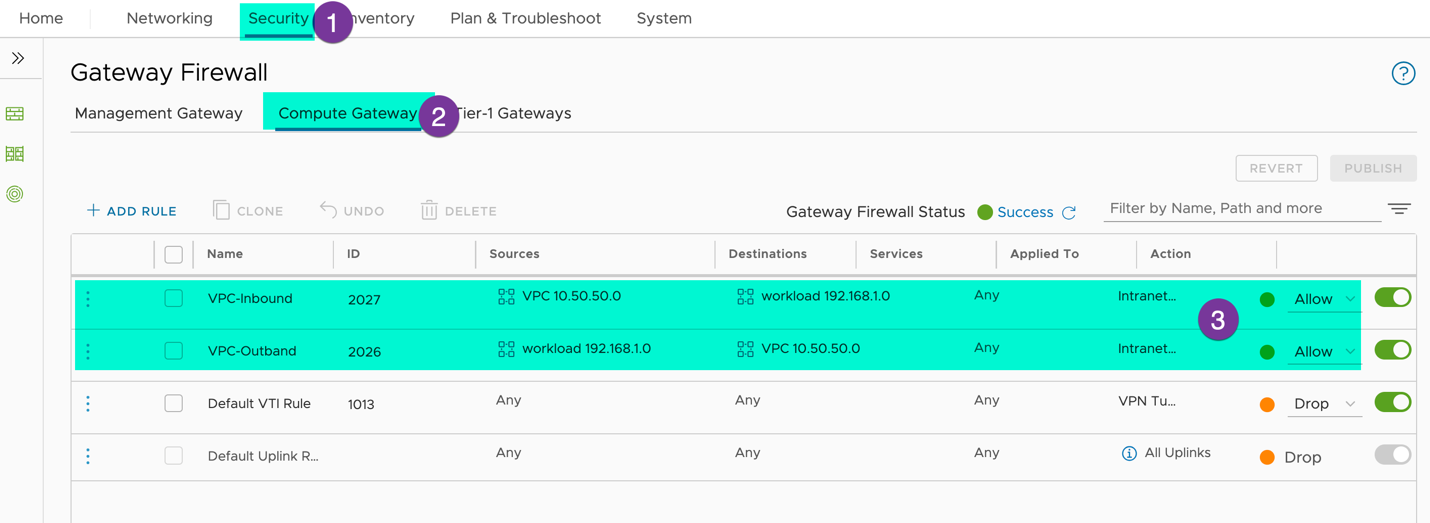
Make sure VPC CIDR is included in VTGW static Route
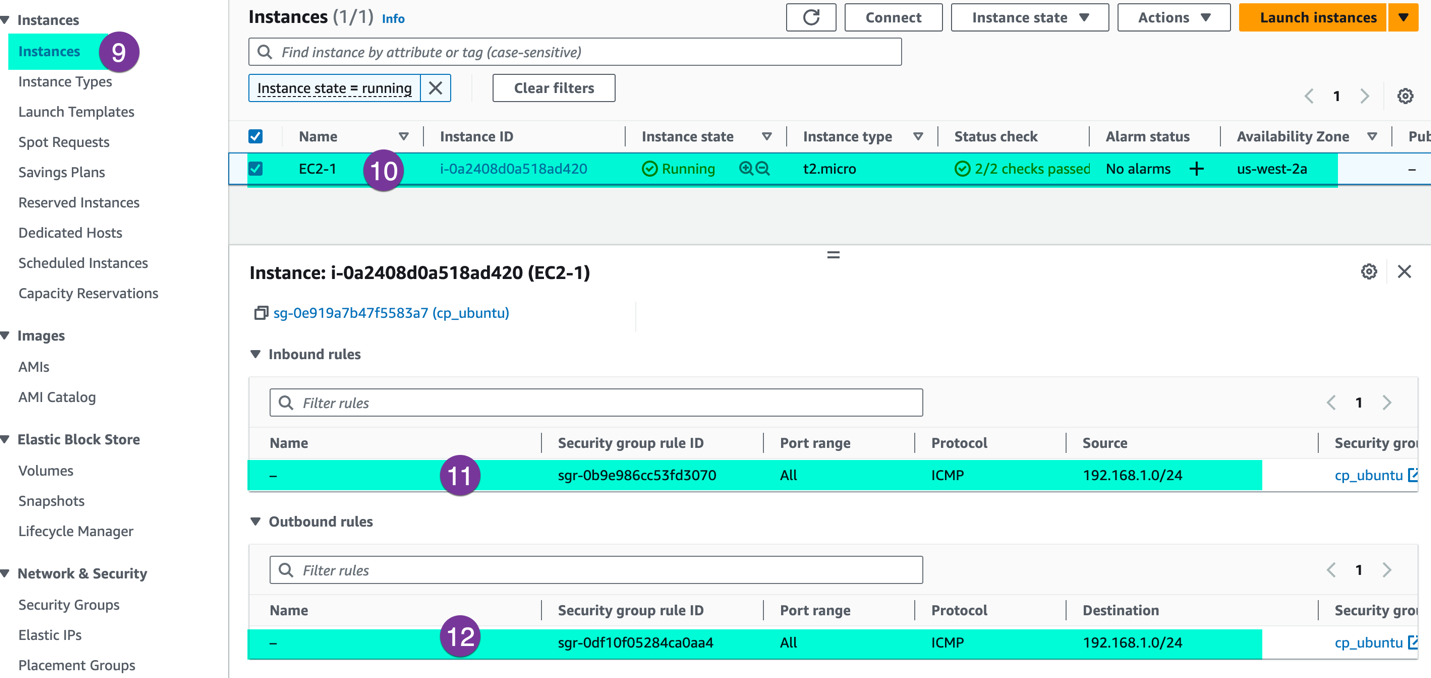
On the AWS console: Make sure, VPC route propagation and Static route for SDDC have been configured

Make sure the EC2 security group allows the communication between SDDC workload segment and EC2 instance
VMC vCenter: Open the VM execute the ping test (in my case here Linux01-VM resides on VMC SDDC and EC2 instance (10.50.50.158) on the VPC)
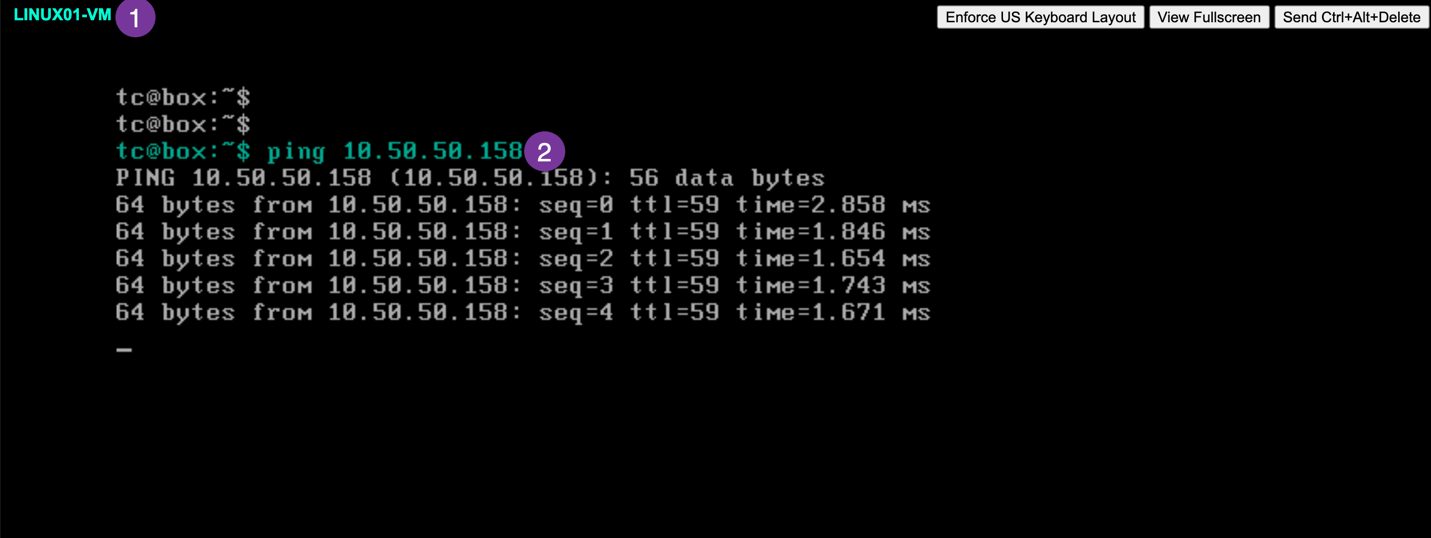
In conclusion, this post has shown you a seamless and efficient communication between the SDDC workload and the EC2 instance in your AWS VPC. I hope you find this information helpful and beneficial for smooth connection between your SDDC and existing your TGW/AWS environment .
![]()